We gutted our kitchen two years ago. Two years later and it is still not done.
There are two reasons for this. One is my crazy need for perfection, which means it takes me forever to make a design decision. The other, less fun, reason is budget. We ran out of money to add some of the finishing touches. The list is not long, but it is important. I need window treatments, lighting to replace the outdated pendants, and a stove. All of our appliances are stainless steel, except for our sad, outdated stove. It stands out like a sore, ugly thumb. We have prioritized our wish list and are slowly getting close to a finished kitchen {and a huge kitchen-warming party to celebrate}.
Because budget is such a huge consideration when planning any kitchen update, I wanted to share my tips for when to splurge and when to save.

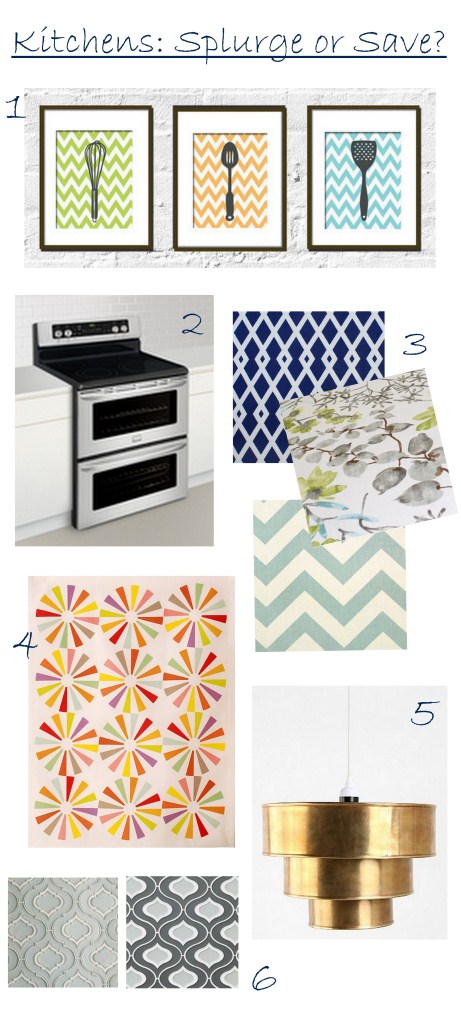
SAVE on artwork. There are so many amazing online resources for inexpensive, yet fabulous art for your kitchen. Etsy is my favourite. That's where you will find this trio of kitchen utensil art {1} and these spin wheel tea towels {4} which are just asking to be framed. Another great idea is to frame black and white photos of your children eating. I have a picture of my son eating his very first birthday cake in ours. It adds a fun, personal touch.
SPLURGE on kitchen appliances. You use them every single day so invest in the best you can afford. if you are like me, that may mean a wait, but it is worth it. Once the people at Frigidaire showed me this freestanding double oven {2}, I was smitten. I have recently started baking with the boys so the option to cook a meal while also making cookies is pretty fantastic. I also love that it has five elements. Talk about some serious multitasking. And—wait for it—it has a protective coating to reduce fingerprints and smudges. It is now at the top of my 'want' list.
SAVE on window treatments. My go-to company for fabrics is Tonic Living. Their selection is gorgeous and affordable. Plus, they create custom window treatments. Custom can be very expensive, but because they keep the price point on their beautiful fabrics {3} low, they will make your budget happy.
SAVE on lighting. There are so many chic, yet affordable options available now. This stunning gold triple tiered pendant {5} would look amazing in our...I mean any.....kitchen. And yes, it is okay to mix metals!
SPLURGE on backsplash tiles. Like any other permanent element in a kitchen, a backsplash is an important investment. You can pair inexpensive cabinets with a gorgeous backsplash to create a custom, high-end look. My favourite tiles are these beauties {6} from Canadian company, Edgewater Studio.
What's at the top of your kitchen wish list? Do you have any budget-saving kitchen decor tips? Share them in a comment below!
Check out our Dream Kitchen section full of tips, tricks and advice to turn your kitchen from drab to fab—whether you want to transform it from top to bottom or simply update it and get organized.
Would you love to have a brand new oven? Click here to find out how you could win a Frigidaire Double Oven!

This is proudly sponsored by our friends at Frigidaire.
www.frigidaire.ca

I love Halloween, because of the candy of course, and because it is such a great opportunity to have fun with decor. Last year I made a Halloween poster {you can find the free printable here}. This year I wanted to make something that added a little light and a little spook to my decor so I created these spooky silhouettes:

They are glass candle holders {for fake candles only} with painted Halloween images.
Here is the before shot. The jars are from Michaels and the candle holders are from Homesense.

This is such a simple project. Simply go online and do a google image search for free Halloween clip art. When you find images you like, first make sure they are copyright free. Then, print each image.
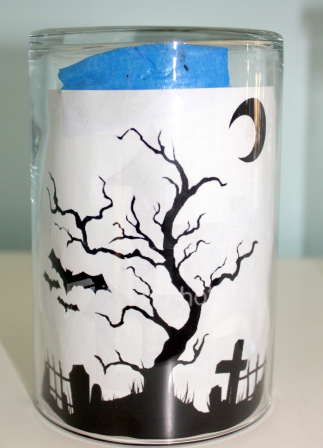
Once you have your boo-tiful pictures printed, cut them out and tape each one to the inside of a jar like this:

Then you take black craft paint and paint right over the image on the outside of the jar. You can use glass paint, but you do not have to. I used chalkboard paint for mine, but I tested craft paint and it worked well too.
Once they are dry, arrange them together and add fake tealights. It is important not to use real candles for two reasons: the glass will get very hot and the candle will run out of oxygen to burn. You can buy fake ones at most dollar stores.
TIP: I painted the images on both sides of a couple of the jars. If I were to do this project again, I would only do one side {see the one on the left}; it just looks better.


How do you decorate your home for Halloween?

We are hosting Thanksgiving this year so I am already thinking of DIY decor ideas. Last year I painted metallic pumpkins. As much as I loved them, I never like to do the same thing twice.
I recently came across the Martha Stewart Crafts glitter and have been desperate to try it so I bought two shades of green and a vibrant yellow to create a glittery vase centerpiece. The vases I bought are a simple cylinder shape. I also picked up some mod podge.

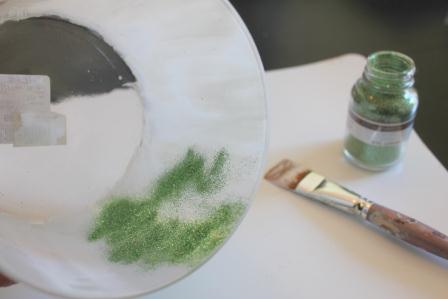
The process is very simple: you take a paint brush and coat the inside of each vase with mod podge. Then shake the glitter into the vase, covering the mod podge completely. You will have a ton of excess glitter, but you can pour it back into the jar to re-use.
Warning: they will look awful at first, but give them time to dry and you will have created sparkly vase goodness. If there are any glitter-free spots, simply apply more mod podge and glitter.

The end result is really, really pretty {if I do say so myself}. Sorry for the quality of the photos. It was hard to take shots without the glitter being too glittery.


I chose to apply the glitter on the inside of each vase because I think it gives them a more subtle sparkle. If you do so, you will need a smaller vase inside to hold flowers and water.

This DIY was one of seven projects I shared on stage at the Fall Home Show with the fabulous Dee Brun. This was my first time at the show and I LOVED it! I am so grateful to have been asked. Stay tuned for more posts of DIY projects for Halloween and Christmas.