Canning food is a great option for everyone. Honestly, I'm hard pressed to think for whom canning would not be a good fit. It's totally a doable afternoon project that will reap sweet rewards for weeks and months afterwards. So what are you waiting for? It's the season for fresh produce so grab your favourite fruits and vegetables and get your canning on!"
Let’s break down just how easy canning is.

YOU! Canning can be a great solitary pursuit if you like to use the kitchen meditatively. There is something about the peaceful, calming nature of preparing foods with love – or, if you lean towards the more extroverted - make canning a family or friends’ operation. The benefit to working with others is that you can arrange a 2 for 1 deal and split the fruits (and vegetables) of your labour.

Whatever your “what” is, make sure it is the freshest, most delicious possible. Pick or select produce harvested as close to your canning date as you can manage, and use only the best of the crop. Subpar ingredients will produce subpar results, and no one is looking forward to “Mom’s Mediocre Jam” every June.

Your kitchen, your mom or sister’s kitchen, your friend’s kitchen – really, anywhere there’s a stove, hot running water, ample counter space, and light. It’s that easy! Bernardin makes canning easy and their line of products is available in the places you're already shopping, like Canadian Tire, Walmart, and Loblaws stores.

Any time of the year will work, but there’s never a better time for amazing canning than the next few months as delicious fruits, vegetables, and herbs come into all their seasonal, fresh glory. Another note about the “when” is needed, to add that canning is NOT a difficult or time-consuming proposition as people often think. Gone – looooong gone – are the days of tedious canning preparations, and thanks to modern kitchens and improved techniques learned over the years, canning your own foods is a quick and fun task. You can turn out a beautiful batch of jam or preserves easily from start to finish in less than a morning.

Read the above sections again. It’s fresh, fast, easy, delicious, and anyone can do it. Plus, you’ll feel like a kick-ass pioneer who MAKES HER OWN JAM.

Here’s where the magic happens.

Wash your jars and lids and rinse well – a dishwasher is perfect if you have one, but don’t stress if not. (I can several times a year and don’t own a dishwasher.)
TIP: Double check the recipe for jar size; some jams and jellies call for the cutest teeny jars but you may be dealing with last year’s 250 ml set. Assembling all the proper tools first is the best path to success, so please, read the recipe FIRST and don’t make assumptions that it will be “just like that other thing” you saw your sister make.
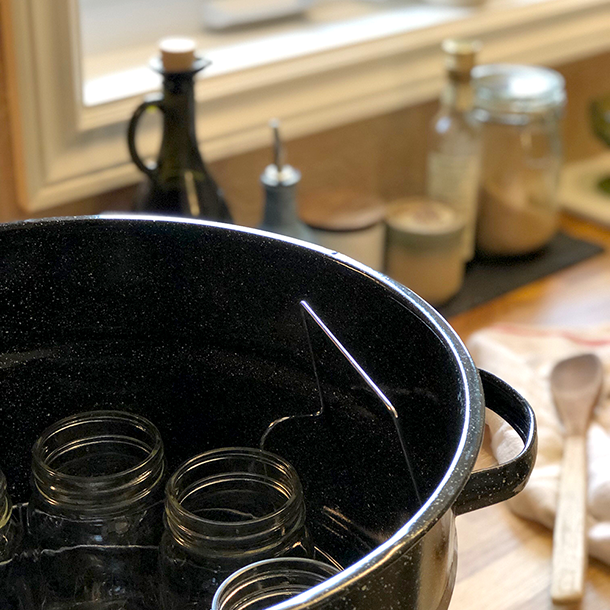
Now you are ready to sterilize. Place your jars on a rack in your water canning pot and cover them with water. Heat to a simmer.
TIP: If you are dealing with hard water, dribble a tablespoon or two of vinegar into the pot water to eliminate cloudy jars. While the mineral cloud will not affect taste of the final product, it doesn’t look fab on the jar and you’re not going to love it. We want you to LOVE it.

Heat your SNAP lids in a separate, smaller pot of hot water. (NOT the screw bands, just the flat inside lids with the rubbery seal on them – and make sure these are BRAND NEW each time – the SNAP lids are not meant for reuse in canning.) Do not boil – just get them very hot at about 180F and keep them hot in the water until ready for use.

LET’S GET THIS PARTY STARTED. It’s time to prepare the recipe! Here’s the perfect one for beginners to canning (and the one we’re using in the images here).
That's it. For real! This recipe is a "long boil" recipe which means the fruit releases it's own natural pectin and does not require you to add any pectin.
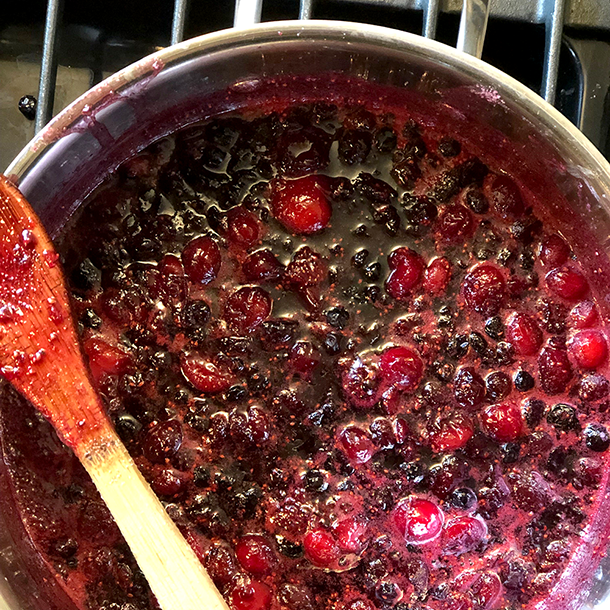
* I even made this recipe a bit easier by using frozen berries, which I crushed with a potato masher while simmering up to the boiling point, and spoiler: it worked fabulously. Frozen berries are picked and flash frozen at the peak of ripeness and the resulting jam is so good, I caught my son eating it straight from the jar. (The jar is now labelled with his name for his use only, which in hindsight hardly seems like a punishment.)

Bring crushed berries and sugar to a low rolling boil and cook - stirring frequently - for about 20-25 minutes. Once mixture has reached "gel stage" - ie. does it coat a metal spoon in a sheet rather than drip right off? - you are done. Full instruction and explanation of gel stage available here on the Bernardin site.
Remove the jars from your canning pot with the Bernardin tongs and place them on a clean cloth on your counter. (Keep the canning water hot on the stove – you are going to need it again.)
Once your recipe is prepared, keep it HOT while ladling into your jars.

When lading food into jars, make sure you leave head space (room for expansion) using the following:
Remove air pockets and bubbles from contents with a plastic or wooden tool – NO metal.
If this affects head space, dribble in more of your recipe to account for the difference. With a warm, wet, clean cloth, remove any dribbles or spills from the rims and jars.


Centre your SNAP lid onto the clean, filled jars. Bernardin makes a handy magnetic tool for fishing the lids out of the water (you’re keeping them warm in a pot of hot water, right?) Then use the screw bands to secure lids but do not tighten them past finger tight. The hot liquid and air in the jar will need room and you do not want to be cleaning grape jelly off your kitchen ceiling for six weeks.

Place your clean, filled, finger-tightened jars back into your canning pot and if necessary, add more water to the pot so that jars are covered by 1 inch of water. Cover the pot with lid and bring pot to a boil for time noted in recipe. (This may be affected by your altitude so check recipe.) After the boiling time has passed, turn heat off, but let jars remain in hot water on stove for an additional 5 minutes.

Use the Bernardin tongs to remove the jars from canning bath. Keep them upright in a place on where they can sit undisturbed for 24 hours.
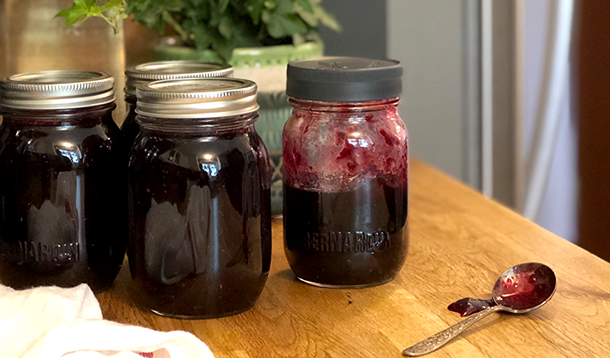
Bonus: sit back and listen to the pop-pop-pop of the SNAP lids sealing. It’s music to a canner’s ears. (Even if they don’t “pop,” you can see that they are sealed by a downward curvature of the middle on each lid – and they shouldn’t move.)
You can now remove the screw bands if desired (I like to keep them on for storage and gifting, but I’m extra that way.
Now throw all the dirty dishes in the dishwasher and relax, knowing you have some delicious foods ready to consume for up to the next year and celebrate this: You’re a canner now!

This is proudly sponsored by our friends at Bernardin.

