Every year, when I carve my Hallowe’en pumpkins, I am reminded of the horrified look on my then-three year old son’s face when I first tried to get him to eat roasted pumpkin seeds. “But mommy,” he cried, “we don’t eat GUTS!” He couldn’t believe that the slimy innards of a pumpkin could possibly be transformed into something edible.
Well, I’ve got news for him – not only are roasted pumpkin seeds delicious on their own, they make fantastic candy. This pumpkin seed brittle is so tasty, I’m tempted to go knocking on my neighbours doors just before Hallowe’en, offering to take their pumpkin ‘guts’ off their hands. You can eat the brittle as is, or use it as a garnish for desserts like cheesecake and panna cotta or even savoury dishes like roasted vegetables or salad.
Ingredients
Directions
 Preheat oven to 325F.
In a small bowl, toss the well rinsed pumpkin seeds (make sure there is little to no stringy pumpkin flesh clinging to the seeds) with the olive oil and salt.
Spread the seeds out in a single layer on a baking sheet and bake, stirring occasionally, until the seeds are just beginning to turn brown (about 25 minutes).
Remove the seeds from the oven and set aside.

Line a clean, large baking sheet with parchment paper.
In a medium saucepan, stir together the sugar, water and corn syrup. Cook over medium heat, stirring constantly, until the mixture begins to boil and the sugar is dissolved. This will take about 15 minutes; do not be tempted to rush the process by turning up the heat as the sugar will burn.

Once the sugar mixture is boiling, let it continue to cook but do not stir. With an instant read thermometer (or a candy thermometer), check temperature often.
When the temperature of the sugar mixture reaches 285F (soft crack stage, in candy making terms), add the roasted pumpkin seeds and stir to blend well.
Continue to cook for another 5 – 10 minutes, continuing to check temperature often and stirring occasionally, until mixture reaches 300F (hard crack stage) – approximately 5 minutes.
Take the pot off the heat and add butter, baking soda and vanilla. It will foam up a little but stir vigorously to blend well.
Quickly pour the mixture out onto the parchment lined tray. With the back of a silicone spatula, spread the brittle into as thin a layer as possible.
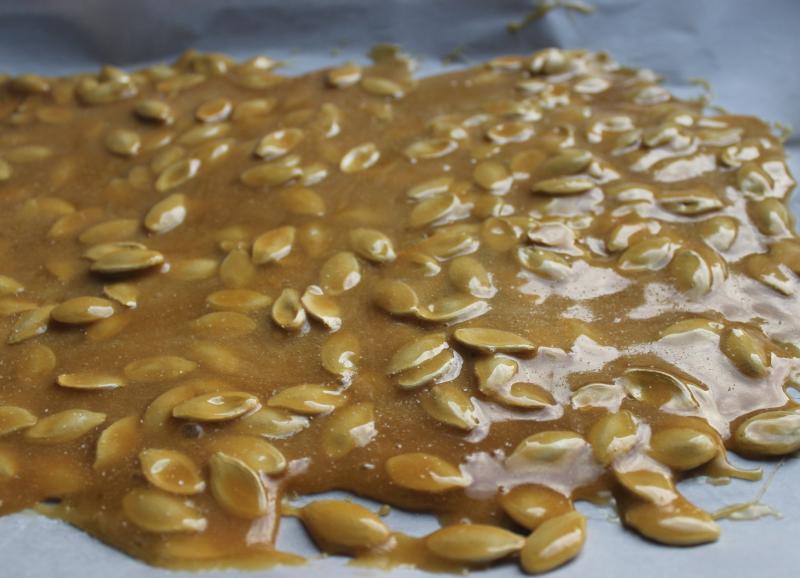
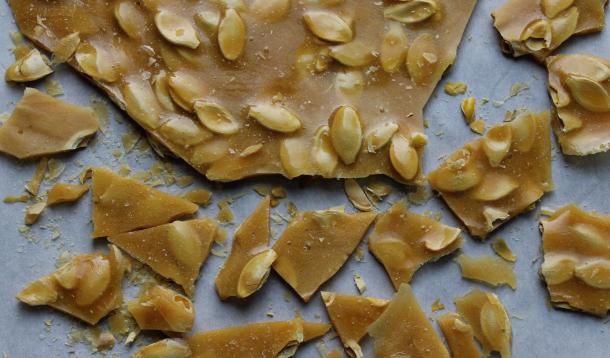
Let the brittle cool completely then break into pieces; store in an airtight container for up to two weeks.
Makes about 4 cups of brittle

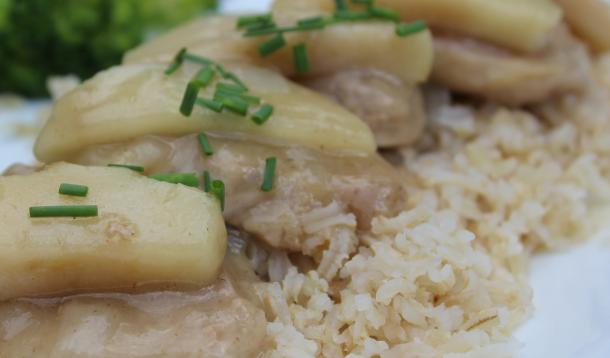
This is a great dish not only because it only takes 30 minutes to make but also because its mild flavours appeal to even the fussiest eaters. A nice twist on classic gravy, this apple gravy has a sweet-sour tang that is subtle yet very flavourful. Cutting the pork tenderloin into medallions is a great way to get more servings out of a small quantity of meat plus it provides kids with portions that are not intimidating. I prefer Gala apples for this dish because they soften but don’t fall apart when cooked. I like to serve the pork and a generous portion of apple gravy on top of brown rice or mashed potatoes; it would probably be very good on pasta as well. It’s a great make-ahead dish as it reheats easily over low heat in a pan or using the microwave. You can easily double this recipe as well and it would be ideal for the slow cooker too!
Ingredients
Directions
 Slice pork tenderloin into medallions approximately ½ inch thick.
Remove green onion tops, mince and set aside. Finely dice the white parts of the green onions and reserve.
In a large, heavy-bottomed frying pan that has a lid, heat oil over medium-high heat (the lid will be used a bit later).
While oil is warming, dredge pork pieces in flour (I like to put the flour in a small plastic bag and add a few pieces of pork at a time. Close the bag, give them a shake and they’re coated). Once dredged, set pork medallions on a clean plate and discard remaining flour.
Working in small batches, sear pork in oil until nicely browned on both sides. Avoid overcrowding in the pan; remove seared pieces to a fresh plate as needed to make room for more.
When all pork pieces have been seared, add green onions (white parts only) and cumin to the pan.
Stir for a minute then return pork medallions from the plate to the pan along with any accumulated juices.
Add chicken stock, salt and pepper; stir to combine. Note that the pork should be just barely covered by the chicken stock – add more (or a bit of water) if needed.
Add vinegar and honey; stir again.
Bring mixture to a boil, then cover pot and reduce heat to medium low. Cook pork mixture for 10 minutes, flipping pork pieces once.
While pork is cooking, peel, core and slice apples into twelfths. After the pork has cooked for 10 minutes, add apples to the pan and stir so the slices nestle into the sauce. Cover again and cook 10 minutes longer, until apples are tender.
At this point, you can either finish the dish and serve it, or put it in the fridge for up to 24 hours. If putting in the fridge, reheat on medium-low heat till bubbling and meat is warm, then proceed with next step. You can also freeze the dish at this point.
Just before serving, add cornstarch and water mixture to the sauce to thicken it slightly. Stir gently but thoroughly to make sure the thickening is evenly distributed and let the sauce cook for 2 minutes.
Serve pork medallions with apples and gravy on top; sprinkle with minced green onions. Put any remaining gravy in a warmed jug and pass it around at the table.
Serves 3 – 4 hungry people

