I don't mean to make you jealous, but I married into a grape-growing family. This has many, many benefits: at our wedding, each guest was given their own bottle of Gewurztraminer with a personalized label, we get to spend our vacations hanging around a vineyard, and in the fall, we share in some of the harvest excitement. Although my in-laws are now retired and have sold most of their property, they still live on two acres of land with several rows of Concord grapes. And this is one of the greatest benefits of all - for a prairie girl like me: UNLIMITED CONCORD GRAPE CONSUMPTION.
But even I can only eat so many grapes, especially since in the fall my mother-in-law sends me home from Thanksgiving weekend with a minimum of fifty pounds of Concords. That, my friends, is a lot of fruit. I eat a lot and give away a lot to friends, but I also juice it and freeze it for future use.
![]() At A Loss For Lunches? This Is The Ultimate School Lunch Ideas List
At A Loss For Lunches? This Is The Ultimate School Lunch Ideas List
Where am I going with this? Fruit leather. I don't know how it is in your house, but in mine, fruit leather is a very popular snack, and for good reason - it's easy to grab on the go and it can be shoved in a bag or a backpack without fear of being squished. It is also very easy to make - all you need are some apples and either a thick juice or a thin fruit puree.
Never fear - you do not need to marry into a grape-growing family in order to make your own fruit leather! You can make any flavour combination you like, with whatever fruit you have on hand.
What's that, you say? It's winter, and you don't HAVE a plethora of fruit on hand? This is what frozen fruit was made for. This is frozen fruit's day in the sun. Simply thaw frozen fruit and puree - using the soft fruit and the liquidy juice that results from thawing.
Food dehydrators are great for this, but if you don't have one, use your oven on the lowest setting, and crack it open to let some heat out. I promise you, it's well worth the effort to have your own, delicious fruit leather on hand. Your children will think it's magical!
Ingredients
Directions
 Peel apples and cut into chunks. If you have an apple peeler and corer, now is the time to use it. I am devoted to this one from Lee Valley.
In a food processor, pulse apples until they are in small pieces. Add the fruit juice or puree and process until smooth.
DEHYDRATOR VERSION: spread the mixture onto parchment paper-lined dehydrator trays. The edges must be thicker than the centre or the leather will be brittle. The centre should be about 1/8 inch thick, and the edges about 1/4 inch thick. Set the dehydrator to 135 degrees. The length of drying time will vary depending on the moisture level in the puree; a grape mixture will take 8-10 hours, but a pear-apple mixture will take closer to 6.
OVEN VERSION: spread the mixture onto parchment paper-lined baking sheets. The edges must be thicker than the centre or the leather will be brittle. The centre should be about 1/8 inch thick, and the edges about 1/4 inch thick. Put the oven at its lowest setting possible, and crack the oven door a bit while drying to let some heat out. The length of drying time will vary depending on the moisture level in the puree; a grape mixture will take 6-8 hours in the oven, but a pear-apple mixture will take closer to 4.
Check the leather often! Over-drying leads to brittle fruit leather. It is done when the puree has become leathery and pliable and there are no sticky spots in the centre.
Store wrapped in plastic wrap, like a fruit roll-up. I also slice up pieces and store them in an airtight jar, so my kids can access it with ease.
Don't be afraid to experiment! This is a fun thing to get your kids involved with, and the sky's the limit when it comes to flavour combination. Almost any fruit can be used - have fun with it!
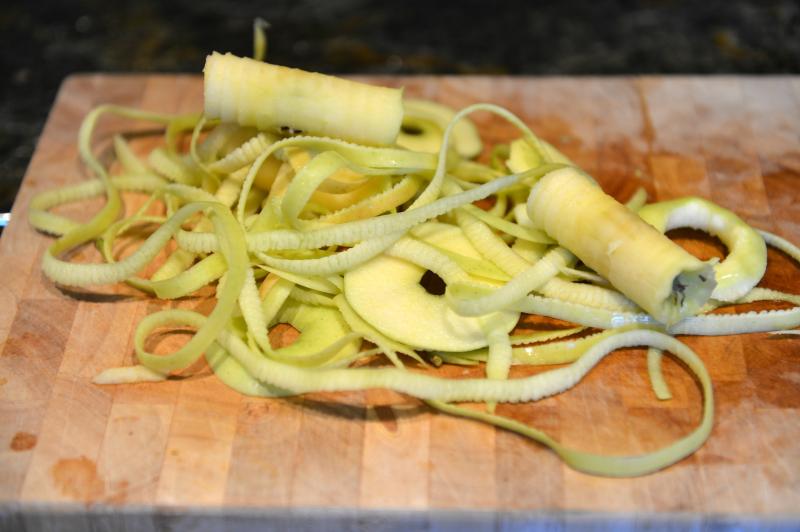
First peel, core, and slice the apples.

Process the apples, along with the puree or juice, until very smooth.

Spread the puree out on parchment paper - be sure to make it thicker on the edges than the centre.

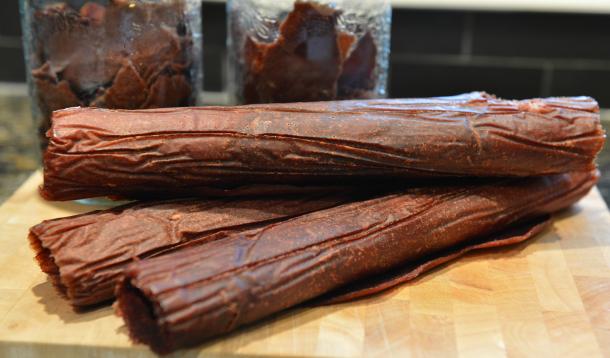
My children showing off the finished product. As you can see, these are pretty big! I slice them up and keep them in airtight jars.
I love my food dehydrator - if you have one and need more reasons to use it, why not try my Kale Chips: Two Ways, or my Dill Pickle Zucchini Chips. Maybe you just have a lot of extra strawberries - try my Chocolate Covered Strawberries!
I admit, I'm not the most with-it person sometimes. It often takes me a long time to realize that something is a "thing." For example: the sudden, disturbing resurgence of acid-wash jeans. I kept seeing girls wearing jeans similar to my 1987 favourites, and I had myself convinced that those girls were simply unique individuals, but after a while I realized: acid-wash jeans are a "thing" again. I know, I weep for humanity too.
![]() It Does The Body Good: Why You Need To Eat More Lentils
It Does The Body Good: Why You Need To Eat More Lentils
Another example: my kids kept talking about Taco Tuesday, and asking if we could have tacos on Tuesdays, and I was somewhat puzzled. I mean, tacos are great and all, but what was with the Taco Tuesday? I shrugged, inwardly congratulating them on being alliterative, and got out the taco shells.
Months went by, and I went with the kids to the Lego Movie. Then it hit me, in a Saint Paul on the road to Damascus kind of way:
TACO TUESDAY IS A THING.

So I'm a little slow to catch on sometimes.
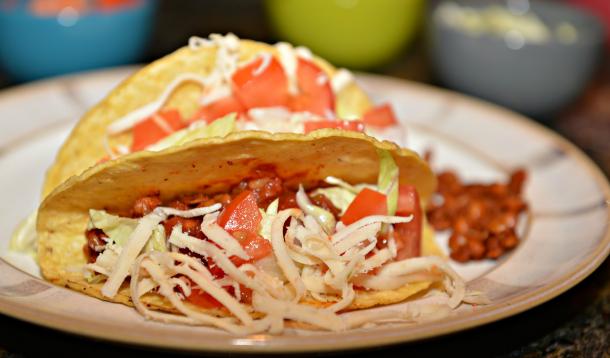
The great thing about taco night - Tuesday or otherwise - is that dinner preparation can really be a family affair. In the time it takes me to prepare the taco filling, the children can be prevailed upon to help with the toppings. Even small children can help wash the tomatoes and spoon the sour cream and salsa into bowls, and maybe even grate cheese; older children who like to show off their knife skills can chop tomatoes and shred lettuce.
And what about the taco filling?

Lentils make an excellent alternative to the typical ground beef; full of fibre, iron, and protein, they are a perfect vegetarian taco filling. It's like Meatless Monday married Taco Tuesday and had a delicious, nutritious baby.
Ingredients
Directions
Whisk together tomato paste, water, oil, lime, chili powder, cumin, coriander, onion, and garlic.
Fold in rinsed and drained lentils until coated.
In a saute pan or frying pan, cook lentil mixture over medium until heated through.
Spoon into taco shells, topping with lettuce, tomatoes, salsa, sour cream, and cheese (use non-dairy alternates if necessary).


Want some delicious taco toppings? Try my Holy Moly That's A Good Guacamole and my Feeling Hot Hot Hot Fresh Salsa. Are you saying, "Forget the tacos, I want more lentils!"? Try my Savoury Lentil Stew.
Remember Eat-More candy bars? I have not eaten one for many years, but the old cowboy commercial with the skipping record has been burned into my brain since childhood. The slogan back in the Eighties was "A Good Chew - And Peanuts Too." I wasn't a huge fan of Eat-More bars back then, to be honest; if I received any for Halloween I probably would have traded them, and I certainly wouldn't spend my allowance on them during weekly after-school trips to the corner store.
![]() Finally! A Nut-Free Granola Bar That's Safe For School
Finally! A Nut-Free Granola Bar That's Safe For School
Recently, a good friend sent me a recipe for homemade Eat-More bars, asking if I could hack it for her. This - requests for recipes from readers - is one of my very favourite parts of this job. I knew exactly what my friend wanted: a healthier candy bar that took her household allergies to nuts, corn, and dairy into account. Your wish is my command, I thought, tying on my apron and gathering my ingredients.
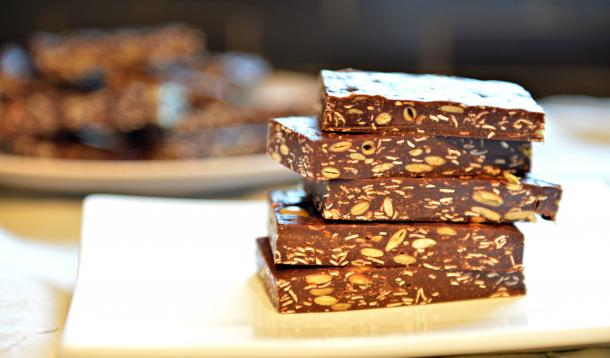
These homemade, nut-free Eat-More bars are very easy to put together, but I should warn you - they are addictively delicious! Although I'm not a fan of the original, these bars are to die for. I whipped up a batch for my friend, taking a small sample for myself - quality control, if you will. Then I took another sample. And then another sample. Then I realized if I didn't package these bars up immediately I would eat them all in very short order. That's when the name struck me as being very appropriate: once you eat one, you want to eat more.
Ingredients
Directions
Line a baking sheet with parchment paper, set aside.
In a medium saucepan, melt honey and chocolate chips together over low heat, stirring frequently.
Add tahini, and stir until smooth. Remove from heat.
Stir in oatmeal and pumpkin seeds. Using a spatula, spread mixture onto parchment paper-lined baking sheet to a 1/2 inch thickness. HINT: lightly spraying or wiping the spatula with oil will ensure the mixture won't stick, but will spread smoothly.
Place baking sheet in the freezer for 30-45 minutes, or until firm enough to cut into bars.
Cut into bars or squares, and eat more!
Want more copycat recipes? Try my Homemade Dairy-Free Dole Whip, my Healthy Homemade Fudgsicles, or my take on Tim Horton's Cranberry Blueberry Bran Muffins.

