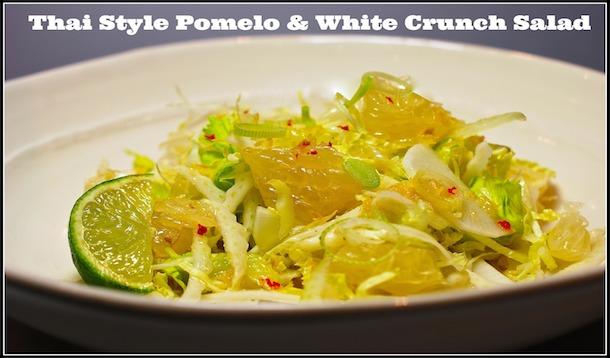
With the cold weather lingering and spring around the corner, I’ve got my mind on fresh, tasty flavours. Inspired by one of my favourite destinations, I came up with this Thai inspired salad. Pomelo salads are a Thai staple, but the addition of some crunchy Asian vegetables takes this salad to the next level. Pomelos are in season now, a more mellow and drier version of a grapefruit. They are surprisingly addictive with Thai seasonings — be prepared to make these a new favourite.
This is really easy to pull together and is jammed with flavour and crunch. It is a refreshing change from a usual garden salad. Give it a try and serve it up with some chicken or pork on the side for a great weekday dinner.
Salad Ingredients:

Dressing:
1 tbsp Thai fish sauce
1 tbsp agave nectar
juice of 1 lime
1 Thai chile, minced
1 tbsp rice wine vinegar
1 tsp grated ginger Peel, segment, and break up pomelo segments.
Pomelos have a really thick outer skin and a lot of pith (the white stuff you see in all citrus fruits). Peel it like a regular orange and use a knife to cut along the top of the segment. Remove the tough outer skin and break up the segments, they will fall apart. Thinly slice all salad ingredients and combine.
These are great ingredients to keep in your refrigerator, as they retain their crunch and store well without spoiling too quickly. You can find all of these items at your local grocery store these days, but if you’re feeling a little adventurous, head out to your local Asian market for a little foodie excursion. Feel free to use Daikon radish or regular cabbage if you can’t find those listed above. Whisk together dressing ingredients.
You can add more or less spice depending on your preference. Feel free to add more or less of the fish sauce for saltiness, the lime or vinegar for sourness and the agave for sweetness depending on your liking. You can use sugar, cane sugar or honey if you don’t have agave on hand. Combine with salad and let sit for 5 minutes for flavours to muddle.
This salad sits well in the refrigerator and can be made ahead of time. The crunchiness of the vegetables will hold until the next day without getting too soft.
Serve!

In a salad slump or just looking for something new and interesting? Try this Zucchini Ribbon Salad or the Freekeh Greek-eh Salad.
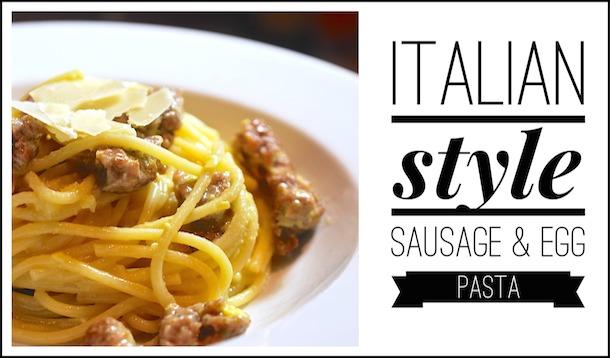
This pasta is an all time favourite at my house. The recipe is based on a version of the classic pasta carbonara, a traditional Italian dish that reminds me of childhood camping trips with the family. It only has a couple of ingredients but I guarantee you'll be surprised at how tasty and delicious it is. Bonus — it's really quick and easy to pull together; you can cook up the meat and get the 'sauce' ready in the time it takes the pasta to boil.
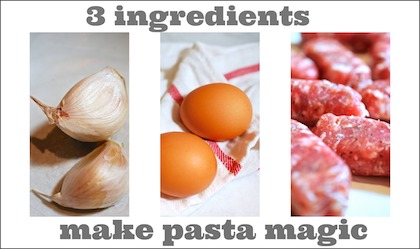
Ingredients:
3 large or 6 small sausages
2 tbsps olive oil
3 garlic cloves, crushed
1 package/500 gr spaghetti
3 eggs
parmesan to finish, grated or shaved
salt and pepper Bring salted water to boil.
You can prep the rest of the ingredients in the time it takes the water to come to a boil. This recipe is really that quick. Remove sausage from casings. Break up with a fork and cook until meat starts to change colour. Add garlic. Cook until meat is browned.
Feel free to use any of your favourite sausages here, but a good quality homemade sausage from your local butcher makes all the difference. For a leaner option, use turkey or chicken sausages.
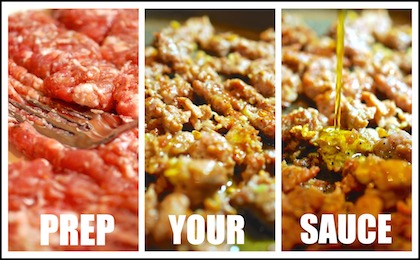 Take off heat and add 2 tbsps fresh olive oil.
I like to use sausages from a local butcher who uses a lean meat mix. When I'm done cooking, there is generally not very much oil in the pan, so I like to 'top up' with fresh olive oil. If you use a sausage that renders more fat, remove before you add the fresh oil. This will keep your pasta feeling light and fresh rather than heavy and oily. Beat eggs and set aside.
I always make sure to use my farmer’s market organic eggs here. Usually they are a lot creamier than store bought eggs and can make all the difference in creating an excellent sauce.

Once pasta is 'al dente,' use tongs to remove pasta and place directly into sauce. Do not drain pasta before placing, just use the tongs to get it all in the pan.
THIS IS A CRUCIAL STEP. You need the pasta to be a little wet and drippy with pasta water. The water contains starch and will ensure your dish stays creamy without drying out. Depending on how ‘wet’ the pasta is when you place it in the pan, you may have to add a ladle or two of pasta water later on when you mix in the eggs. Keep the pasta water aside until you’re are all done. This is gold!! Over very low heat, add eggs and stir up the pasta until the egg cooks and thickens slightly into a creamy sauce.
This should only take a couple of minutes. You will notice the eggs change by getting opaque and thicker. If you notice the pasta appears dry, this is the time to add a ladle of pasta water. Top with parm shavings and cracked pepper and serve immediately.

Like my recipes? Check out a few of my other favourites:

serves 2
This recipe is on our table at least twice a week. I am a big fish lover, but even those in my family that aren’t huge fans love this dish. It’s super tasty, healthy and I can pull it together in 20 minutes or less. This sauce is great on any fish, feel free to keep it in your fridge and use it on any of your favorite types. For those of you that don’t like anchovies, you can opt out, but if you’re ever going to give them a try, do it here. They pack a huge punch of flavor, and really lose their ‘fishiness’ when cooked.
Sauce:
Fish:
1 lb organic salmon cut into 2 steaks
 Pour ½ tbsp olive oil into a medium size frying pan that is suitable to be used in the oven as well. Heat over a medium flame.
Make sure to use a pan that you can be transferred to the oven. This is a one-pan meal, started on the stove top and then finished in the oven. This allows you to perfectly cook your salmon from the top and bottom. Don’t worry if you prefer your salmon skinless. The skin protects the salmon and keeps it together while cooking but once done, the steak will slide off easily for serving.
Season salmon with salt and pepper.

Place salmon in pan skin side down and gently heat. Cook until salmon starts to turn pink around edges and bottom, 6-8 minutes. Remove pan from heat.
There are two main things that make this salmon delicious. One is the sauce, the other is making sure you do not overcook your fish. The stovetop to oven method always ensures your fish is cooked perfectly, if you learn to recognize what that looks like. Fish cooks very quickly, so make sure to pay attention and remove from heat as soon as it is done.

While salmon is cooking, place all ingredients for sauce in hand blender and blend until smooth and combined.
I use an immersion blender for this, but feel free to use a mini chopper too.
Spoon sauce liberally over salmon and spread.
You can store any unused sauce that has not been in contact with the fish in the fridge for up to a week to use again.
Set oven to broil. Place salmon, still in frying pan into oven and broil until salmon is cooked and sauce is crusty.
I like using the broil function to finish cooking the salmon really quickly at this point. Broiling also gives you that crispy crust on top. In order to avoid potentially burning your fish, place the oven grill on the second or third rung from the top.
Serve immediately.
Check out some of my other favorite recipes:

