
You’ve seen them everywhere—those photographs with a tack-sharp subject and a blurred out background. How does that happen? The secret is in the aperture setting. (Before you read on, you might want to open this Glossary of Photographic Terms.)
The aperture on your camera is the opening in the lens through which light travels to the sensor. By changing your aperture settings, you can change how large or small that hole is and control the amount of light that reaches the sensor. (I’m assuming that no one who reads this is exposing film.)
F-Stop Basics:
Depending on the camera and/or lens that you are using, f-stops typically range from f/1.4 to f/32 in the following increments:
f/1.4 f/2 f/2.8 f/4 f/5.6 f/8 f/11 f/16 f/22 f/32
Here’s the thing that always tripped me up with aperture: the SMALLER the f-stop number, the LARGER the opening. Hopefully this image will make that clear

Since a larger aperture will let in more light, you can use a faster shutter speed than you would at a higher aperture. (You can read more on the exposure triangle here.) If you’ve heard people talking about “fast glass,” they are typically referring to a lens that has the ability to go to a fairly low f-stop number, such as f/2.8 and below, no matter focal length you choose on the lens. These lenses are usually more expensive.
Depth of Field:
Probably the most important thing to understand about aperture, though, is that the smaller the f-stop number (therefore, a larger aperture), the smaller the depth of field (or area in focus) would be.
Those creamy, dreamy, blurred backgrounds that you see? Chances are they were taken using a large aperture.
Much to my chagrin, understanding how big your depth of field is requires a great deal of math. Since math is NOT my thing, I’ll let you check out this site. Needless to say, I don’t whip out a calculator every time I want to take a picture—I’m much more of the trial-and-error type.
Here are the basic things that I keep in mind about aperture when I’m taking a photo:
Here’s an example of a photograph I took at f2.8:

The front row is in focus, and everyone in the second and third row is out of focus. Imagine if this was a large group of people—I'd really need to use a smaller aperture to get everyone in focus.
To illustrate how your focus point can change a picture when paired with a large aperture, look at this photo:
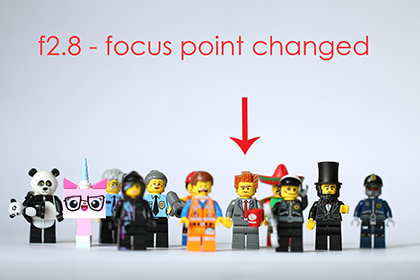
Now the focus has changed from the first row to the second row—everything on the same plane as President Business (yes, we are Lego Movie fans in my house) is in focus.
Finally, in order to get everyone in focus, I needed to stop down to f/32:

I tend to shoot a lot of photos "wide open," or at my largest possible aperture. Here are a few examples:


You can take advantage of changing your aperture whether you're using a dSLR or a point-and-shoot. If you have a shooting mode that says "Av" on your camera, that stands for "aperture priority." It will allow you to select the aperture that you'd like to use, while it automatically adjusts all the other settings for you. Try taking multiple photos of the same thing, from exactly the same position. Each time, change your aperture by a few stops and see what happens. (You'll probably only really notice the differences once you look at the images on your computer.)
No dSLR or point-and-shoot? You can even take advantage of a shallow depth of field on your smartphone—newer models have the ability to go to f2.8 and lower. Try this test: pick a subject in the foreground and lock the focus (typically by double tapping it or selecting the focus square, depending on what phone you have). Click and see what happens. Smartphones have smaller sensors than digital cameras, so the background won't be quite as blurry, but it should give you a bit of the same effect. I took this with my iPhone:

Front row in focus, back rows out of focus.
Stay tuned for more Photography 101 posts!
Looking to create some creative backgrounds with a shallow depth of field? Check out How to Make Custom Bokeh Shapes.
Lens openings with apertures image by Koeppi via Wikimedia Commons

