
This recipe for Teriyaki Beef is quickly becoming a favourite in our house. The kids love the taste and I love how little thought it takes to throw this together. Not only is this recipe super easy, the entire meal can be ready in less than fifteen minutes which makes it much faster than takeout and perfect for a weeknight dinner.
As a public service announcement however, I feel as though I have to warn you about how amazing this combination of ingredients smells while cooking. The smell is so good my stomach starts to grumble within minutes and my children are eagerly waiting at the dinner table without being called ten times to come and sit down. That right there is worth remembering the fresh ginger in the vegetable aisle!
Simply cook beef in sesame oil (this is where it starts to smell amazing).

Add all the stuff.

Mix and serve.

Ingredients:

Instant Rice (cook desired amount according to package directions)
1 lb extra lean ground beef
1/3 cup teriyaki sauce
1 tbsp sesame oil
1 tsp fresh ginger, peeled and grated/minced with a garlic press
1 tsp salt
½ tsp red pepper flakes or a few dashes of hot sauce to taste (optional)
2-3 sliced green onion (optional)
 Cook desired amount of rice according to package directions.
In sauté pan, heat oil over medium-high heat.
Add ground beef and cook until no longer pink. When the beef is fully cooked, I like to drain off the excess fat.
Reduce heat to medium-low, add teriyaki sauce, ginger, salt and red pepper flakes/hot sauce (if using). Stir until combined and beef is well coated (approx 3-5 minutes).
Serve over rice topped with green onion (if using—my kids won’t eat them so I don’t).
BONUS: Looking for an extra hit of veggies? Feel free to add ½ julienned pepper, 1 cup of frozen broccoli florets and/or ½ cup grated/match-stix carrots to heated oil. Sauté 3-5 minutes until veggies are softened then add beef.
DOUBLE UP: Double this recipe and serve half over rice and the next night for dinner, substitute this Teriyaki Beef for the chicken in this Fresh Spring Rolls recipe. Or, you can freeze the leftovers in family-sized or individual-sized freezer bags.
PS: Looking for other super fast better-than-take-out recipes? Be sure to try my Asian Chicken Peanut Butter Noodles.
Adapted from Hormonal Imbalances.

There are certain recipes I hesitate to even call cooking when I make them. This Chicken Parmesan Casserole recipe is one of them. Between us, let’s call it “assembly” but when your mother-in-law comes over, we’ll call it something you’ve slaved over a hot stove for all day!
I promise your secret is safe with me and I also promise, cooking dinner doesn’t get much easier than this.
Simply brush oil and garlic all over the pan.

Add chicken, top with basil.

Pour on the sauce and add a little more basil.

Top with cheese.
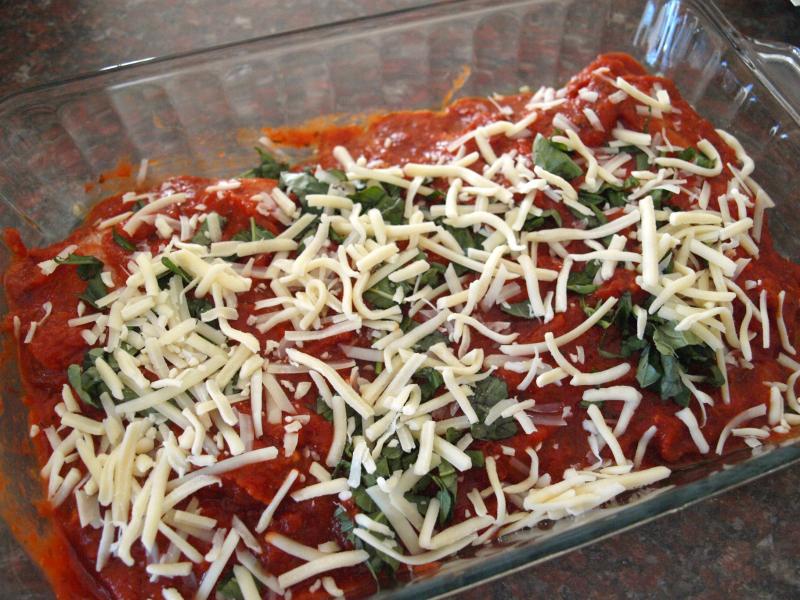
Then add the croutons and a little more cheese.

Bake and voila!

Ingredients:

2 tbsp. olive oil
2 cloves garlic, crushed
6 boneless skinless chicken breasts
1 jar of tomato sauce (approx. 650mL)
¼ cup fresh basil, chopped (fresh basil is key—so it’s worth not forgetting at the grocery store)
1 cup mozzarella, shredded
½ cup parmesan, shredded
1 package croutons (approx. 128g)
Add oil and garlic to 9 x 13 casserole dish and spread with brush or wooden spoon to cover bottom of pan.
Add chicken and sprinkle with ½ basil.
Top with tomato sauce and sprinkle with remaining basil (or you could use it all here; I just really like fresh basil).
Top with ½ mozzarella cheese and ½ parmesan cheese.
Add croutons and spread all over casserole.
Top with remaining cheese.
Bake in pre-heated 350F oven for 35 to 45 minutes (depending on size of chicken breasts).
Bonus: This recipe freezes really well and is great as a grab-out-of-the-freezer-and-rush-out-the-door work lunch.
PS: Want to try my other favourite lunch options for work? Check out my Leftovers to Lunchbox Favourites and my Asian Chicken Peanut Butter Noodles.
Adapted from Food Wishes.

Last week I spent a few early morning hours in my son’s Kindergarten class with eight other moms. We were in charge of baking 7 apple crisps with groups totaling 28 Kindergartners. It was a fun morning and as a work-outside-the-home mom I treasure the times I can re-work my schedule to see my son’s face light up when I walk into his classroom to volunteer.
Unfortunately, the apple crisps were being saved for the next day when the class was having a teddy bear picnic. When my son learned that the apple cinnamon smells making their way through his school hallways were not going to grace his lunch table we had a serious situation on our hands.
![]() These Apple Pie Bites Are So Easy To Make Your Toddler Can Help
These Apple Pie Bites Are So Easy To Make Your Toddler Can Help
What could I do, but promise to whip up something apple crisp delicious when I got home from work that night?
Thankfully this recipe took all of 10 minutes to whip together including peeling and slicing the apples (I of course was well practiced from the morning activities however!).
Simply slice your apples and toss in lemon juice.

Butter your Crockpot.

Pour the apples in.

Mix up all the dried ingredients.

Add the butter.

Spread on top of the apples.
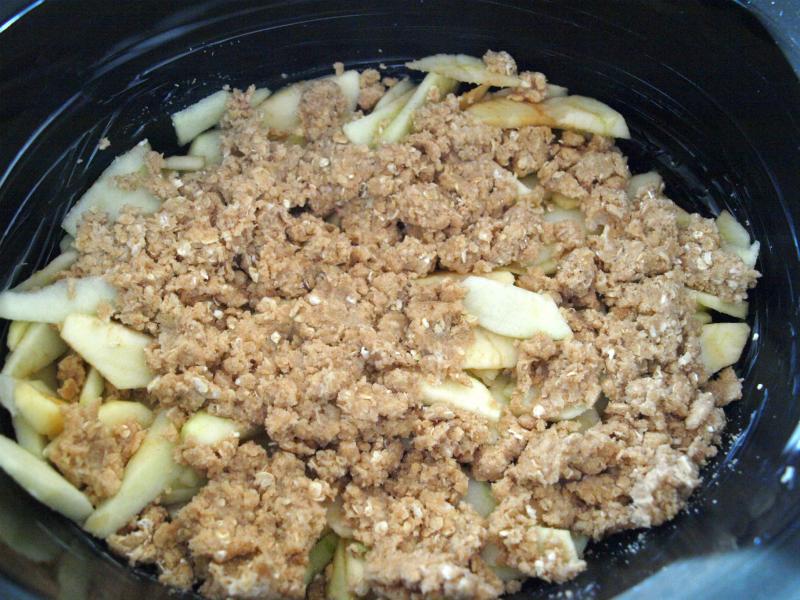
Add some paper towel to soak up the moisture and ensure a perfectly crispy top.

Cook and serve with ice cream or whipped cream (your choice!).

Ingredients:
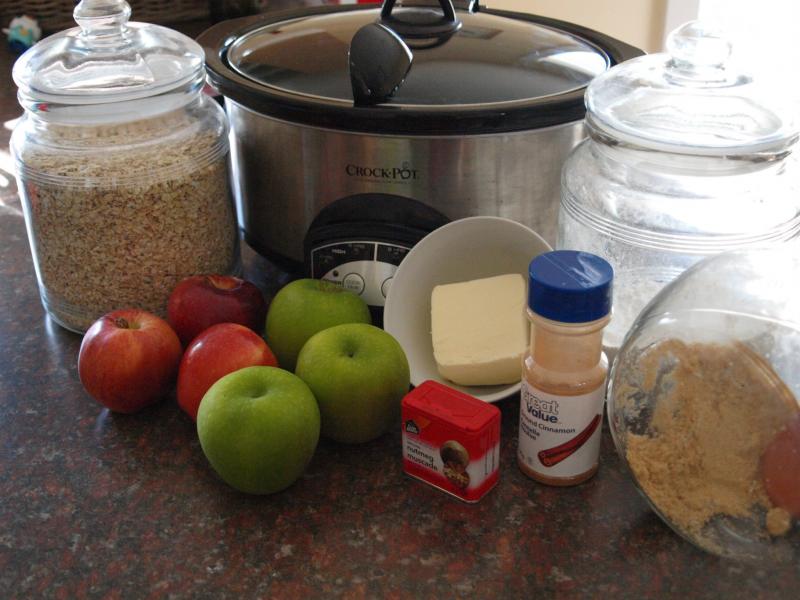
6-8 medium baking apples (I like to use at least half granny smith for their tartness)
1 tsp lemon juice (from the container is just fine)
2/3 cup quick-cooking oats
2/3 cup flour
1/2 cup brown sugar
½ tsp cinnamon
¼ tsp nutmeg
½ cup butter, softened (not melted)
Directions:
Butter Crockpot on the bottom and up to the middle of the sides.
Peel, core and thinly slice apples, putting them into a bowl. Add lemon juice and stir, then pour apples into Crockpot.
In a separate bowl, combine oats, flour, brown sugar, cinnamon and nutmeg. Mix well.
Using a pastry cutter or two knives, cut in softened butter until combined and crumbly.
Spread on top of apples.
Cover top of Crockpot with paper towels at least two-thick (this will absorb much of the moisture and allow your crumb mixture to get just the right amount of crunchy) then top with lid.
Cook on high for 2- 2 ½ hours on high.
Serve with real vanilla ice cream or real whipped cream.
![]() Vegan Kitchen Hacks: Coconut Whipped Cream Recipe
Vegan Kitchen Hacks: Coconut Whipped Cream Recipe
Tip: This Crockpot Apple Crisp makes a fabulous dessert when your oven is currently holding a turkey. If you have a digital Crockpot that turns to “warm” when it is done cooing, you can whip this dessert up before guests come and leave on warm until you’re ready to serve.
Go Big or Go Home: To increase the size of this dessert use 12-14 medium-sized apples and increase to 1 cup oats, 1 cup flour, 2/3 cup brown sugar, 1 tsp. cinnamon, ½ tsp. nutmeg and 2/3 cup butter.
Bonus: Looking for other super easy apple desserts? Try my Apple Pie Bites or my Mini Apple Pies.
Because I Love You: Looking for other crowd pleasing but Canned Soup Mom-easy desserts? Try my Cake Batter Cookie Bars or my Gingerbread Cake.
Adapted from 365 Days of Slow Cooking.

