
Mother's Day breakfast can mean cold toast, burned pancakes, and a mess in the kitchen. This easy, delightfully dairy free recipe combines chewy coconut with sweet mango, all drizzled with a tart-sweet lime syrup. These pancakes are tiny; only about 3 inches across, so if you have hungry bellies you made need to double or triple the recipe. Small is good for kids though; take the leftovers and sandwich them with Philadelphia chocolate cream cheese with a decadent lunchbox treat!
Ingredients:
1 cup unsweetened desiccated coconut
3/4 cup flour
1 1/2 tsp baking powder
1 egg, beaten
1 cup coconut milk (shake the can so that the solids in the can are mixed in well with the liquid)
1 Tbsp honey
2 mangoes, sliced
Lime syrup:
2/3 cup sugar
juice of 4 limes, and the grated zest from one of them
 In a blender, pulse the coconut so that it becomes a coarse mixture. Add the flour and baking powder, then pulse for a bit to combine. Pour the mixture out into a bowl.
Make a well in the flour and stir in the beaten egg, then whisk in the coconut milk and honey, continuing to whisk well until a smooth batter forms. Allow the batter to sit and rest for 15 minutes. If the batter is too thick, add a little more coconut milk or water.
Lime syrup: In a small saucepan, mix together the sugar, 2/3 cup water, lime juice and zest over high heat, stirring until the sugar has dissolved. Reduce the heat and continue to simmer the mixture for about 15 minutes until it has reduced and thickened to a syrupy consistency. Take off the heat and allow to cool, adding a little more lime zest if needed.
Once the pancake batter has rested, prep to cook the batter. Add a small amount of oil to a non stick fry pan, swirling to coat the bottom. Heat the pan over medium low heat. Spoon out the batter into the hot pan by heaping tablespoons, spreading out to make small pancakes. Cook the pancakes about 2-3 minutes until golden on the bottom, then flip and cook until golden and cooked through. Keep warm while you cook the rest of them.
Serve the pancakes warm with slices of mango and a bit of lime syrup drizzled on top. Save the leftover lime syrup to stir into club soda for a refreshing summer drink.
Make 16 small pancakes
Adapted from Gordon's Ramsay's Home Cooking
If you love to eat, cook, and talk about all things food, then Eat! Vancouver is surely the place for you to be this May 24, 25, and 26th. Now in it's 11th year, with everything from hundreds of exhibitors, wineries and breweries, Food Network chefs, competitions, cooking classes, restaurants and more, there are loads of things to see, do, and taste.
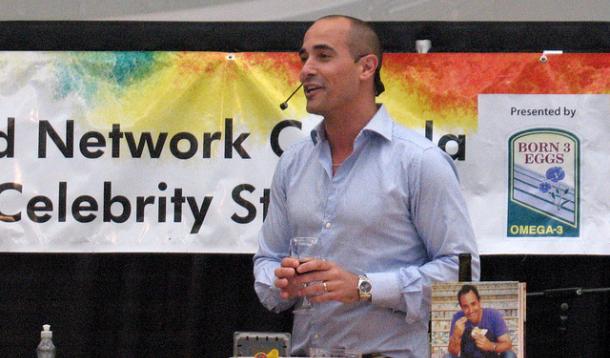
This year marks our third trip to Eat! Vancouver, and it's become something Kevin and I look forward to all year long. We love to wander the floor looking through the booths and sampling new products, and dropping in at the Bites Of Vancouver area to sample tiny plates from local restaurants. We often catch our breath by watching a show at the Food Network celebrity stage, always looking forward to see the chefs that we watch live on Food Network cook and chat with the audience. At any rate, it's THE place to get your inner foodie on whether you just love to eat, or want to cook.
Before you go, there's some things you should keep in mind:
1. If you can, take transit. Parking can get expensive in Vancouver and for events, you may pay about $20 to park for the day. The skytrain station is across the street from BC Place so you should have no problem getting there. We always drive part way, park the car, then catch the skytrain. It's just so much easier. Get a day pass if you're going to go a few different places, it's worth the money.

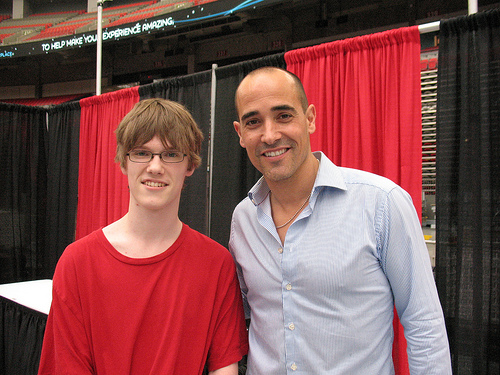
2. Buying your admission tickets online not only saves you some cash, you get to bypass the big lineup at the entrance. Once you are inside go straight to a booth and buy your tasting tickets, which are the food currency at Eat! Vancouver. We buy a $10 sheet of 20 tickets each, and that's usually more than enough for us. As you can see from the photo, Kevin is really excited about those tasting tickets. Many exhibitors offer free samples, but if you want a larger portion then it costs a few tasting tickets.
3. Arrive early so you can look through the booths easily. By around 11:30 am, the place is packed and it's hard to see much.
4. Wear comfy shoes and be prepared to walk a lot. Also, take a re-useable shopping bag to put your samples and purchases in because you will become loaded down with stuff. Or, at least I do. There are so many great products to try or buy, you want to make sure to have some cash on you to spend as well.
5. Check out the stage schedules if you want to catch a celebrity show or a cheese seminar. We saw David Rocco last year and he was really great. If you have a book that you would like them to sign, make sure to bring it as you'll probably have a chance to meet them and do that after the show. Kevin was so excited to meet David Rocco that we stood in line forever just to say hello! This year the chefs are Anna Olson, Rob Feenie, Chuck Hughes, and Bal Arneson.
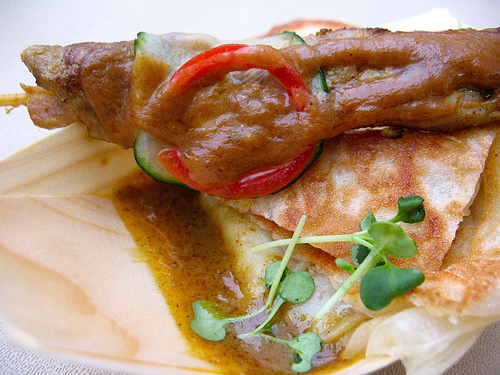
6. Be prepared to eat because it's the whole point of the festival! The dish pictured above was a warm naan bread, and curried chicken skewer from Ebo restaurant in Burnaby. One of Kevin's favourite dishes at Eat! Vancouver was raw oysters, much to my surprise. We never go home hungry—in fact, by the end we're usually completely stuffed.
Most of all, have fun! Eat! Vancouver is a great time to explore and whether you choose to dive on in or stick to more familiar favourites, there really is something for everyone.
Even if you aren't into slurping down raw oysters.
Completely, utterly, exhausted.

Welcome to my new blog on Yummy Mummy Club! I’m so excited to have a space of my own to share what’s happening in my kitchen. Now you’ll be able to find all of my content in one space!
Last week a co-worker gifted me with some rhubarb from her garden. A few years ago I may have politely refused-for much of my childhood, we ate rhubarb all the time in pies, stewed, jams, you name it. I think it’s because the climate in Central BC didn’t allow much else to grow, but the end result was that for a very long time I couldn’t bear to look at rhubarb again until just recently.
What are platz, you ask? As far as I knew growing up, it was just a delicious dessert but in reality, platz are a thin Mennonite coffee cake, topped with fruit and a crumble topping. You can vary the fruit however you wish. Try using berries, rhubarb, plums, peaches, pitted fresh cherries, or even a mixture to make up your own combination. The result can be a very moist cake so you may need to cook it a bit longer than stated. It’s best eaten the day it’s made and doesn’t freeze well. It's also a fantastic way to use up all that rhubarb growing in your garden.
Ingredients:
1 cup flour
1/2 cup sugar
1 tsp baking powder
1/4 cup butter
1/2 cup milk
1 egg, beaten
1 tsp vanilla
rhubarb (about 1 cup, diced)
strawberries (about 1 cup, diced)
Topping:
1 1/2 cups flour
1 1/2 cups sugar
1/2 cup melted butter
 Pre-heat oven to 350 F. Grease a 9x13 inch pan and set aside.
In a medium bowl, whisk together the flour, sugar, and baking powder. Cut in the butter with a pastry cutter or 2 knives until it resembles fine crumbs. You could also use a food processor for this if you wish.
Whisk together the milk, egg, and vanilla in a medium sized bowl. Pour into the flour mixture and stir until just combined. Pour batter into the prepared pan and spread evenly. Top the batter with diced strawberries and rhubarb.
In a medium sized bowl whisk the flour and sugar together before mixing in the melted butter with a spoon. Spread the crumble topping evenly over top of the fruit.
Bake the platz for about 30-35 minutes in the top 1/3 of the oven until golden brown. Allow the platz to cool before slicing.
Adapted from Mennonite Girls Can Cook
Makes 16 slices
If you love the idea of fruit and a crumble topping, take a look at these Blueberry Crumble Bars. If chocolate calls your name, then head on over to Chocolate Rice Krispie Squares (You know what? They make amazing ice cream sandwiches, too)

