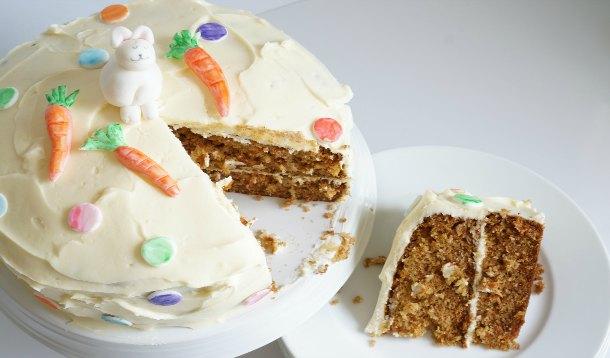
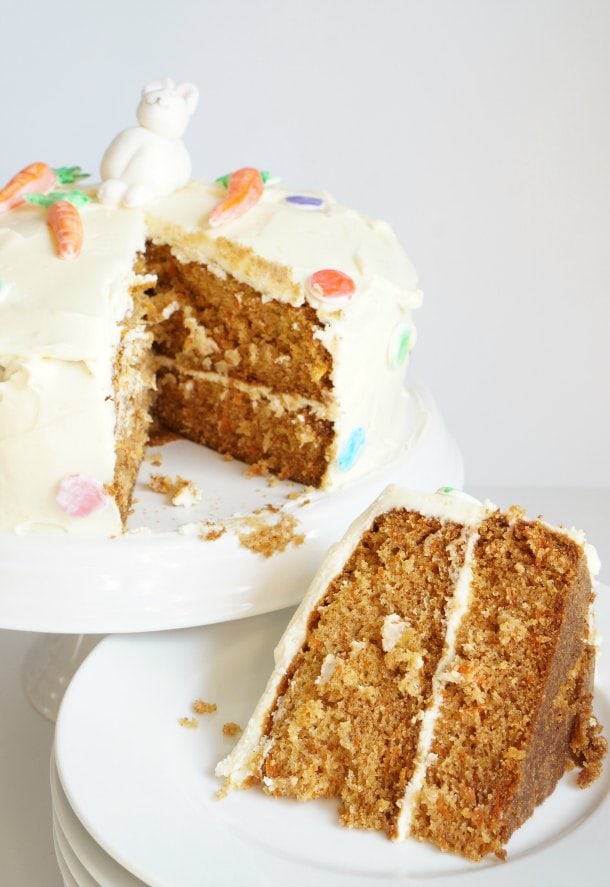
I can't imagine Thanksgiving without apple pie and I can't imagine Easter without a delicious carrot cake. Carrot cake is the perfect dessert for people who don't like overly sweet desserts. The cream cheese frosting is rich and smooth, but not too sugary. This carrot cake is a great recipe to make with the kids. The recipe calls for a whole lot of shredded carrots, so put the kids to work grating the carrots on a box grater. My girls had fun making all the decorations for our carrot cake out of fondant - of course there had to be a bunny on top. In the end you will have a delicious cake that everyone helped make and that everyone will enjoy.
Ingredients
3 cups grated carrots (about 1 lb, 6-8 medium carrots)
1/2 cup finely chopped pineapple
2 1/2 cup all purpose flour
2 tsp baking soda
1 tsp salt
1 tsp ground cinnamon
1/4 tsp ground ginger
2 cups granulated sugar
1 1/4 cup vegetable oil (we use safflower oil)
4 large eggs
1 tsp vanilla
Cream Cheese Frosting
1 1/2 cream cheese
1 cup room temperature butter
1 1/2 cup icing sugar
1 tsp vanilla
Directions
![]() Preheat the oven to 350°F. Butter two 8" round cake pans. Line with parchment paper and butter again.
Preheat the oven to 350°F. Butter two 8" round cake pans. Line with parchment paper and butter again.
![]() Combine grated carrots and pineapple in a small bowl and set aside.
Combine grated carrots and pineapple in a small bowl and set aside.

![]() Whisk together flour, baking soda, salt, ginger, cinnamon in a small bowl. Set aside.
Whisk together flour, baking soda, salt, ginger, cinnamon in a small bowl. Set aside.
![]() In an electric mixer cream together granulated sugar, oil and eggs until light yellow. Beat in vanilla.
In an electric mixer cream together granulated sugar, oil and eggs until light yellow. Beat in vanilla.
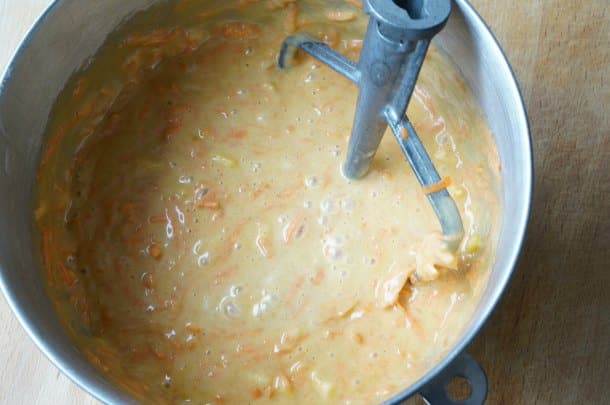
![]() Add half of the dry ingredients to the wet ingredients and mix until combined. Add half of the carrots and pineapples. Add the second half of the dry ingredients, followed by the carrots and pineapples. Mix until combined.
Add half of the dry ingredients to the wet ingredients and mix until combined. Add half of the carrots and pineapples. Add the second half of the dry ingredients, followed by the carrots and pineapples. Mix until combined.
![]() Divide cake batter equally between the two prepared pans. Bake in 350°F oven for 50-60 minutes, until toothpick inserted comes out clean. Remove from pans and place on rack to cool completely before icing.
Divide cake batter equally between the two prepared pans. Bake in 350°F oven for 50-60 minutes, until toothpick inserted comes out clean. Remove from pans and place on rack to cool completely before icing.
![]() For the frosting. Combine cream cheese, butter, icing sugar and vanilla in a medium bowl. Beat until smooth.
For the frosting. Combine cream cheese, butter, icing sugar and vanilla in a medium bowl. Beat until smooth.
![]() Now it's time to assemble the cake. Use a serrated knife to remove the rounded top off one of the cakes. Place a dot of icing in the middle of the cake plate and place the cake with the sliced off top on the cake plate. The dot of icing will hold the cake in place.
Now it's time to assemble the cake. Use a serrated knife to remove the rounded top off one of the cakes. Place a dot of icing in the middle of the cake plate and place the cake with the sliced off top on the cake plate. The dot of icing will hold the cake in place.

![]() Use an offset spatula to spread frosting on the top of the lower layer of cake. Place the second cake on top of the first. Use the spatula to spread frosting over the entire cake. It is best to spread on a thin first layer of frosting. You can place the cake in the fridge to firm up the frosting before spreading the final layer of frosting on the cake.
Use an offset spatula to spread frosting on the top of the lower layer of cake. Place the second cake on top of the first. Use the spatula to spread frosting over the entire cake. It is best to spread on a thin first layer of frosting. You can place the cake in the fridge to firm up the frosting before spreading the final layer of frosting on the cake.
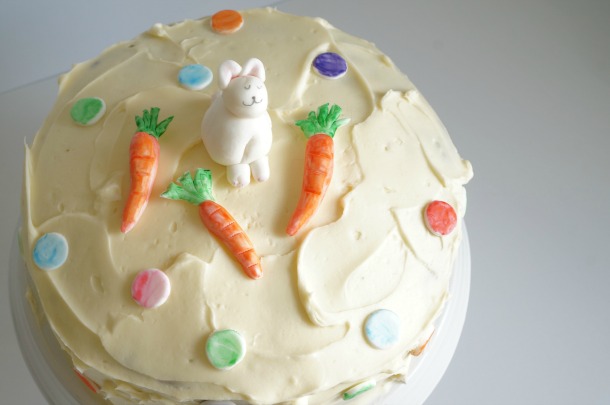
![]() My daughters used white fondant to make a bunny rabbit, carrots and small dots. They then used food colouring and paint brushes to paint details on the fondant decorations. Set aside to dry before placing on the cake.
My daughters used white fondant to make a bunny rabbit, carrots and small dots. They then used food colouring and paint brushes to paint details on the fondant decorations. Set aside to dry before placing on the cake.
![]() Enjoy.
Enjoy.
![]() RELATED: Bunny Bait Easter Trail Mix That's Highly Addictive
RELATED: Bunny Bait Easter Trail Mix That's Highly Addictive
I distinctly remember looking down at the menu and wanting to order a dish that I simply did not know how to pronounce. How the heck do you pronounce "gnocchi"? Yep, I tried "g-nock-ee" - that's not right. Through embarrassing trial and error I learned the proper pronunciation is "nyo-ch-ee". Once the pronunciation was sorted, the question became what is gnocchi?
Gnocchi is a surprisingly easy to make, little potato dumpling pasta. Yep, gnocchi is made from potatoes. A great batch of gnocchi will taste like little fluffy pillows that melt in your mouth. A few years ago we started making homemade gnocchi and we discovered the best part about making gnocchi is how much fun it is to make with kids.
Ingredients
4 medium russet potatoes
1 1/2 cups all purpose flour
1 large egg
1/4 tsp salt
1/4 tsp ground pepper
Directions
![]() Line a baking sheet with parchment paper and dust with flour. Set aside.
Line a baking sheet with parchment paper and dust with flour. Set aside.
![]() Place cleaned potatoes in a large pot with cold water, bring to a boil. Boil the potatoes until a knife inserts easily - boil for about 30-40 minutes.
Place cleaned potatoes in a large pot with cold water, bring to a boil. Boil the potatoes until a knife inserts easily - boil for about 30-40 minutes.

![]() Remove softened potatoes from the water, place on a clean tea towel to cool slightly. When the potatoes are cool enough to pick up (about 5 minutes) use the tea towel to rub off and peel off the potato skin.
Remove softened potatoes from the water, place on a clean tea towel to cool slightly. When the potatoes are cool enough to pick up (about 5 minutes) use the tea towel to rub off and peel off the potato skin.

![]() Press the potatoes through a ricer. If you do not have a ricer, grate the potatoes with a box grater. Set the grated potatoes aside to cool before working further with them. Let them cool for about 20 minutes.
Press the potatoes through a ricer. If you do not have a ricer, grate the potatoes with a box grater. Set the grated potatoes aside to cool before working further with them. Let them cool for about 20 minutes.

![]() Dust flour over the grated potatoes and make a well in the middle of the grated potatoes. Drop the egg, salt and pepper into the centre of the well.
Dust flour over the grated potatoes and make a well in the middle of the grated potatoes. Drop the egg, salt and pepper into the centre of the well.

![]() Use your hands to work the egg, potatoes and flour into a dough. Knead the dough until the dough is smooth - about 2-3 minutes. If the dough is too sticky add in more flour. Once a ball is formed, use a sharp knife to divide the dough into 6 portions.
Use your hands to work the egg, potatoes and flour into a dough. Knead the dough until the dough is smooth - about 2-3 minutes. If the dough is too sticky add in more flour. Once a ball is formed, use a sharp knife to divide the dough into 6 portions.
![]() Now for the fun part, making the little gnocchi pillows. Roll each portion of the dough into a long, thin snake. Let the kids take the lead on this step - they know how to work with play dough.
Now for the fun part, making the little gnocchi pillows. Roll each portion of the dough into a long, thin snake. Let the kids take the lead on this step - they know how to work with play dough.

![]() Once the dough snake is made, use a sharp knife to slice the dough into 1/2" pieces.
Once the dough snake is made, use a sharp knife to slice the dough into 1/2" pieces.
![]() Set the gnocchi on the parchment paper lined and flour dusted baking sheet until ready to cook.
Set the gnocchi on the parchment paper lined and flour dusted baking sheet until ready to cook.

![]() Drop the gnocchi into a pot of salted boiling water. You will know when the gnocchi is cooked when they float to the surface of the water.
Drop the gnocchi into a pot of salted boiling water. You will know when the gnocchi is cooked when they float to the surface of the water.
![]() Use a slotted spoon, or spider, to remove the gnocchi from the water. Don't pour the gnocchi into a colander... the friction will rough up the gnocchi and make them gummy.
Use a slotted spoon, or spider, to remove the gnocchi from the water. Don't pour the gnocchi into a colander... the friction will rough up the gnocchi and make them gummy.

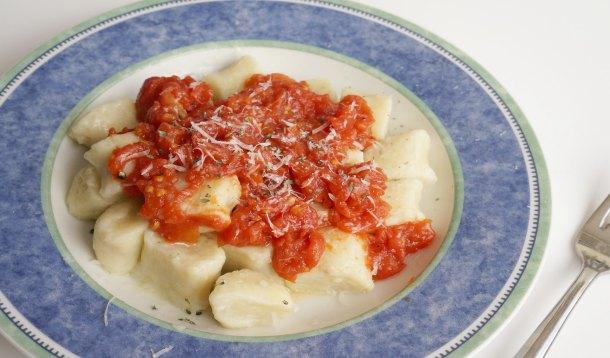
![]() Top the gnocchi with your favourite pasta sauce and grated parmesan cheese. Gnocchi works best with a meatless sauce. We made a super quick tomato sauce; simmering one can of whole tomatoes, 2 cloves of garlic and 1/2 tsp of dried basil. Gnocchi is equally lovely with fresh pesto.
Top the gnocchi with your favourite pasta sauce and grated parmesan cheese. Gnocchi works best with a meatless sauce. We made a super quick tomato sauce; simmering one can of whole tomatoes, 2 cloves of garlic and 1/2 tsp of dried basil. Gnocchi is equally lovely with fresh pesto.
![]() Enjoy.
Enjoy.
It always amazes me when simple ingredients can create such a delicious dish. This recipe makes a lot of gnocchi - possibly more than you will need to feed a family of 4. Leave the leftover gnocchi on the flour dusted baking sheet and pop it in the freezer. Let the gnocchi freeze completely and then transfer to a resealable freezer bag. When it's time to cook the gnocchi, remove from the freezer and spread the gnocchi into a single layer on a plate.
Prepare them the same as in the recipe above.![]() RELATED: 12 To-Die-For Pasta Recipes To Make Tonight
RELATED: 12 To-Die-For Pasta Recipes To Make Tonight
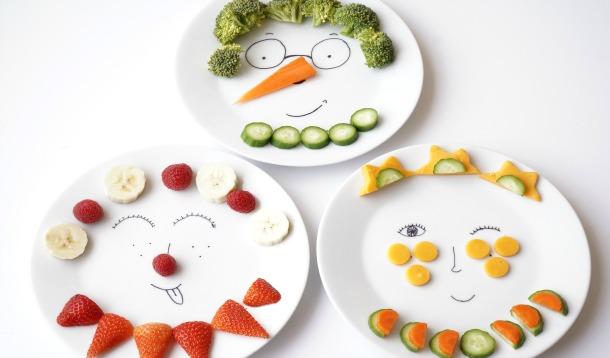
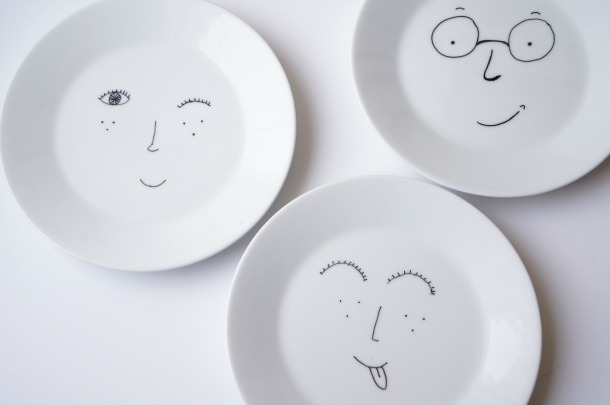
So, the kids don't want to eat their vegetables? Maybe it's time to make eating a whole lot more fun. What kid wouldn't love to eat off of a super silly Sharpie funny face plate? Transform a regular old plate into a silly face plate. The kids can even create their own plate.
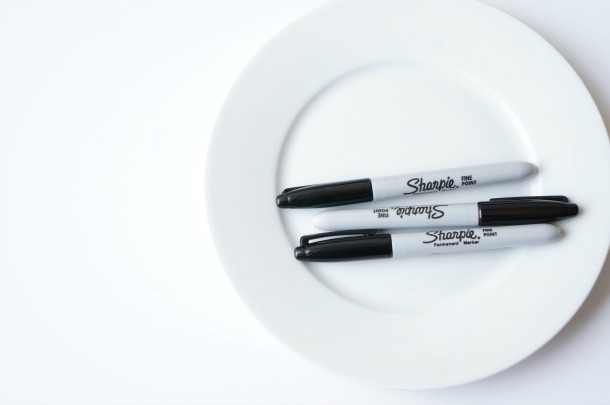
![]() First thing's first, you need a plate. We picked ours up at IKEA, they cost $2.50 each. I'm sure a plate from the dollar store would work too. The only caveat is that the plate should be a single colour, that way your design will show up nicely and the food will provide all the colour you need. Make certain that your marker is a permanent marker - washable markers will rub off on the food.
First thing's first, you need a plate. We picked ours up at IKEA, they cost $2.50 each. I'm sure a plate from the dollar store would work too. The only caveat is that the plate should be a single colour, that way your design will show up nicely and the food will provide all the colour you need. Make certain that your marker is a permanent marker - washable markers will rub off on the food.
![]() Start with a plan. These are permanent markers after all! We sketched out some ideas on paper. This gave us that opportunity to try out all sorts of silly faces. Anything goes.
Start with a plan. These are permanent markers after all! We sketched out some ideas on paper. This gave us that opportunity to try out all sorts of silly faces. Anything goes.
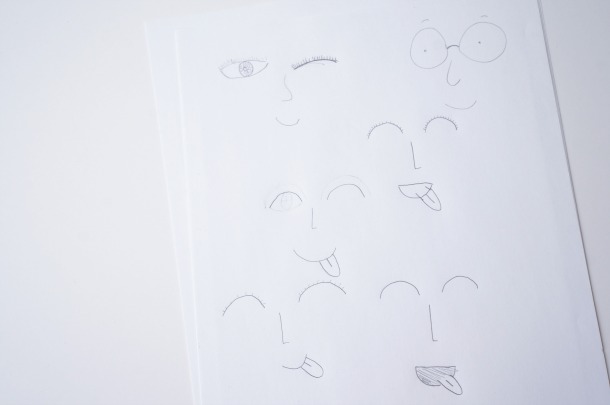
![]() Next, it's time to commit. Use the Sharpie to draw the face on the plate. I love the designs my daughters chose.
Next, it's time to commit. Use the Sharpie to draw the face on the plate. I love the designs my daughters chose.
![]() Once the face is drawn, place the plate inside a 400F oven, directly on the rack. Bake for 30 minutes. After 30 minutes, turn the oven off and let the plate cool completely before removing it from the oven.
Once the face is drawn, place the plate inside a 400F oven, directly on the rack. Bake for 30 minutes. After 30 minutes, turn the oven off and let the plate cool completely before removing it from the oven.

![]() Now it's time for the fun part - the food. Gather up a wide assortment of fruit and vegetables and decorate the plates.
Now it's time for the fun part - the food. Gather up a wide assortment of fruit and vegetables and decorate the plates.

![]() Broccoli hair, raspberry noses - use whatever your kids want. Use a cookie cutter to creatively cut up cheese and larger pieces of fruit and vegetables.
Broccoli hair, raspberry noses - use whatever your kids want. Use a cookie cutter to creatively cut up cheese and larger pieces of fruit and vegetables.

![]() The plates can be washed by hand in soapy water. You could try cleaning them in the dishwasher, but I'm not sure how each individual plate will fare.
The plates can be washed by hand in soapy water. You could try cleaning them in the dishwasher, but I'm not sure how each individual plate will fare.

How cute are these plates!? Who could possibly resist eating the fruit and vegetables that decorate these plates? Let your child take ownership of his own design and creation and watch him eat happily.
Who said that we shouldn't play with our food?

