
Everything I know about multiplication, I learned from a man dressed in a kangaroo suit.
Math Patrol was an educational television program which ran on TVOntario in the late 1970s / early 1980s and I loved everything about it. Each episode featured Sydney – an undercover detective in a giant marsupial outfit – solving primary school level math problems and cracking cases assigned to him by his enigmatic boss, Mr. Big.
I was nine-years-old. It was riveting.
In spite of the low production quality, Math Patrol taught this rural school kid a metric tonne about math because, for the first time, math seemed interesting to me. Dare I say, it was FUN. There were colourful graphics, silly skits and catchy songs with with lyrics like, “What’s seven times nine? Sixty-three you’re doing just fine.”
Fast-forward thirty-six years. I’m teaching my daughter all about multiplication and - I’m not gonna lie - it’s hard work.
Since we don't have a man in a kangaroo suit, we compensate by skip counting (while actually skipping), piling up dried beans, using glittery flash cards, playing counting games with balls and making up stories about squirrels and their nuts. We also marvel at fun tricks like the one I’m about to share with you (no thanks to my third grade teacher). Would it have killed you to show this to the class Mrs. Reid?
To begin, grab an old glove and a pair of scissors and then, cut a finger from the glove.
Have your child hold out both hands in front of them and ask them to imagine that their fingers are numbered from one to ten - from left to right.
To find out what to do next, have a look at the following photographs.
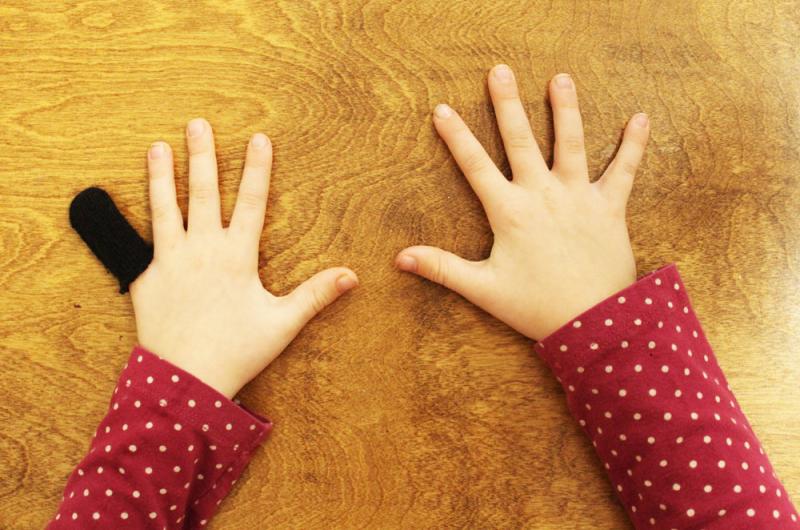
Place the glove tip on finger number 1.
Q: How many fingers are to the left of the glove?
A: 0
Q How many fingers are to the right?
A: 9
Therefore, 9x1=9.
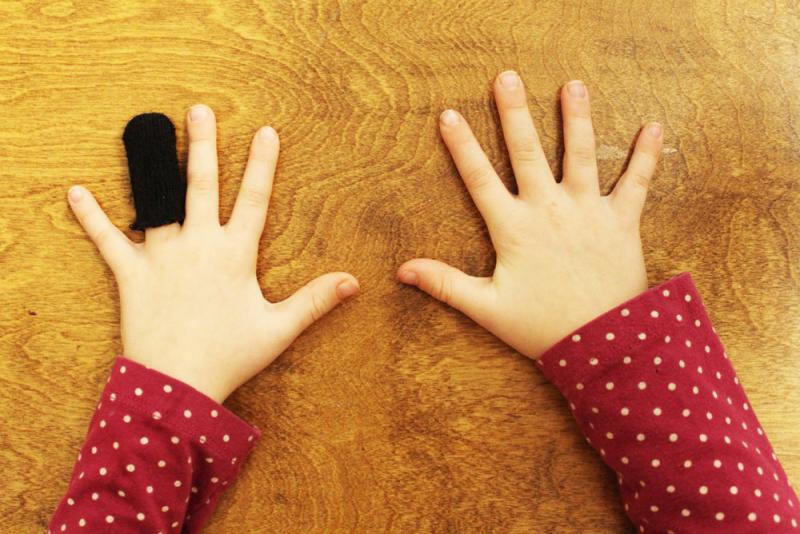
Place the glove tip on finger number 2.
Q: How many fingers are to the left of the glove?
A: 1
Q How many fingers are to the right?
A: 8
And so, 9x2=18.
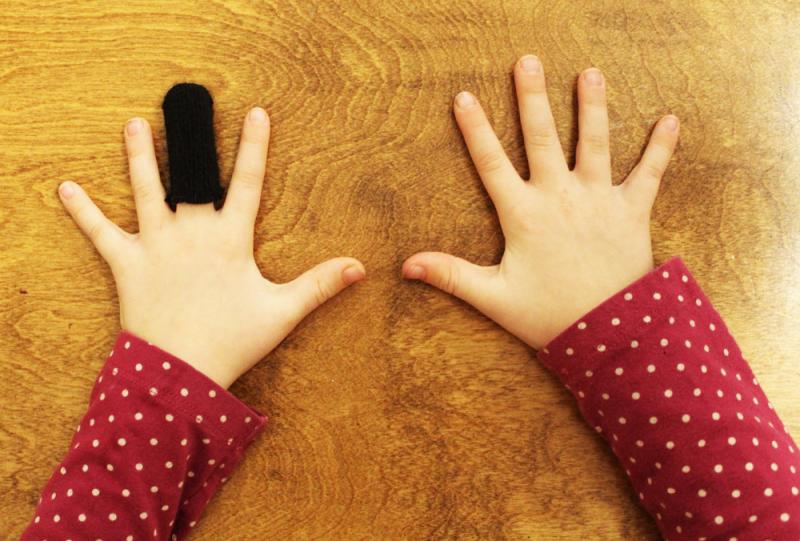
Place the glove tip on finger number 3.
Q: How many fingers are to the left of the glove?
A: 2
Q How many fingers are to the right?
A: 7
So we know, 9x3=27!
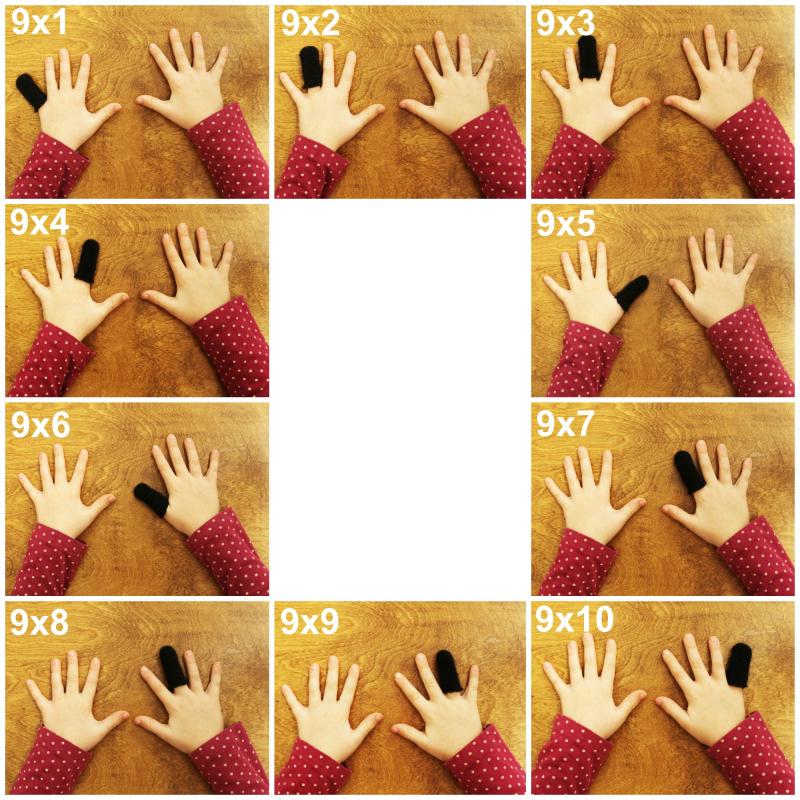
Tell me, is your mind blown yet? Mine was.
This works every, single, time (up to ten because, fingers).
Seriously, have a look and remember... count how many fingers are to the left of the glove, and how many fingers are to the right.
And as if that's not enough, the number nine has another trick up its sleeve.
Once your kids have successfully multiplied nine times fill-in-the-blank, you can show them how to check their answers by adding up the digits in the results. If done correctly, those answers will each add up to nine!

This works no matter how high you go.
9x11=99 (9+9=18, 1+8=9)
9x12=108 (1+0+8=9)
9 x 13 = 117 (1+1+7=9)
And so on because numbers are amazing, even when you don't have a kangaroo suit.
For those of you interested in sharing quirky math facts with your kids, check out Vi Hart's YouTube Channel which features (among other things) Vi Hart - a self-described "recreational mathemusician" - sharing her love of numbers while pointing out connections between mathmatics and the natural world.
Hands up if you’ve ever thought about painting a picture, only to talk yourself out of it because, first off, you don’t know how to paint and also, you don’t want to waste precious art supplies because after all, you don’t know how to paint.
Sound familiar?
You’re not alone. And while it is much easier to say, “I can’t draw a straight line” than it is to actually sit down with a #2 paintbrush, the truth is, making something from nothing can be a crapload of fun. And, studies have proven that both creating and viewing art can reduce cortisol - the stress hormone.
But, it isn’t for sissies.
You better believe it takes nerve to sit down in front of a blank sheet of paper or canvas. And stretching your hand out to make that first smudge, streak or smear can be terrifying, even for seasoned artists. But oh the satisfaction when you finally do plunge into the cool waters of creativity.
The other morning - after spotting a gorgeous Instagram post - I invited my daughter to join me in making a couple of somethings that had never existed before. The technique was so simple; yet so effective, and in the end, we hit all the art making nails on the head because not only was the process enjoyable, the end product was beautiful (not unlike a cracked kaleidoscope that's been glued back together).
Win-win!
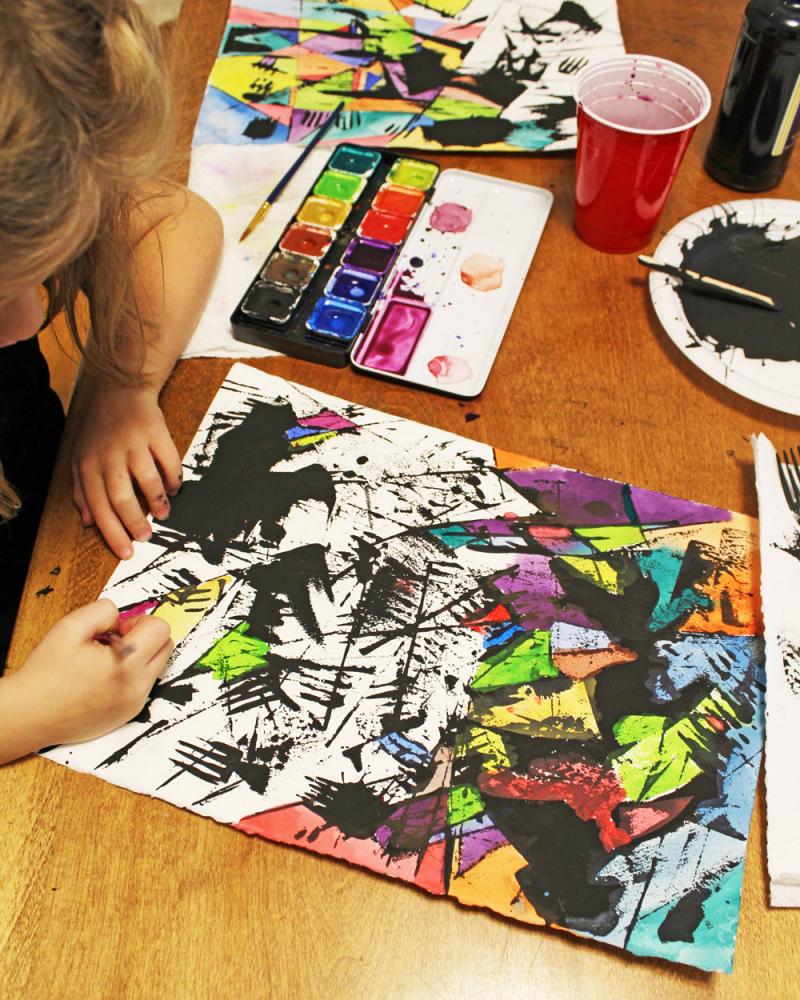
I snapped some photos as we worked and then wrote down the steps so you and your kids – or just you, I won’t judge – can learn how to fake being an artist and get over the fear of painting a picture when you don't know where to begin. This is such a terrific skill-building activity because it challenges you to make decisions and encourages you to take risks. And you'll think you’re just having fun!
By the way, have you ever noticed how my kid is always wearing her pajamas in my how-to pics?
I digress. Let's get started, shall we?
It’s really important to use watercolour paper instead of computer paper or construction because it has been designed to absorb a lot of water. If you don’t use it, be prepared for your paper to curl just like my hair in high humidity weather.
We used an old fork and knife, some wooden craft sticks and an expired Indigo iRewards card I was no longer using because the clerk suggested a Plum rewards card made more sense for me since I don’t get to the city often enough to make the iRewards card worth my while. But you can just use an expired Visa card.
The paint does not have to be expensive, but it does need to be acrylic. You can generally find small bottles of this stuff at the dollar store and – of course – at any craft store. You don’t need a lot for this project.
A paper plate works well.
The quality here isn’t super important but try to find a brush with soft bristles that come to a point, rather than a rough square-shaped brush.
This is important. Tempera, acrylic or poster paints won’t give you the desired effect so make sure you find a decent set of watercolours for this project. And although price doesn’t matter – keep in mind that the more expensive the paint, the longer the colours will last.
Kids + paint = I shouldn't have to explain this.
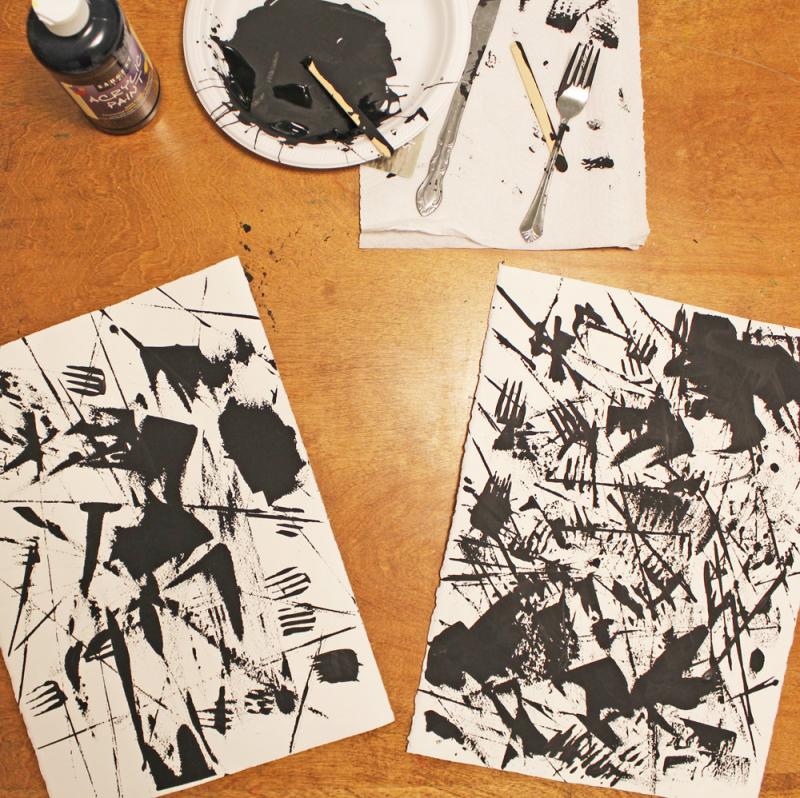
Squeeze some black acrylic paint onto a tray.
Grab a tool, dip it into the paint and start making marks on the watercolour paper. Do your best to avoid painting dogs, cars, trees or smiley faces. The key here is to make lines, not pictures.

Don’t overthink what you are doing. This is not a test, (unless you have plans I don't know about), it is rather, an opportunity to flex your creative muscle(s).
Test out different tools to see what kinds of lines they make. An old credit card or craft stick is perfect for creating long lines that stretch out to the edges of the paper.

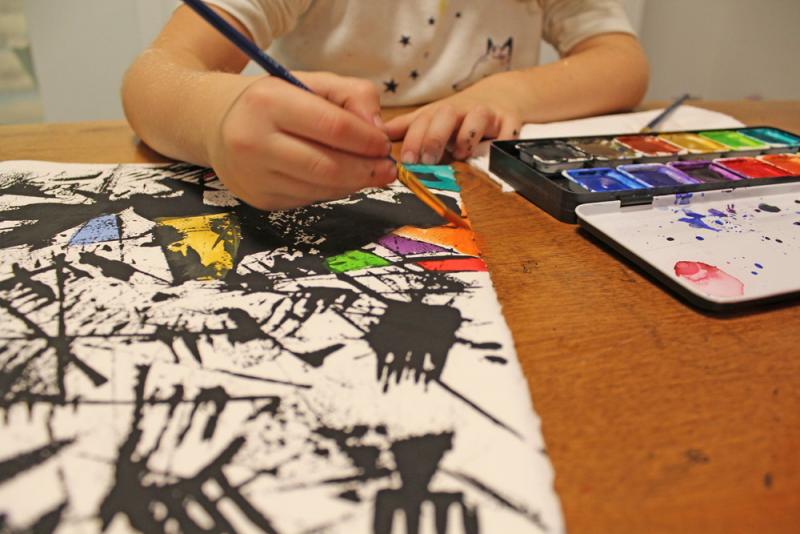
When you feel like you can’t add another drop of black, stop and back away from the paper allowing it to dry completely.
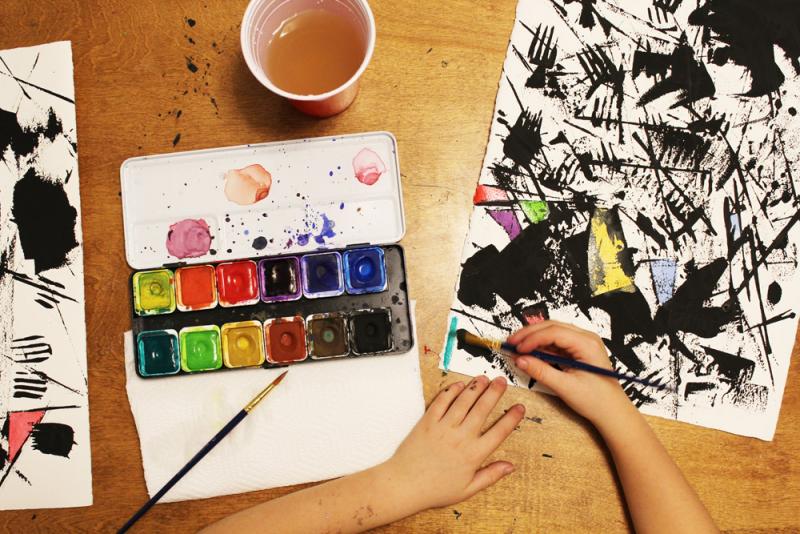
Once the paint is fully dry, grab some watercolour paints. Find the blank spaces and fill them in with different colours.

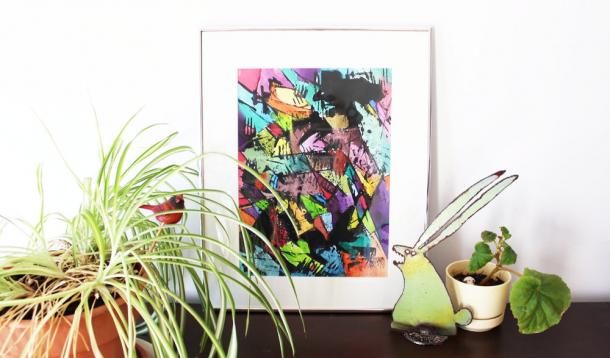
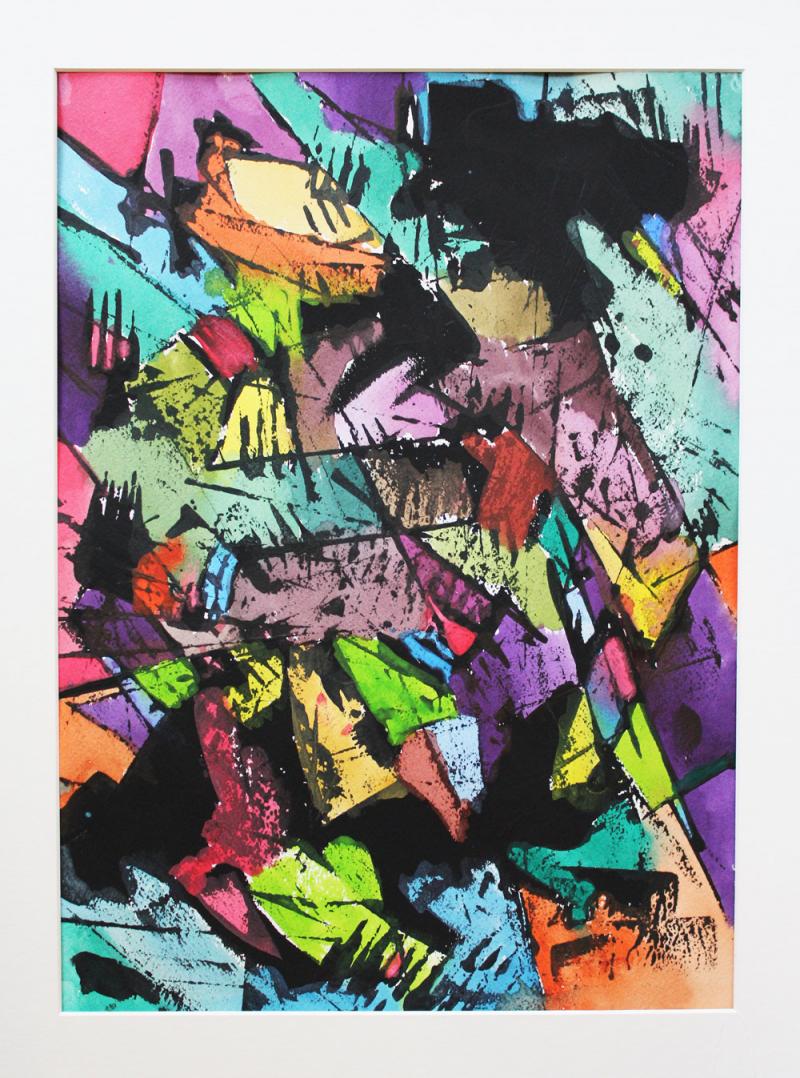
In the end you’ll end up with something like this masterpiece, created by my 8-year-old.
Meanwhile, once your painting is hanging on the wall (or propped on the piano, as the case may be), you are ready to take the next steps necessary to fake being an artist.
Step two involves only a few items of clothing. Black clothing. Why black? Because anything else will detract from the work and let’s face it, nobody needs that. Step three requires you to practice repeating phrases like, “The colours are reminiscent of Kandinsky" and, "The lines remind me so much of DeKooning’s Excavation series.”
Got it? Good. Now go ahead and jump in because - as always - the water’s fine.*
*In all seriousness - you won't regret giving this technique a shot and if you get your kids involved, you'll enjoy the process even more. Trust me, I'm an artist.

![]() RELATED: How to Make Art When You Don't Know How to Make Art
RELATED: How to Make Art When You Don't Know How to Make Art

