When my daughter was just a few weeks old, I carefully placed her pudgy hand in a puddle of paint before smushing it gently onto a piece of paper. I planned to do the same thing, year after year, until she turned eighteen. But that - along with my goal of yearly photo books - went right out the window somewhere around year two.
Still, I love handprint crafts because they - like my first clumsy attempt - serve as a permanent record of just how small my daughter once was.
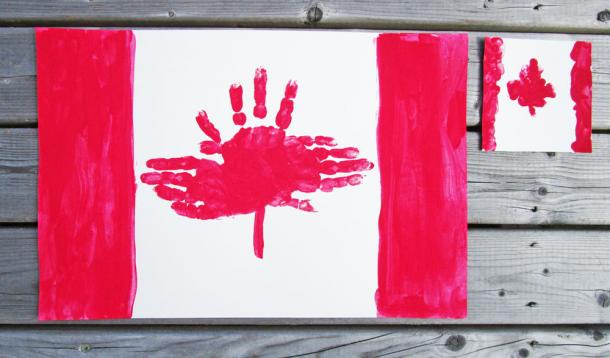
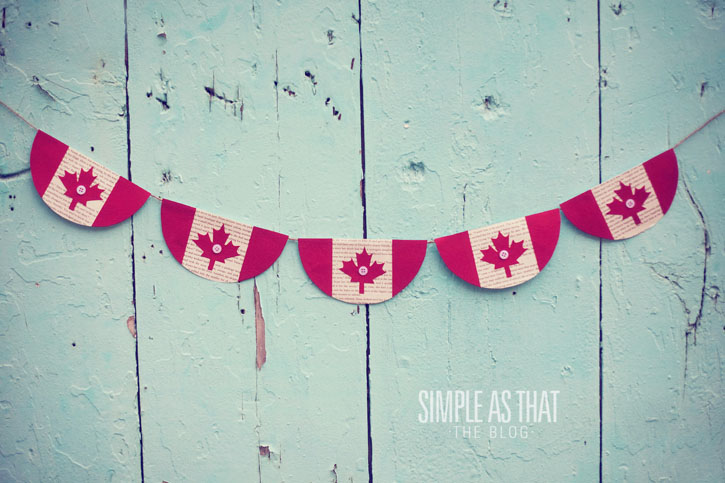
This Canada Day, why not make a Canadian flag using your child’s handprints? Better yet, wrangle the entire family and have each member make a flag – or two – in different sizes. And when you’re done, you can take the pictures to your neighbourhood stationary store and have them laminated so you can use them as placemats and coasters for Canada Day barbeques - this year and for years to come.
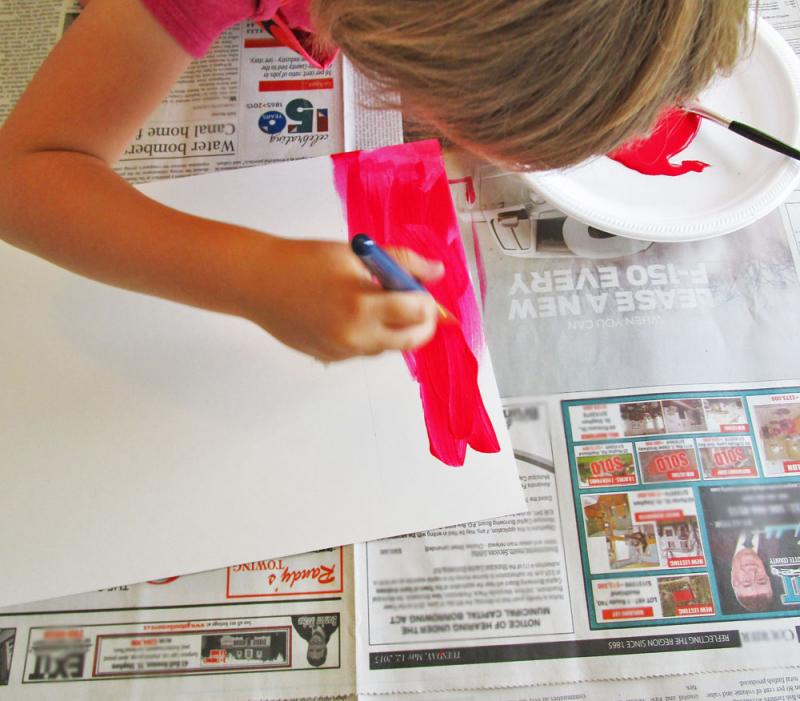
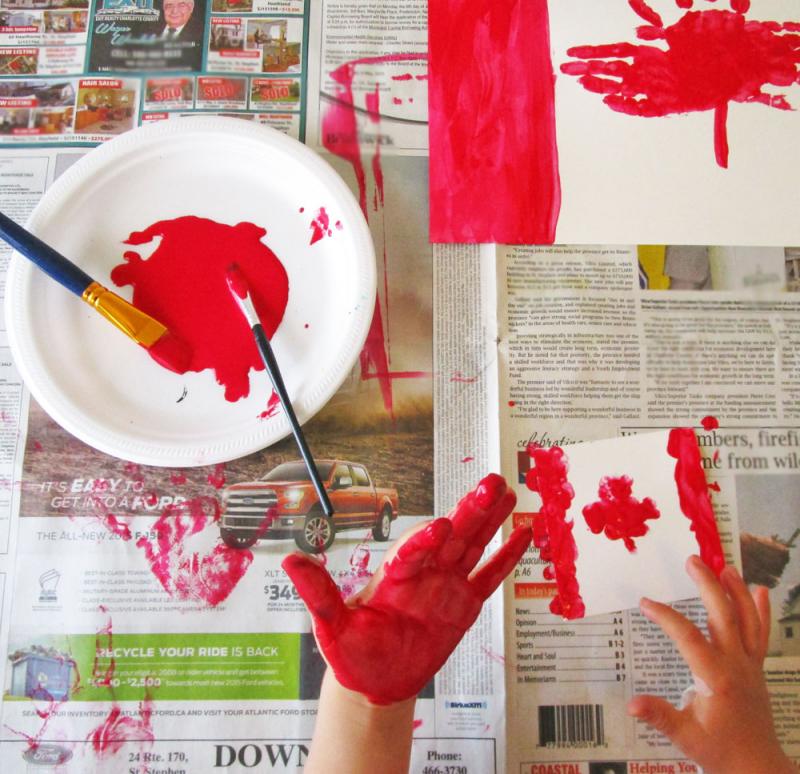
To begin, you will need: some white paper (we cut 10” x 15” pieces of poster board for placemats and 4” x 4” pieces of poster board for coasters), red paint (we used tempera), a couple of paintbrushes, newspaper, lots of paper towels and a hand.

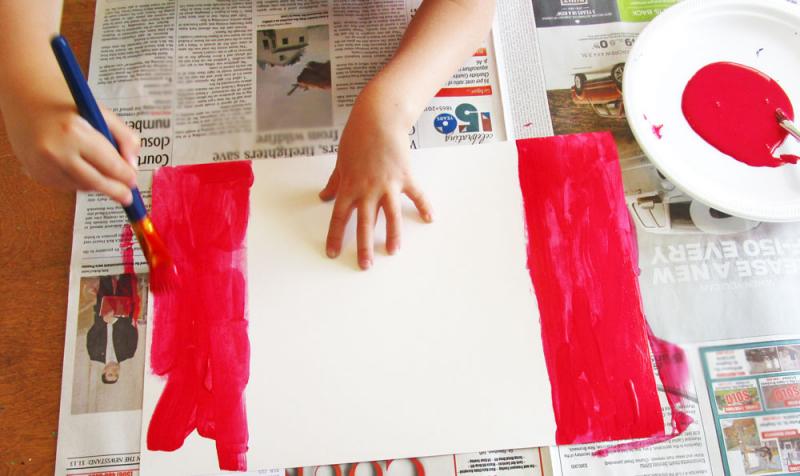
First, have your child paint two red stripes at the edge of the paper. Or, invite them to use their fingertips to fill in the spaces. My daughter chose the paintbrush.
Encourage your kiddo to dip the palm of one hand in red paint. Or, have them use a paintbrush to coat their hand instead.

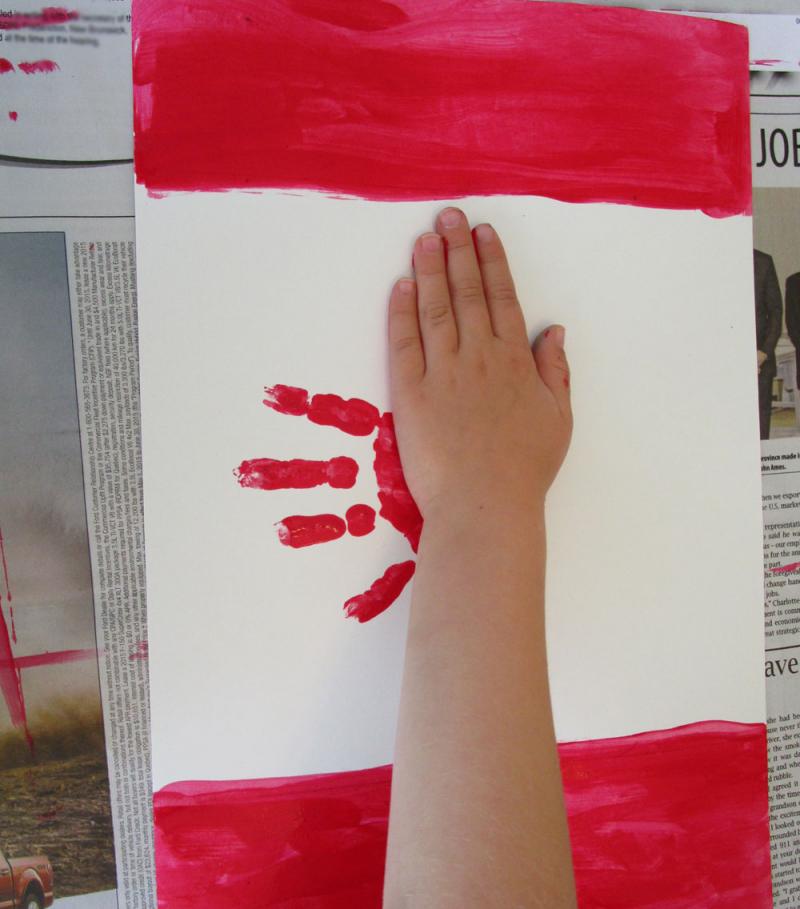
The first handprint goes onto the middle of the paper – straight up and down.


You now have what looks like it might be a Canadian flag and so, you could leave the picture as is, or you can add more handprints.
After your kiddo gets more paint on his/her hand, turn the paper and have them place the next handprint facing right.
Continue with another handprint facing left and add a small line at the bottom of the prints, until you have what looks like this...

Meanwhile, your child can use the smaller pieces of paper to make coasters. The process is the same except instead of using handprints to create a maple leaf, your kids can use fingerprints. Dab, dab, dab.

Cute, right?

And if you're looking for other great Canada Day crafts, look no further than these cool ideas on YMC.

Canada Day Craft: DIY Maple Leaf Magnets


Five Great Canada Day Activities

It was supposed to be a relaxing afternoon of crafting.
My then 4 year-old daughter and I had decided to make homemade play dough – as we so often did.
The ingredients were few: water, salt, flour, cream of tartar and oil, with a touch of food colouring thrown in for fun.
The process went a little something like this.
Me: Ok, now pour in the salt. Careful – don’t touch the pan. The pan is hot. Don’t touch the pan!
The 4 year old: Ok mommy. I won’t touch it.
Me: Perfect, now pour in the flour. The pan is hot. DON’T TOUCH THE PAN!
The 4 year old: I won’t touch the pan.
And on it went, until I burned my hand on the hot pan and my girl ate a handful of salt, hoping it might taste like sugar.
You know, there are times when I look at the wise little person before me and see the mature grown-up she will become. Then, there are times that send me hurtling head first into the far corners of my mind where bluebirds sing, ladybugs dance, and no one can hear me crying.
On that afternoon - a relaxing afternoon of making play dough - I decided to add cinnamon to our mixture. The holidays were coming and quite frankly, plain play dough smells of old feet and the sour breath of a dog on the wrong diet. My daughter helpfully shook the jar, releasing the pungent spice into the bowl while I kneaded the ingredients into a pile.
What happened next was terrifying.
“I need water!”
My little girl jumped down from the step stool she had been standing on and ran to the sink.
“Did you eat too much salt?” I questioned, frantically searching for a cup.
“No,” she sobbed, “cinnamon.”
I ran to my daughter’s side with a cup of water and tried to comfort her as thoughts began to race through my head - fast and furious. Cinnamon is edible. It’s a food. People eat it. We eat it. She eats it. It can’t be harmful. Could it be harmful?
My throat is hurting!” my daughter screamed between coughing fits as she tried to gulp down the water.
Then, it hit me. When I was a kid, I once ate a handful of peppercorns, thinking they were chocolate chips. As in - the apple doesn’t far from the tree. Also, I remembered the remedy for my pepper pain was milk.
I opened the fridge, grabbed the carton and poured. Within seconds of ingesting the milk, cinnamon shot out of my girl like a frightened mouse fleeing from a hungry owl.
It was far from poetic.
My husband was out on a coffee run, but my mother was in the house and so while trying to remain calm, I called her into the kitchen. She immediately paged Dr. Google and what she discovered was disturbing. For one thing a party game known as “The Cinnamon Challenge” had been sending adolescents to hospitals across the country…
I phoned my husband, who headed straight for home. Meanwhile, my child was improving slightly yet still experiencing waves of distress, partly from the discomfort, but also from the thought of additional cinnamon ejections. After all, this was only the second time in her life that food had made its way out of her the wrong way around. The first involved the phrase “spitting spaghetti.”
After calling our province’s free health line, I was transferred to Poison Control where the person on the other end of the line suggested we speed our way to the emergency room, "just to be safe."
By the time we arrived at the hospital, things had calmed down enormously and after witnessing the casual gait of the on-call doctor as he entered our room, I was fairly certain that everything would be all right. After a thorough heart, lung and throat inspection, he informed us that cinnamon is an irritant which is not be eaten dry.
Duly noted.
But most of all, he told us my daughter was 100% fine.
At the end of the day, we were incredibly lucky, though at the time I don't think I realized just how lucky we were. When I read the recent news about a Kentucky family who lost their 4-year-old son (after he crawled onto the kitchen counter and ate a mouthful of dry cinnamon) I felt as though someone wearing steel-toed boots had kicked me squarely in the gut. Twice. My heart aches for the parents of that little boy.
At best, eating dry cinnamon will result in a sore throat and upset stomach. However, inhaling it (or other spices) can be life threatening. So talk to your kids about the potential dangers and if they are too young to understand, lock up your spices or place them in a high, inaccessible cupboard. Do it now. And always supervise your young children closely when they assist with cooking and baking.
Their lives may depend on it.
You can give a dad a necktie; you can give a dad a mug. You can give a dad a hammer; you can give a dad a hug.
Or, you can give a dad a little something different.
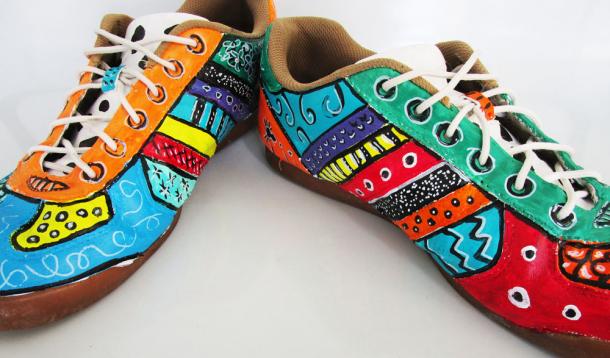
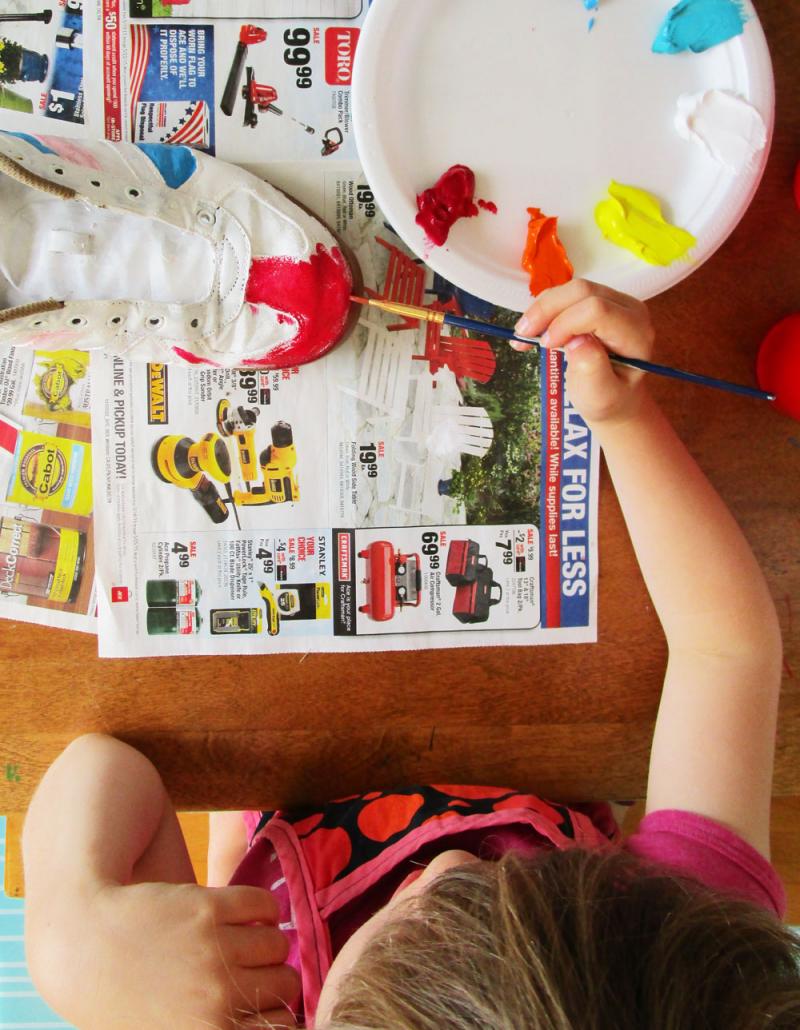
This year my daughter and I conspired to come up with an out of the ordinary Father’s Day gift and it didn’t take long for me to convince her that painting a pair of his shoes was the best idea ever.
Deciding which pair to embellish was a no-brainer.
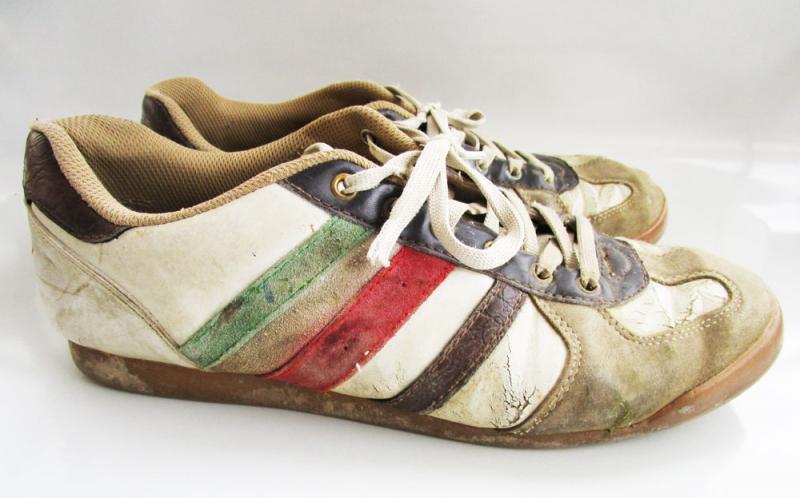
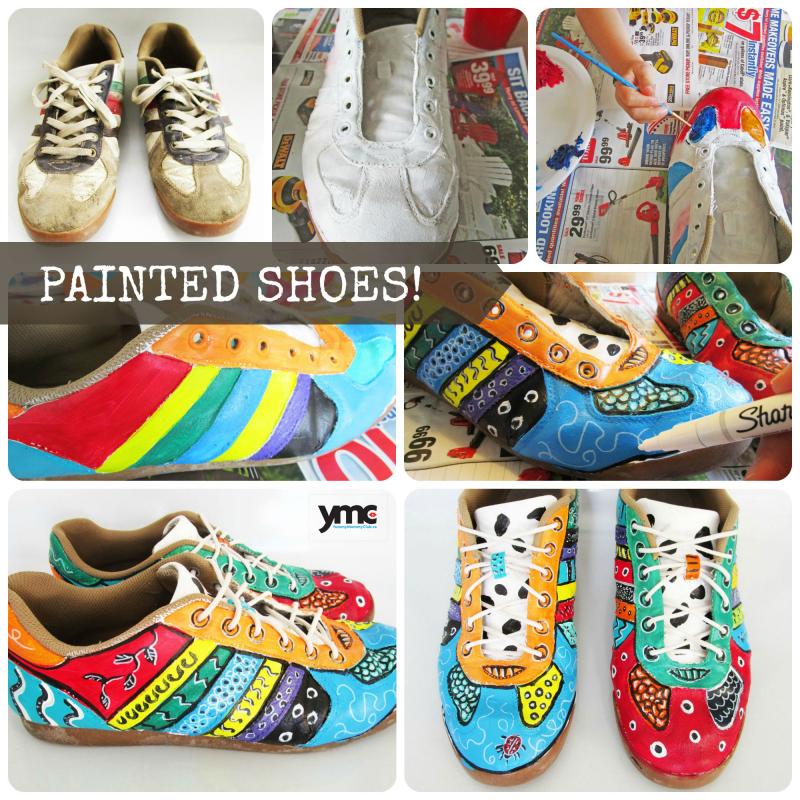
Behold... my husband's shoes.
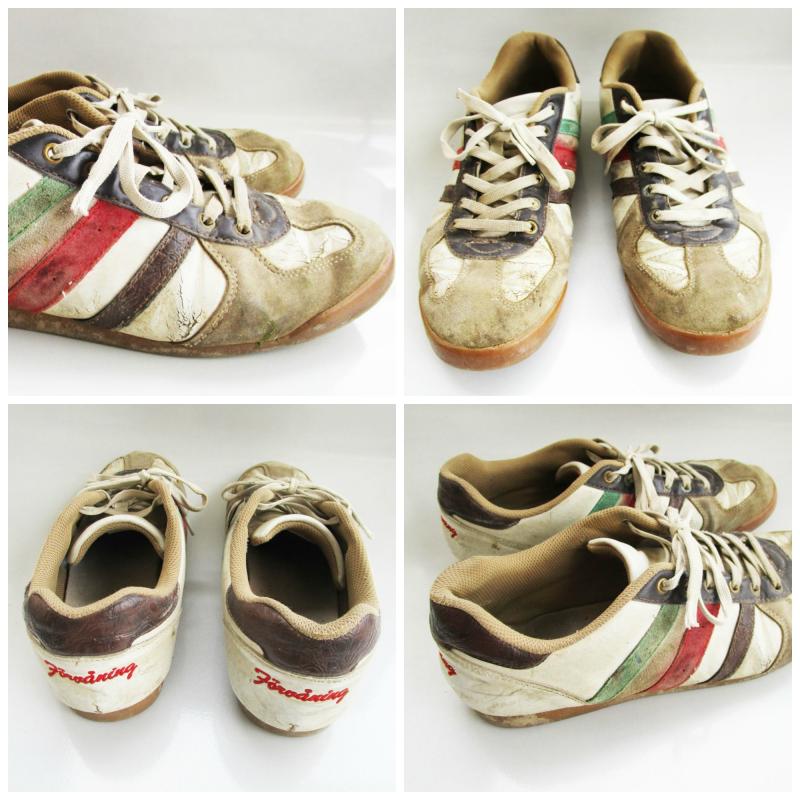
He knows they are well past their best before date. And he doesn’t wear them anymore. However, because he purchased them - on sale - from an ultra-cool shop in The Netherlands after a delightful lunch consisting of croquettes and kibbling, he WILL NEVER THROW THEM OUT.
If your kids have an dad (or grandfather) with a keen sense of humour and a taste for adventure, for why not make his footwear just a little more fabulous? Just maybe be sure to ask first. Or maybe not. Your call.
Cover your work area with newspapers and remove the shoelaces.

Give the shoes a base coat of paint. We used white but any colour will do.
The paint MUST be acrylic. Tempera, watercolour or poster paints will wear off at the first sign of rain. (Water based house paint could work in a pinch).

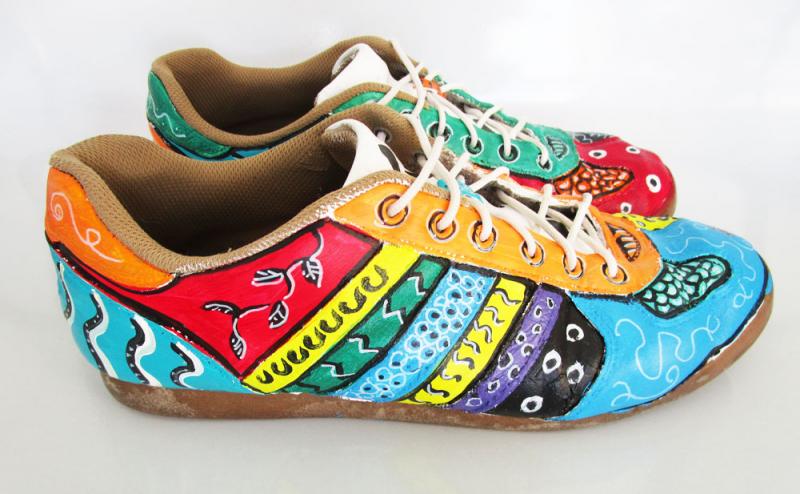
Once the base coat has dried, start adding colours wherever it makes sense. My husband’s shoes had natural divisions so my kiddo and I just filled in the spaces.

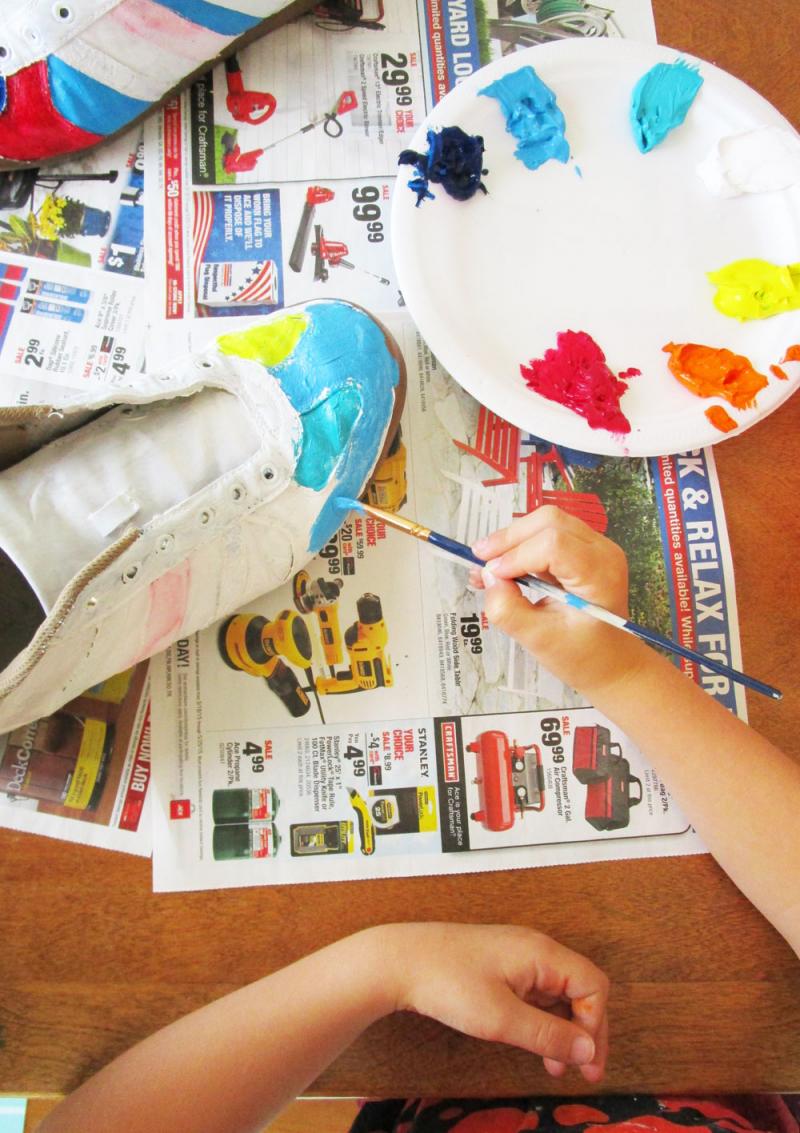
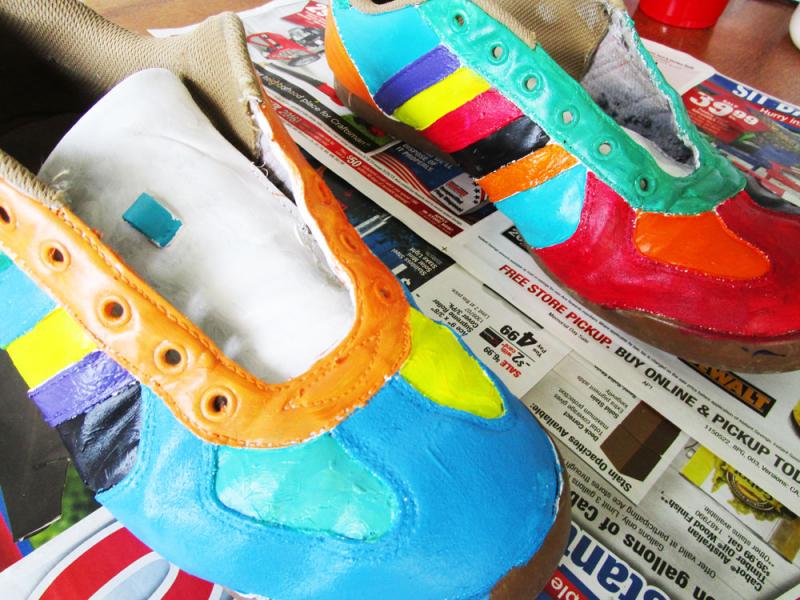
Embellish, embellish, embellish. My mini-me wanted to add googly eye stickers. It was a great idea but… not too permanent. So, we compromised and instead painted black circles on white circles. We also added lines, dots and zigzags and – since my hubby is the artistic coordinator for a public garden – we made sure to include some creepy crawly bugs.
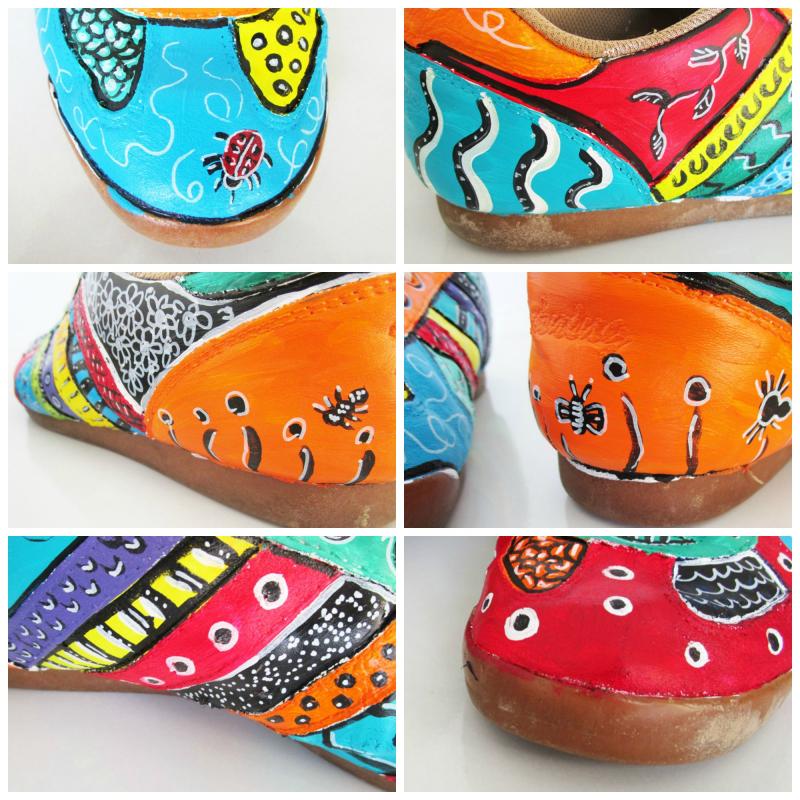
As a final touch, I pulled out an oil-based Sharpie paint pen. Perfect for adding little details.
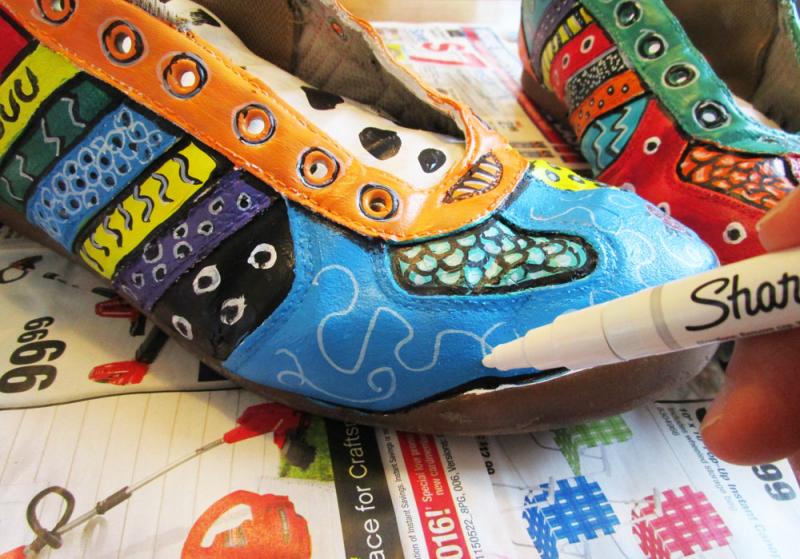
Let the paint dry and lace 'em up.
Full disclosure: My daughter bailed on me partway through the project, leaving me to finish painting the shoes on my own. To her credit, she initially jumped in with both feet (see what I did there) and painted up a storm until other things (a bird on the front porch, a rabbit in the playground and Kate & Mim Mim on the television) pulled her away. Because, six year-olds.
Nevertheless, she felt very much a part of the process and for that reason alone, she will force her father to wear these colourful kicks to work, every single day.
And, wouldn't custom painted shoes be a fantastic gift for tweens and teens to make for their fathers? Or (better yet) can't you see this being a terrific activity for kids and dads to do together?
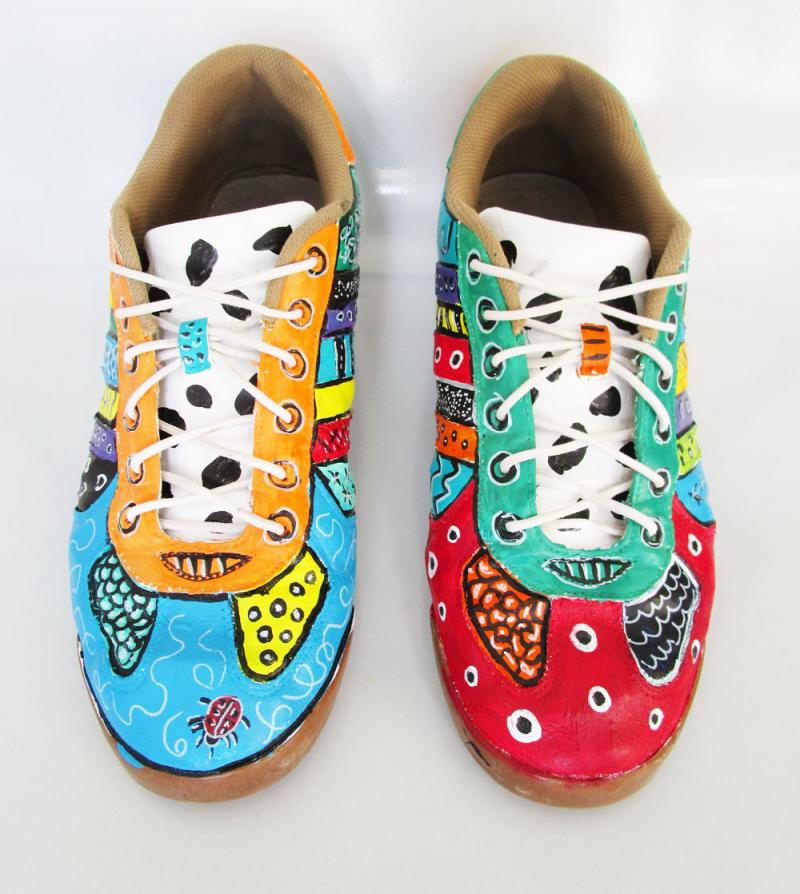
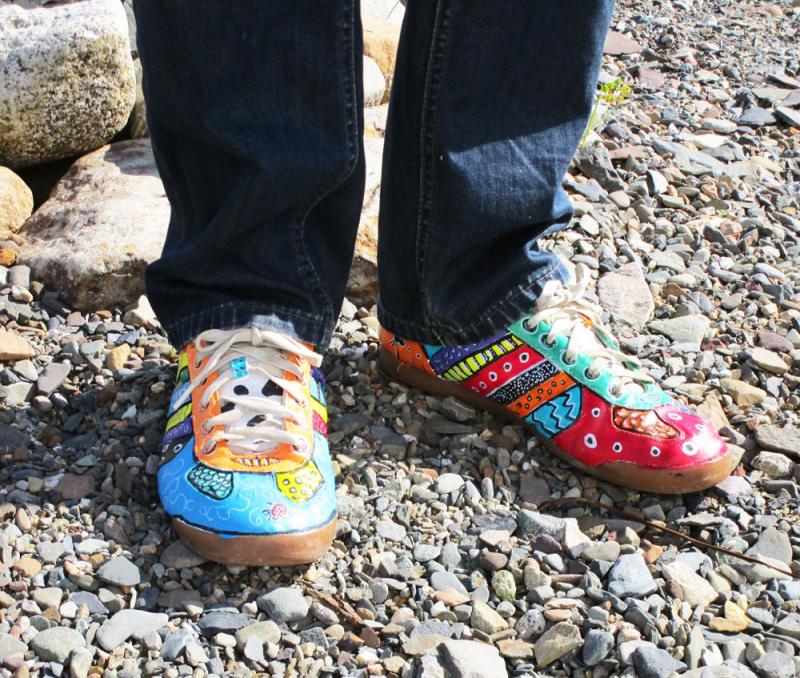
You have to admit, the results are pretty awesome.
From this:
To that:
And... he wore them!
![]() RELATED: Why You Should Not - Under Any Circumstances - Let Your Kids Create Art
RELATED: Why You Should Not - Under Any Circumstances - Let Your Kids Create Art

