Every once in a while (okay a lot of whiles), I get a craving for cheese—especially in the cooler Canadian months. While I love baked cheesy pastas, cheesy appetizers, fondues, and pretty much anything else with cheese, sometimes cheese happens on a whim, like when you're steaming vegetables on a weeknight and only have 5 minutes to whip up this basic, but super yummy, cheese sauce.
I use this cheese sauce for vegetables and for a very quick homemade mac and cheese for the kids. I've also been known to eat it with a spoon. Just saying.
Simply melt your butter.

Add your flour.

Then your milk.

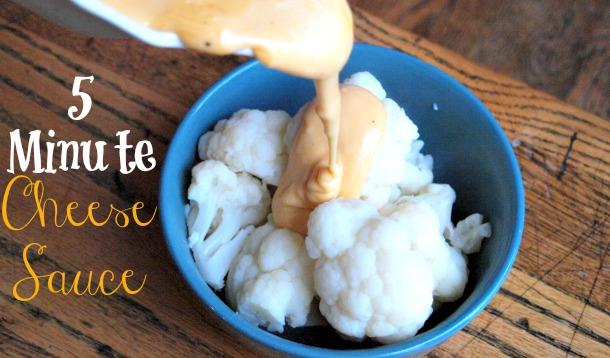
Then, of course, your CHEESE!

Stir until melted, and enjoy!

Ingredients:
 Melt butter over medium heat. Add flour and whisk gently until smooth. Add milk, continuing to whisk gently until smooth and bubbly. Add the cheese, and keep stirring until everything is all melty. Season with salt and pepper (how much you need depends on what kind of cheese you use). Enjoy!
I love summer because it's the season of laid-back, easy-going outdoor entertaining. In the summer, it's perfectly acceptable to call friends up the day before and say bring your kids, a cooler of beverages, and a potluck item (sometimes even your own lawn chairs!), and come hang out by the pool, beach, or in the backyard for the day. I LOVE these kinds of invitations and have many go-to recipes that are perfect for summer barbecues, including this Frozen Chocolate Cream Pie Recipe, which just happens to be one of my husband's favourite desserts.
Simply make (or buy) a graham crust.

Press into a pie plate.

TIP: Use the back of a tablespoon to flatten the edges.

Beat sugar and cream cheese.

Melt the chocolate and milk together.

Mix in chocolate.

Add the Cool Whip and stir until combined.

Fill your pie crust.

Drizzle with more melted chocolate, if desired, then freeze and enjoy!

Ingredients:
Crust:
1 1/4 cups graham crumbs
1/4 cup melted butter
OR simply buy a pre-made graham crust available in the baking aisle.
Pie:
1 cup milk chocolate chips (you can use semi-sweet, but my family prefers milk chocolate)
1/3 cup milk (I use skim)
2 tbsp. sugar
125g cream cheese, softened
3/4 of a 1L container of Cool Whip (I just eye-ball it), thawed
2 tbsp. milk chocolate chips for top of pie (optional)
Directions:
Combine graham crumbs and melted butter.
Press firmly into prepared pie plate (ie: buttered or sprayed with non-stick spray). NOTE: Feel free to do the bottom and sides, or just the bottom of the pie plate—whatever you prefer!
In mixing bowl, mix cream cheese and sugar with electric mixer until combined.
Melt chocolate and milk together—careful not to burn (see below for chocolate melting tip).
Add chocolate to cream cheese mixture and mix with electric mixer until combined.
Stir in Cool Whip.
Put filling into pie crust, cover, and freeze for at least 4 hours before serving.
Optional: Before freezing, melt 2 tbsp of milk chocolate chips and drizzle over top of pie using a fork.
TIP: To melt chocolate in the microwave, set power to 50% and melt for 1 minute. Remove chocolate, stir, then melt again in microwave at 50% power in 30 second intervals. Remove from microwave when chocolate is almost melted (but you can still see the shapes of some of the chocolate chips). Stir gently until all chocolate is melted, and use as desired.
BONUS: Looking for some of my other favourite summer potluck recipes? Check out my Traditional Potato Salad (just like my Grandma makes), my Loaded Baked Potato Salad, my Lemon Poppy Seed Bundt Cake, my Oreo Brownie Cake Bars, and, of course, my super easy Pitcher Mojitos.

I don't know if this happens to other hockey moms, but there seems to be a point in the summer when I finally realize that the hockey season is over and yet I'm still driving around with the hockey bag in the trunk. I'm so used to rushing to and from cold hockey arenas that piling groceries and beach toys on and around the over-stuffed hockey bag seems totally reasonable. Except it’s summer and the hockey season is officially over.
So what do hockey moms do in the summer?
I mean besides counting down the days with our children until the new season starts and they hit the ice again and we get to see our fellow hockey moms, of course.
We do this mostly because my son can’t get enough of the game (I mean who doesn’t want to spend their summer in a freezing cold arena?) but also because a few months off the ice makes it more challenging to get right back into it when the next season starts. Even a week of power skating summer camp is fantastic for muscle memory.
Weeks (okay months) went by before I actually took the hockey equipment out of the back of the truck. I was scared to open it because even six-year-old boys can have smelly sweaty hockey equipment. Summer is the time to clean/air out everything, get rid of the old stuff, and make a list of what your child will need new in the fall.
I have team photos, cute hockey trading cards with all my son’s stats, and awesome action shots from tournaments. They are all sitting in that very important pile of papers in a basket on my kitchen counter. One or two need to be framed, some shared with relatives, and others tucked away in an album for reminiscing many years from now.
Thankfully, our driveway is big enough for a reasonable game of ball hockey. With just a couple of nets, some sticks, an orange street hockey ball and a handful of neighbourhood kids, my son is entertained for an entire afternoon.
Community hockey doesn't run on its own. Yes it costs money to play, but it also takes hundreds of volunteer hours from coaching to organizing tournaments and fundraisers. Hockey moms are among the top minor hockey association volunteers and over the summer we sign-up, plan, and even get a head start on our volunteer assignments.
My son’s hockey coaches spend hours sharing their own skills and talents making him a better player and just plain making sure he’s having a whole lot of fun. Now that the summer is here, and we aren’t rushing around to all the kids’ activities I realize that the “thank you coach” I tossed out after the last game in the middle of the change room mayhem just doesn’t seem like enough.
A basket of our favourite morning products including homemade Strawberry Maple Jam (recipe below!), homemade bread, Kraft peanut butter, and the Maxwell House Roast & Ground coffee dropped off on our coach’s doorstep to recognize all the mornings he didn’t have time for breakfast during the season.
And now for the jam recipe because there are very few things that are as Canadian as hockey and maple syrup!
Easy Strawberry Maple No-Cook Jam Recipe

Ingredients:
1 1/2 lbs. of fresh strawberries (stems removed)
1/4 cup lemon juice
3/4 cup maple syrup
3 1/4 cups granulated sugar
3/4 cup water
1 box Certo pectin crystals
 Toss strawberries into blender or food processor and pulse until finely chopped but not quite pureed. You should have about 1 3/4 cups of mashed strawberries.
In a bowl, mix strawberries, lemon juice, maple syrup, and sugar. Stir until combined and let sit 10-15 minutes.
Meanwhile, in a saucepan combine water and Certo and bring to a boil over medium-high heat. Boil 1 minute, stirring constantly.
Add Certo mixture to strawberry mixture and stir gently approximately 3-5 minutes until combined.
Pour into glass jars and cover with air-tight lids. Let sit at room temperature until set (approximately 24 hours).
Once jam is set, store in freezer for 3-4 months or in refrigerator for 2-3 weeks.
Makes: 40 oz or 2 1/2 pints
This is proudly sponsored by our friends at Kraft.
www.kraftcanada.com

