I once knew a lady who used to make these gloriously cheesy buns that she would leave in our staff room for us to buy for $1 each. People would clamor to snag a bun for their lunch the moment the basket arrived, clinging to their treasures and then savoring them at lunchtime to the envy of all who missed the opportunity.
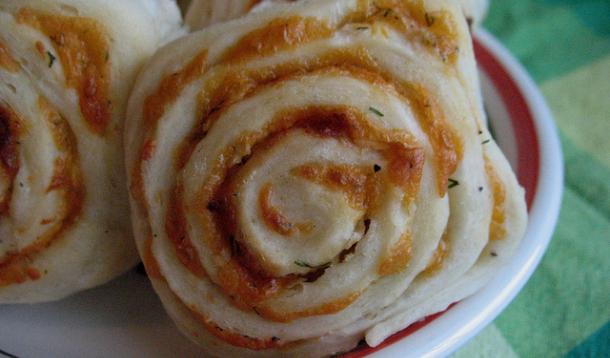
These buns are the closest I’ve ever found to the ones we coveted so long ago-swirly like a cinnamon bun, but instead of sweet they are packed with cheese, tiny bits of onion, and fresh dill. The second I pulled them from the oven I was surrounded by my family, inhaling deeply and risking burns by snatching still hot buns from the pan. I swear we ate half the batch almost immediately.
These buns are seriously addictive. If you make them, you’ll want to make more so you can continue to eat them, day after day. I think they would be perfect with a bowl of soup, chili, or even split in half and slathered with some warm bacon jam.
Ingredients:
Dough:
3 cups flour
1/2 tsp salt
cracked black pepper
1 tbsp sugar
2 1/4 tsp quick rise yeast
1 1/3 cups milk
4 tbsp butter
 In a small saucepan over medium low heat, warm the sugar, milk, and butter until the butter has melted and the milk is steaming. Take off the heat and allow to cool until still very warm, but not hot.
If you are making the buns by hand, mix the flour, yeast, salt, a few good grinds of pepper together in a large bowl. Pour in the milk mixture and stir with a wooden spoon until a ragged dough forms. Turn the dough out onto your counter and knead it for about 8 minutes. You should have a soft, slightly sticky dough. If it’s too dry, feel free to add a little more warm milk.
If you are making the dough with a stand mixer, combine the flour mixture and milk mixture using a dough hook attachment and let it run until you have a soft, slightly sticky dough. You may need to add a little more warm milk. Let the mixer knead the dough for about 5 minutes, or you can just turn it out on the counter and knead it yourself.
Place the dough in a lightly oiled bowl and cover with plastic wrap. I set mine in the oven with a light turned on. The residual heat from the light will keep it warm enough to rise.
Filling:
1/2 cup grated onion
2 tsp chopped fresh dill
1 3/4 cup grated aged cheddar cheese
1 tbsp butter, for brushing on top
In a medium sized bowl, stir together the onion, dill, and cheese. Set aside. When the dough has finished rising, turn it out onto a floured counter and with a rolling pin, roll it into a 12x16 inch rectangle. Spread the cheese mixture on top of the dough, leaving a ½ inch border on the short ends. It won’t seem like a lot-in fact, maybe not even enough, but it will be fine. Roll the dough up tightly from short end to the other short end. When you finish rolling, pinch the dough together so you have one long cylinder of dough. If the dough won’t stick together, I found moistening the edge with a little bit of water helped it stick.
Transfer the dough cylinder to a cutting board and slice off buns 1 inch thick. Place 12 of them in a parchment paper lined 9x13 inch cake pan. I had a few left over so I put the remaining buns in a small pan, also lined with parchment paper. Brush the tops of the buns with melted butter and then cover with a clean tea towel or plastic wrap, then let them rise for 2 hours.
Pre-heat the oven to 350 F and bake for 20-25 minutes, until the buns are golden and the cheese is bubbly. Turn out into a wire cooling rack and let cool a bit before tearing into them. Store the buns in an airtight container for 2-3 days on the counter, or wrap and freeze them for a few weeks.
Makes 12-16 buns
Adapted from The Smitten Kitchen Cookbook


