When I was a child, Sundays meant spending the afternoon at Grandma's farmhouse, inhaling her home made buns spread thickly with butter or jam, while the adults argued about politics. Nothing was better than grandma's home made bread, except maybe my Mom's buns, which we would race up the driveway to eat once we got of the bus after school. When I got married, I asked my Mom to come to my house and teach me the art of making bread-and to this day I've rejected the idea of a bread maker. There's just something about the feel of the dough beneath your fingers, and then smell of yeast, that brings me right back to Grandma's farmhouse with her wooden stove and cries of, "eat, eat!" Food was love then. I still get that feeling every time I eat warm home made bread, 30-years later.
Ingredients:
8 cups all purpose flour
3/4 cup ground flax seeds (buy them ground or grind your own in a spice grinder)
2 packets (or 4 1/2 tsp) of rapid (instant) yeast
3/4 cup sugar
3/4 tsp salt
2 eggs
1/4 cup olive oil
3 cups very warm warm water Combine FOUR cups of flour and the yeast in a large bowl. Set aside. In a different bowl, combine sugar, salt, oil, and hot water. Add the water very gradually to the eggs, whisking as you go, slowly warming the eggs, but being careful not to scramble them. Once you've combined the eggs and water mixture, pour into the flour/yeast mixture and stir with a wooden spoon. You could use a stand mixer, but I found with 8 cups of flour total the amount of dough was a little too much for my mixer. Gradually add about two more cups of flour, continuing to stir, until a dough forms. If the dough is still very sticky, add the remaining cup of flour. Turn out onto a floured surface and knead about 5-10 minutes.
Let the dough rest, covered with a clean tea towel, about 15 minutes, in a nice warm spot. I like to put mine in the oven with the light on-the heat from the light generates enough heat to help dough rise.
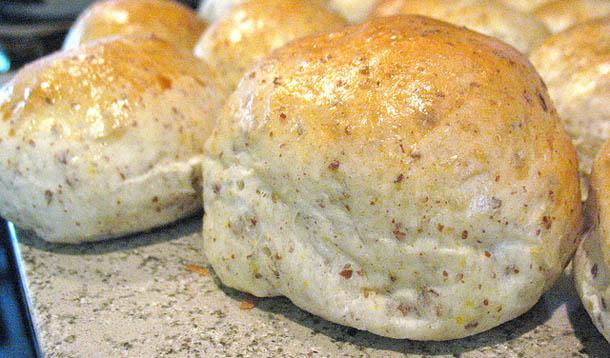
Punch down and shape the dough into 24 rolls, placing them on two greased (or parchment paper lined) baking sheets. Cover the shaped rolls with clean tea towels and allow them to rise for 1 hour until doubled in size. Pre-heat oven to 350 F. Just before putting the rolls in the oven, beat together 1 egg and 2 Tbsp of water and brush over the rolls. Adjust the racks in your oven so that you can bake both pans at once, rotating and switching the pans (swap the one on top and bottom) half way through your baking time, at about 8 minutes. Bake for about 16-20 minutes total, until the tops and bottoms are browned and they sound hollow when tapped on the bottom. Remove from the oven to the counter and let the buns cool.
Makes 2 dozen![]() Tip: If you aren't going to eat these within 2 days it's best to wrap them up well and freeze them.
Tip: If you aren't going to eat these within 2 days it's best to wrap them up well and freeze them.


