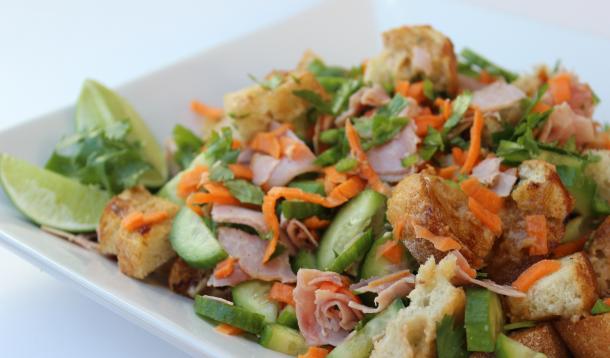
Just as musical mashups can be absolutely addictive, so too are creative culinary combinations. While bread salad is typically considered a Tuscan dish, this Vietnamese version is even more delicious plus it's super quick to prepare. It’s based on the traditional Bahn Mi sandwich, which consists of baguette-style bread filled with meat, mayonnaise, cilantro, cucumber and pickled carrots. With its bright, fresh flavours, this satisfying salad will have your tastebuds singing a happy tune for hours.
Ingredients
Directions
 In a small pot or microwave safe dish, heat rice vinegar and sugar. Stir to dissolve sugar then pour over shredded carrots which have been placed in a shallow bowl. Let sit 15 minutes to slightly pickle carrots, stirring occasionally.
While carrots are pickling, preheat broiler.
Combine mayonnaise, sriracha and soy sauce and spread on bread slices.
Place bread, spread side up, on a baking tray. Broil about 5 inches from the heat until golden brown.
While bread is broiling, drain carrots, reserving pickling liquid.
Let bread cool to lukewarm then cut into 1/2 inch cubes.
In a serving bowl, toss bread cubes with drained carrots, ham, cucumber and cilantro.
Combine 2 tablespoons of pickling liquid with the canola and sesame oils. Whisk to blend well then drizzle over the bread salad.
Serve with lime wedges on the side.
Serves 8

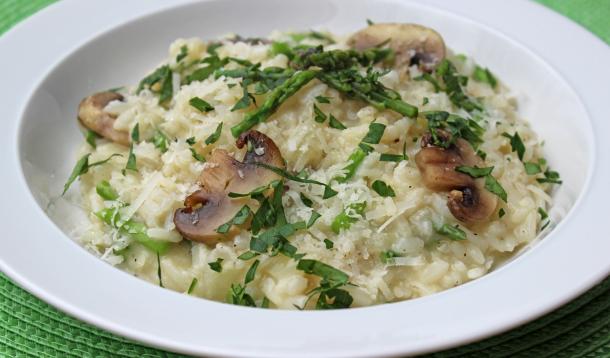
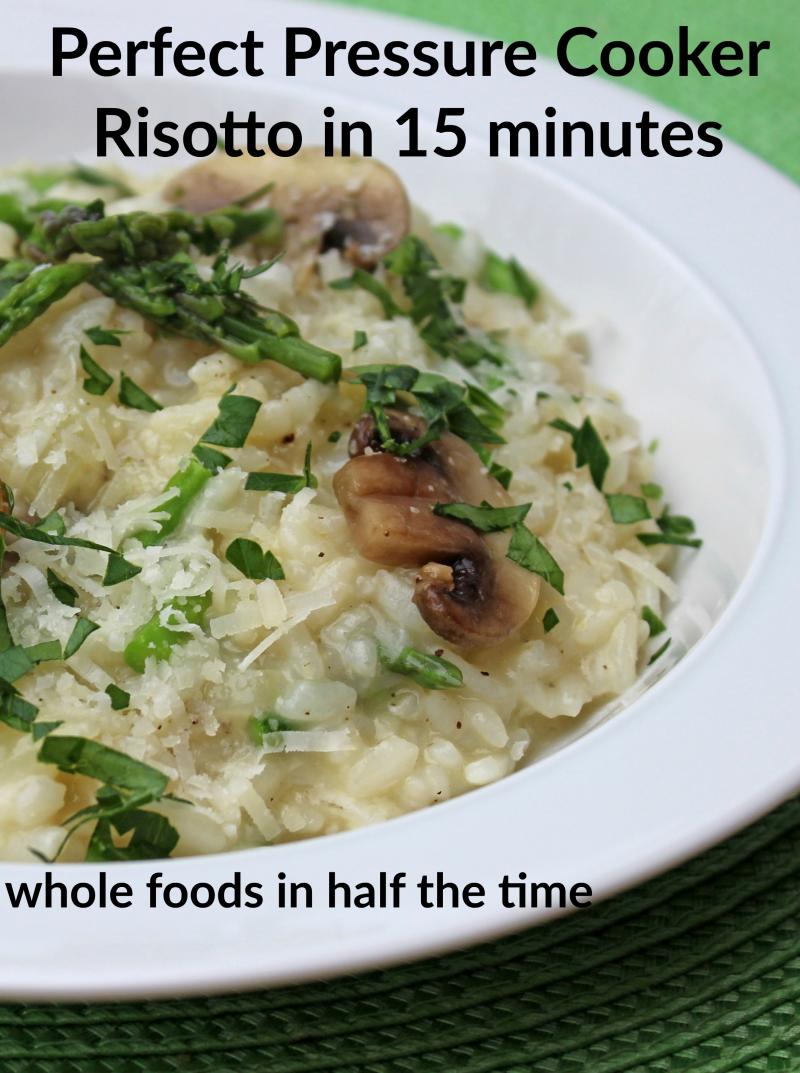
Creamy, perfect risotto in fifteen minutes is just one of the reasons I don’t use a slow cooker. I know lots of people who love their slow cookers, but I am not a fan. My problem with them is that you have to be really organized to have everything ready to start a slow cooker meal at 7 am before heading out the door. I am the kind of person who likes to figure out on a day to day basis what I feel like eating; I’ve been this way ever since I had some major food aversions during my pregnancies.
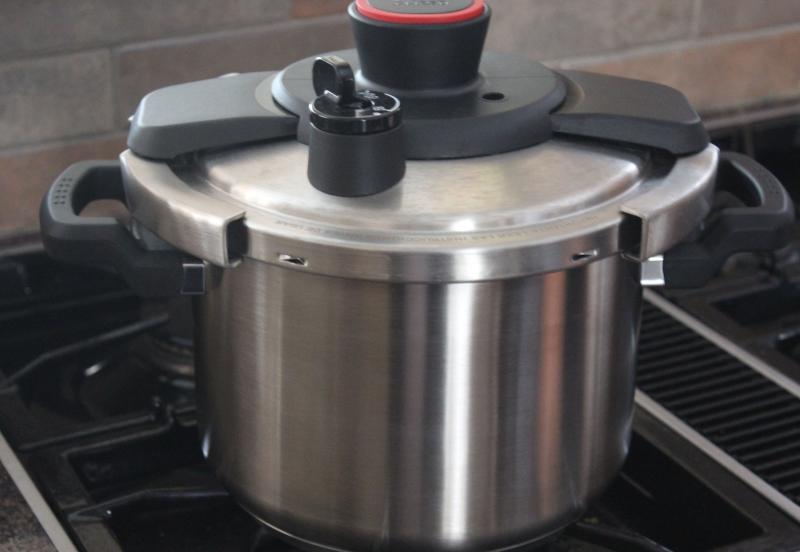
For me, the best solution is a pressure cooker. You may have grown up hearing stories of exploding pressure cookers, but times have changed. The new generation of pressure cookers weigh less, have better seals, and have redundant safety measures and easy to use pressure release valves. They’re pretty much foolproof.
Ingredients
3 1/2 – 4 cups chicken or vegetable stock
1/4 cup olive oil
1 medium onion, finely diced
1/4 tsp salt
1 cup Arborio rice
1/4 cup white wine
1/2 cup each chopped mushrooms and asparagus (optional)
3 tbsp butter, divided
1 cup grated parmesan, divided
Fresh thyme or parsley, divided
Directions
Get all your ingredients prepped, measured, and ready to go.
Add the olive oil, onion and salt to the pressure cooker. Sauté over medium heat until the onion is translucent, about 2 minutes. Add the rice and continue to stir another minute, or until the rice is just slightly toasted.
Add the wine to the pot and stir for 1 minute.
Add 3 1/2 cups of the stock, secure the lid on your pressure cooker, and bring up to high pressure over high heat.
Reduce heat to medium (make sure the pot maintains its pressure) and set a timer to let it cook for 6 minutes.
If adding vegetables, while the rice cooks, sauté the mushrooms in 1 tablespoon of butter until softened. Add asparagus and sauté for 2 minutes more. Remove from heat and set aside.
After 6 minutes, release the pressure using the quick-release valve. Carefully remove the lid to avoid the steam and return the cooker to the stove.
Test risotto and if needs another minute or two, cook on the stovetop, adding more stock, a few tablespoons at a time, if needed to keep it from drying out. While the risotto is still a bit wet, add the butter and half the parmesan. Stir, then taste and add salt if needed. Remove from heat and stir in sautéed vegetables, if using, and most of the thyme or parsley.
Serve the risotto in shallow soup bowls, topping each with remaining herbs and a little more grated parmesan.
Serves 3 – 4.
![]() RELATED: Homemade Microwave Potato Chips that Actually Taste Amazing
RELATED: Homemade Microwave Potato Chips that Actually Taste Amazing
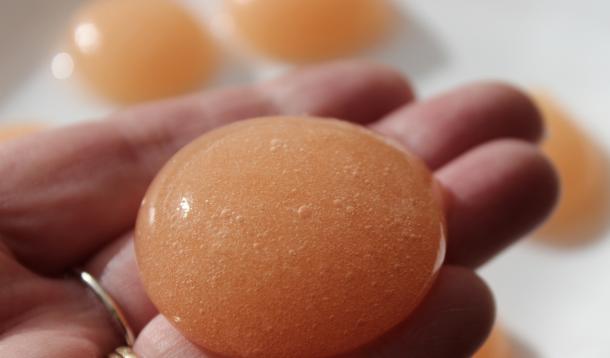
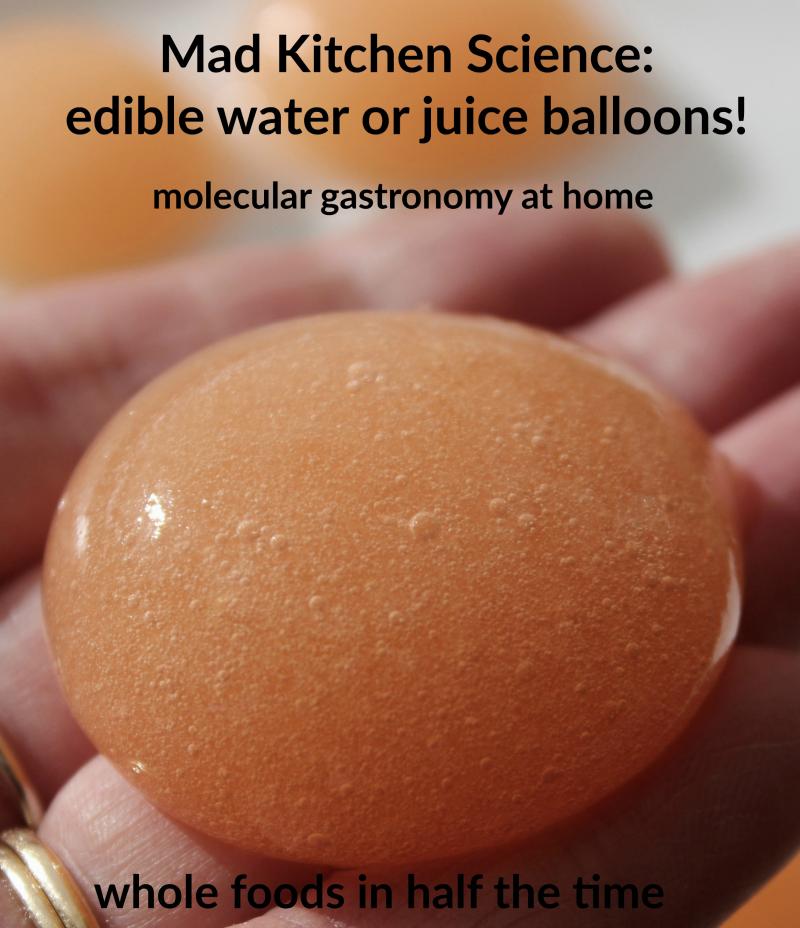
There’s something about science experiments in the kitchen that kids find irresistible. Maybe it’s because you get to transform familiar ingredients into new concoctions, or maybe it’s because you (almost) always get to eat your creations. When I found out how easy it was to capture various liquids in little edible spheres, I couldn’t wait to get some mad science on in my own kitchen. These days, spherification is commonly used in many restaurants; it’s one of the easiest tricks in the molecular gastronomy toolbox.
I’ve enjoyed seeing delicious little pearls of such delights as beet juice, green tea, sugar cane juice on plates. For this edible experiment, you can work with water or coloured water. It’s also very fun to use non-pulpy juice to make even more delicious edible liquid balloons. You can find the necessary food-grade chemicals, both of which are naturally derived, online or at molecular gastronomy supply shops.
Ingredients
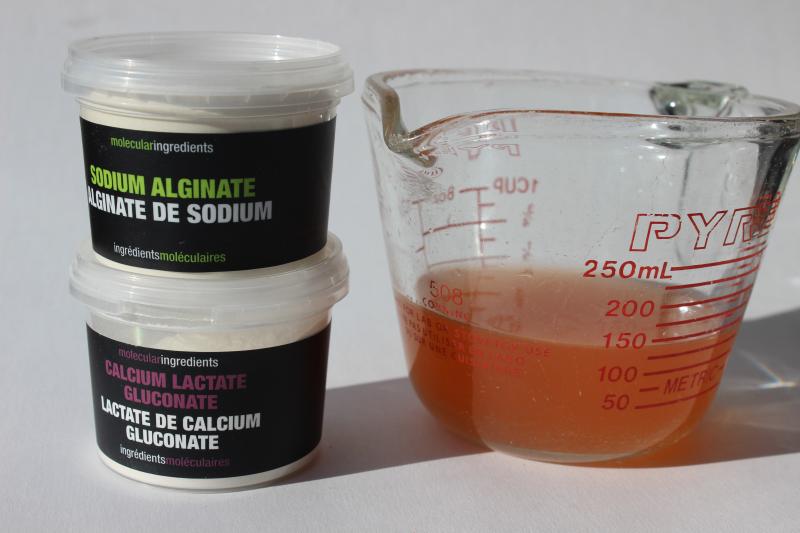
1/4 tsp sodium alginate (seaweed based)
1 tsp calcium lactate
1/2 cup drinking water or pulp-free juice
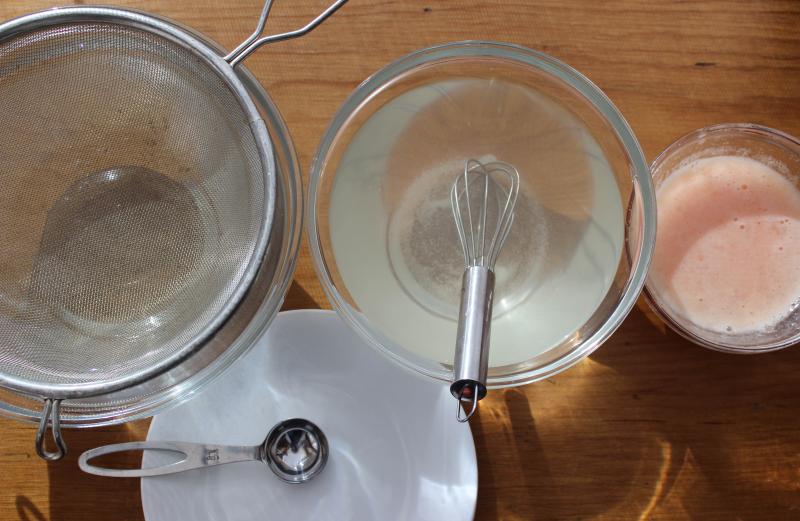
Equipment needed
Small, medium and large bowls (2 cup, 4 cup and 6 cup approximately)
Immersion blender (or regular blender)
Whisk
Sieve (optional)
1 tsp measure with a deep bowl
Slotted spoon
Plate
Directions
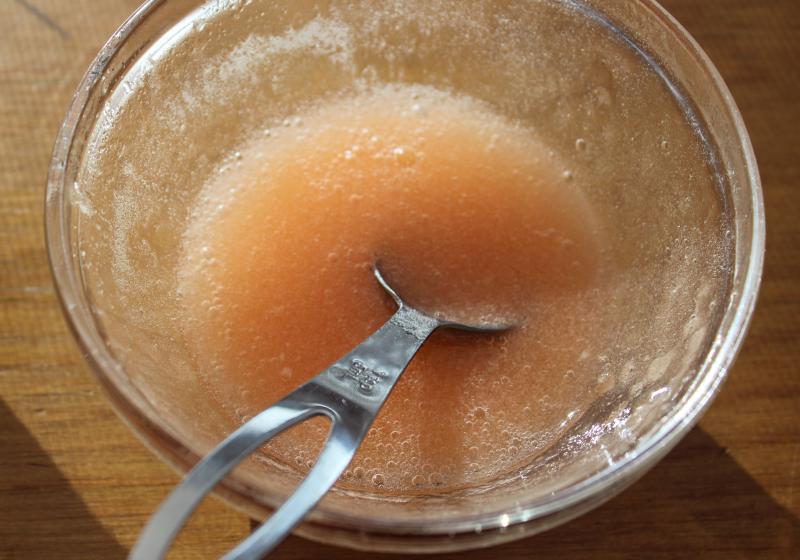
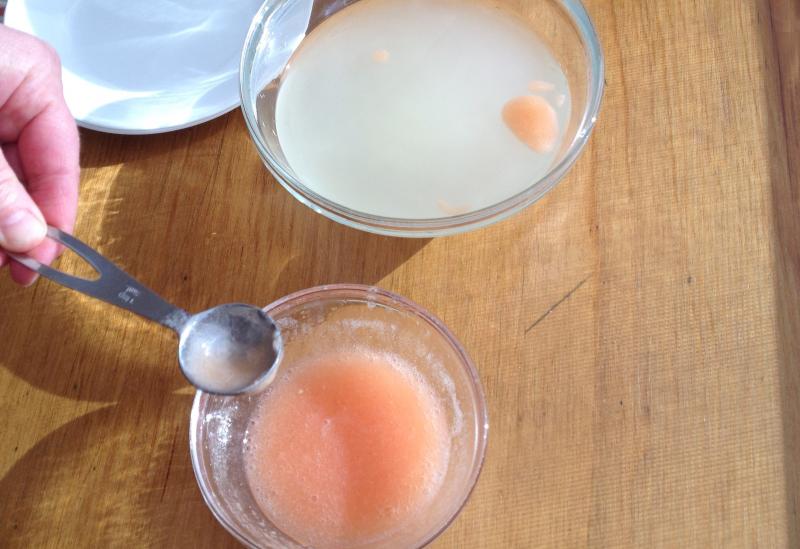
 Put 1/2 cup of water or pulp-free juice in the smallest bowl and add 1/4 teaspoon of sodium alginate to the liquid. Use an immersion blender to completely dissolve the sodium alginate. Set the mixture aside to allow air bubbles to dissipate.
Add 2 cups of cold water to the medium bowl. Whisk in 1 teaspoon of calcium lactate. It may not completely dissolve but whisk for a few minutes to get the majority of it to dissolve.
Add 4 cups of cold water to the largest bowl and set the sieve over top so that most of the sieve is under water. The sieve is not essential but it can make it easier to scoop out the water or juice balloons after they’ve been rinsed.
Line up your three bowls side by side.
Using the deep-bowled measuring spoon, scoop a full spoonful of the first mixture (liquid plus sodium alginate) which should feel slightly gelled.
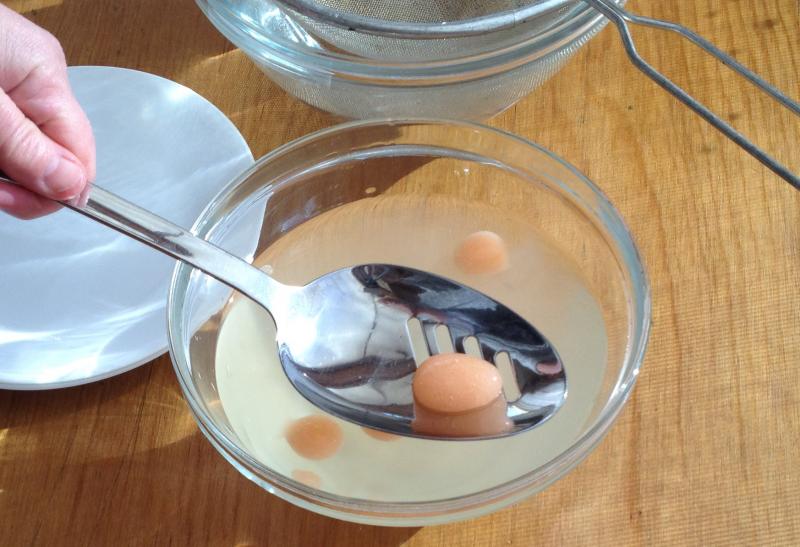
Very carefully drop the gelled mixture into the second bowl (the cold water and calcium lactate mixture). It will take a little practice to get perfectly round spheres but the odd shapes taste the same and can be rather fun looking! You can also use a tiny spoon to make little pearls if you prefer.
Repeat the above two steps until you have three or four balloons in the middle bowl – avoid overcrowding the bowl. Using a finger or a small spoon, gently stir the liquid around the balloons for three minutes, keeping the balloons gently in motion.
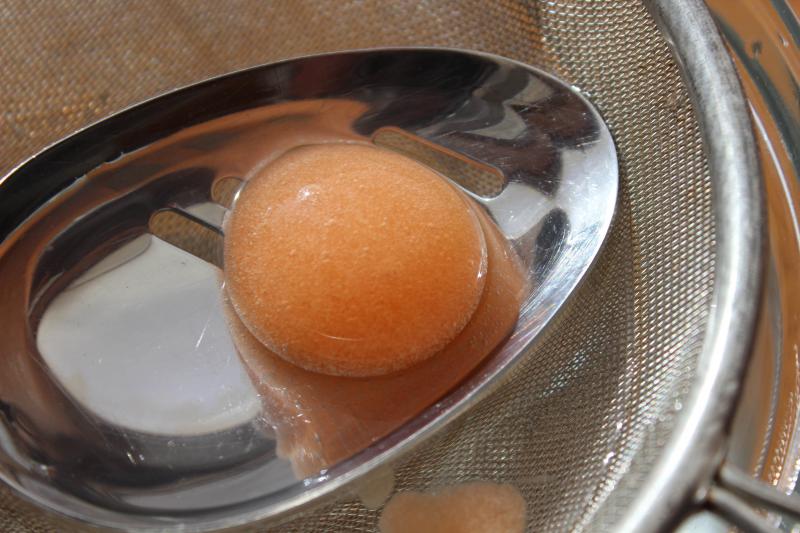
Using the slotted spoon, carefully transfer the balloons to the third bowl to stop the chemical reaction and rinse them off.
Once they've been rinsed, use the slotted spoon to gently place the balloons on a plate and repeat with the remaining sodium alginate + water (or juice) mixture.
Your balloons will now be ready to carefully pick up, jiggle and, of course, pop into your mouth! They’ll feel a little slimy but will taste just fine. Make sure your laboratory assistants appreciate that they are EATING, not drinking this water (or juice).
![]() RELATED: Coloured Flowers: The Magic Of Science In One Little Glass
RELATED: Coloured Flowers: The Magic Of Science In One Little Glass

