Strawberry season is about to begin and with most u-pick strawberry farms in Ontario set to open within the next week or two, my mind is shifting focus and I'm seeing red. Sweet, scrumptious red.
Over the past two days, I have made two trips to my local farm. Each trip I have purchased a 3 litre basket full of strawberries. One basket of strawberries for the kids to nosh on as they please. The other for me to use in the creation of many strawberry-infused goodies.

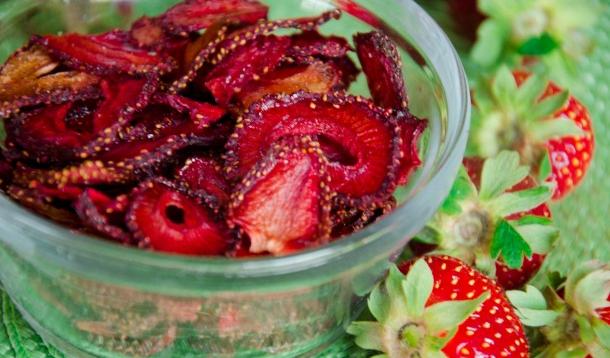
I kicked it all off by making Oven-Dried Strawberries.
Creating fruit crisps is nothing new to me. It's a process that my Great Grandma taught me growing up. We used to spend many a summer in her kitchen preparing oven-dried fruit. Mostly banana and apple chips. However, something I had always wanted to try my hand at, but never had was Oven-Dried Strawberries. The idea of dehydrating strawberries in the oven seemed daunting at first. In reality, it is actually pretty easy. My biggest concern was that the strawberries would stick or become too mushy to flip over during the dehydration process. All issues that you can easily avoid by not slicing your strawberries too thin, and by lining your baking sheet with parchment paper.
Oven-Dried Strawberries have become an afterschool snack that the kids look forward to each day. Move over chips, there is a new healthier snack favourite in town!
If your child has an end-of-school year party coming up, this snack would make a great option! Even my daughter agrees, she loves them so much that she has volunteered me to handle the healthy snacks for her kindergarten classes end-of-year party. Thanks kid. I don't mind at all. Really.
Ingredients
Strawberries (1 litre will warrant the amount of dried strawberries pictured in the photo above)
Sea Salt
Directions
 Set your oven to 200F (preferably on convection if your oven has that feature).
While your oven is preheating, slice your strawberries, vertically into 1/3's.
Line baking sheet with parchment paper. Place strawberries on sheet. Sprinkle a pinch of sea salt over the strawberries. This will help bring out their natural flavour.
Place baking sheet in the oven and set timer for 1.5 hours. If you aren't cooking on convection, you will want to either leave your oven door propped open or check on the strawberries by opening the oven door every 15-30 minutes to allow for air circulation.
After 1.5 hours, remove from oven and carefully flip strawberries over. Return to oven and cook for another 1.5 hours. Keep your eye on the strawberries during the last 30 minutes to ensure they don't burn or over dry.
Cool and serve immediately, or store in air tight container or mason jar for up to 2 weeks.
![]() Still have berries? Make Chocolate Covered Strawberries.
Still have berries? Make Chocolate Covered Strawberries.
"Mom, this dinner is the best!" ... "One of my absolute favourites!"
Those are lines you don't hear my children speak often around the dinner hour at my house. It's like music to the ears! A moment when you feel like rejoicing and dancing a jig because for once you have won the dinner war against the picky eaters. Many parents will understand this exhausting battle that I speak of.
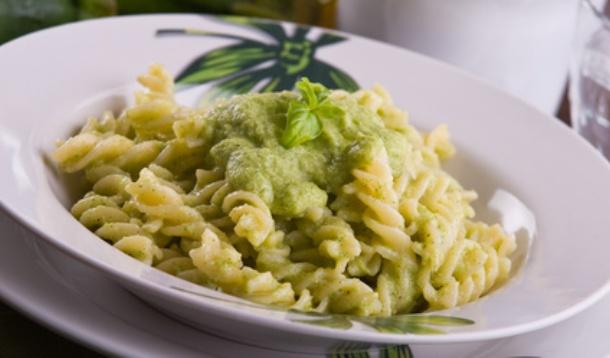
A meal that has been in our weekly rotation as of late has been a Creamy Pesto Pasta. This is a meal that pairs great with grilled chicken.
Whether you choose to serve this dish hot or cold, it's the ultimate 15-minute dinner recipe to prepare on a warm summer day when the last thing you want to do is be confined to the kitchen for longer than you need to be.
Ingredients
2.5 cups macaroni or other tubular or short pasta
284ml can of cream of mushroom and garlic soup (if you don't have access to this soup you can sub with a can of cream of mushroom and a 1-2 minced cloves of fresh garlic)
1/2 cup milk
1/2 cup basil pesto
1/4 tsp Club House Garlic Powder Plus (plain ol' garlic powder will do just fine!)
1/8 tsp sea salt
1/8 tsp ground black pepper
Directions
Bring a pot of water to boil and cook pasta until al dente.
In a skillet, add cream of mushroom and garlic soup, milk, pesto and spices. Bring to a light simmer for a few minutes, and set temperature to medium low until pasta is finished cooking.
Drain pasta and add to creamy pesto sauce. Let stand for 3-5 minutes before serving.
Kick this recipe up a notch:
Add a drained can of flaked tuna to the pasta, transfer the pasta to a casserole dish, and top with a light coating of parmesan. Place casserole dish under broiler and broil until the cheese is bubbly.
With summer just around the corner, my mind is set on not being confined to the kitchen and rather being able to to get outdoors more and enjoying endless hours of playtime with my youngsters. The summer tends to be a time when I seldom cook an elaborate meal and instead a time I further acquaint myself with the barbecue and slow cooker. Who really wants to cook a meal indoors on a hot summer day anyway? Not me!
However, on those random dreary, rainy days you will usual find me in the kitchen to cook up a quick casserole. A classic comfort dish that always just hits the spot.
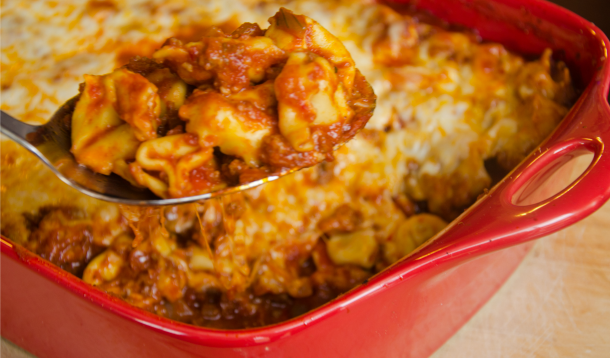
One of my family's favourite dishes is Beef Enchiladas with Homemade Enchilada Sauce. I don't make it often, as it requires a fair bit of time to prepare. When I do you can guarantee that no leftovers will remain.
Recently, I had been craving my beef enchiladas, but wasn't in the mood to do all the preparation. I wound up purchasing a package of cheese tortellini and pairing it with my homemade enchilada sauce. The result was unimaginable! Ever bite of this dish left me in anticipation of another. If YUMazing was a word, it would apply to this casserole!
So... if you have a rainy day getting you down... Don't let it! Just cook up this meal and rejoice! After all it is the ultimate rainy day comfort meal. At least my family thinks so.
Ingredients
1lb extra lean ground beef
4 cups original pasta sauce (I use Ragu Original)
1 cup low sodium chicken broth (water will suffice if you don't have chicken broth on hand)
2 tbsp chili powder
1 tsp cumin
1 tsp oregano flakes
1/2 tsp salt
2 cloves of garlic, minced
1 large onion, chopped
2 (250g) packages 3 Cheese Tortellini
3 cups Tex Mex Shredded Cheese
Directions
Preheat oven to 350F.
In a large frying pan, brown beef with onion and garlic. Drain off excess fat.
Stir in pasta sauce, spices and tortellini. There is no need to pre-cook the tortellini. It will cook in the sauce as the casserole bakes.
Add half of the pasta to a casserole dish and top with 1 cup of shredded cheese.
Add remaining pasta and top with remaining shredded cheese.
Bake for 30 minutes.
![]() RELATED: 10 Tips to the Best Pasta Ever
RELATED: 10 Tips to the Best Pasta Ever

