
You’ve seen them everywhere—those photographs with a tack-sharp subject and a blurred out background. How does that happen? The secret is in the aperture setting. (Before you read on, you might want to open this Glossary of Photographic Terms.)
The aperture on your camera is the opening in the lens through which light travels to the sensor. By changing your aperture settings, you can change how large or small that hole is and control the amount of light that reaches the sensor. (I’m assuming that no one who reads this is exposing film.)
F-Stop Basics:
Depending on the camera and/or lens that you are using, f-stops typically range from f/1.4 to f/32 in the following increments:
f/1.4 f/2 f/2.8 f/4 f/5.6 f/8 f/11 f/16 f/22 f/32
Here’s the thing that always tripped me up with aperture: the SMALLER the f-stop number, the LARGER the opening. Hopefully this image will make that clear

Since a larger aperture will let in more light, you can use a faster shutter speed than you would at a higher aperture. (You can read more on the exposure triangle here.) If you’ve heard people talking about “fast glass,” they are typically referring to a lens that has the ability to go to a fairly low f-stop number, such as f/2.8 and below, no matter focal length you choose on the lens. These lenses are usually more expensive.
Depth of Field:
Probably the most important thing to understand about aperture, though, is that the smaller the f-stop number (therefore, a larger aperture), the smaller the depth of field (or area in focus) would be.
Those creamy, dreamy, blurred backgrounds that you see? Chances are they were taken using a large aperture.
Much to my chagrin, understanding how big your depth of field is requires a great deal of math. Since math is NOT my thing, I’ll let you check out this site. Needless to say, I don’t whip out a calculator every time I want to take a picture—I’m much more of the trial-and-error type.
Here are the basic things that I keep in mind about aperture when I’m taking a photo:
Here’s an example of a photograph I took at f2.8:

The front row is in focus, and everyone in the second and third row is out of focus. Imagine if this was a large group of people—I'd really need to use a smaller aperture to get everyone in focus.
To illustrate how your focus point can change a picture when paired with a large aperture, look at this photo:
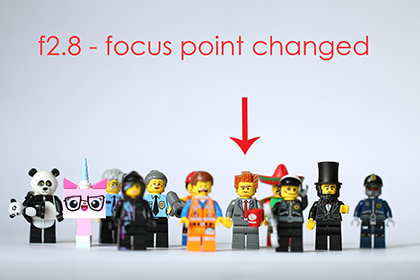
Now the focus has changed from the first row to the second row—everything on the same plane as President Business (yes, we are Lego Movie fans in my house) is in focus.
Finally, in order to get everyone in focus, I needed to stop down to f/32:

I tend to shoot a lot of photos "wide open," or at my largest possible aperture. Here are a few examples:


You can take advantage of changing your aperture whether you're using a dSLR or a point-and-shoot. If you have a shooting mode that says "Av" on your camera, that stands for "aperture priority." It will allow you to select the aperture that you'd like to use, while it automatically adjusts all the other settings for you. Try taking multiple photos of the same thing, from exactly the same position. Each time, change your aperture by a few stops and see what happens. (You'll probably only really notice the differences once you look at the images on your computer.)
No dSLR or point-and-shoot? You can even take advantage of a shallow depth of field on your smartphone—newer models have the ability to go to f2.8 and lower. Try this test: pick a subject in the foreground and lock the focus (typically by double tapping it or selecting the focus square, depending on what phone you have). Click and see what happens. Smartphones have smaller sensors than digital cameras, so the background won't be quite as blurry, but it should give you a bit of the same effect. I took this with my iPhone:

Front row in focus, back rows out of focus.
Stay tuned for more Photography 101 posts!
Looking to create some creative backgrounds with a shallow depth of field? Check out How to Make Custom Bokeh Shapes.
Lens openings with apertures image by Koeppi via Wikimedia Commons

The word “photography” comes from the Greek words “photo,” which means light, and “graph,” which means drawing—it literally means to draw with light. This blog is called Find the Light, because photography is all about understanding how to use the light that’s available to create the picture you want.
There are three variables that work together to create a properly exposed photograph: aperture, shutter speed, and ISO. (Click here for a link to my glossary of photography terms.) Together, these three items make up the Exposure Triangle.

Each camera has a built-in light meter. Most of the time, it accurately measures the light around you and determines best combination of aperture, shutter speed, and ISO for those conditions. (There are circumstances where your camera’s light meter gets it wrong, but that’s a topic for another blog post.)
You can manipulate each of these variables to achieve different results:
However, as aperture, shutter speed, and ISO work interdependently, gaining a benefit in one area (such as a fast moving subject in focus) may require you to give up something from one of the other variables (often a grainier photo from a higher ISO).
As an example, let’s say that you are shooting a landscape and you want the entire scene in focus. That will require that you use a higher f-stop number, such as f/22. This means that the opening on your camera lens will let in significantly less light than if you had set your aperture to f/4. In order to use f/22 and still adequately expose your photograph, you will need to increase the amount of light coming to the sensor by:
The reality is, most of the time we try to find a happy medium.
Don’t panic if this isn’t making complete sense—I’ll be writing blog posts on each item in the exposure triangle in the near future. For now, I just wanted to give you a quick heads up that these items are interdependent.
Here’s a quick video that illustrates how the interdependence looks on a camera:
Want to know more about the individual parts of the exposure triangle? Start with Photography 101: Understanding Aperture.
Ah, the selfie. Word of the year for 2013, the selfie doesn't appear to be going anywhere anytime soon.
I'm not a big fan of having my photo taken, so I don't generally post a lot of selfies. When I do, I usually can't stand them since arms aren't long enough to take a picture at an attractive angle. However, there are moments when I'd like to take a shot of me and my kids, or my friends together, and there's no one else around to take the picture.
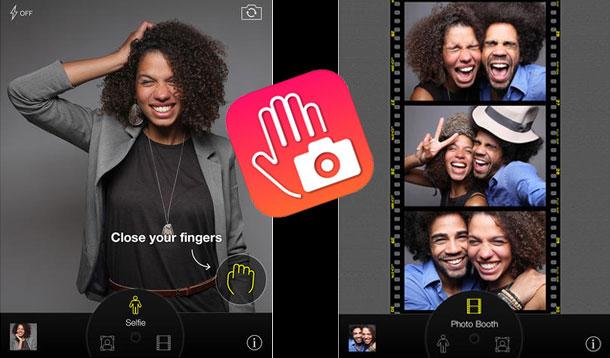
A popular iPhone app now aims to make the process much easier, allowing you to step further back and take the shot just by opening and closing your hand. (No, this isn't sponsored—it's just something I like and wanted to share.)
CamMe just won Most Innovative App at the Mobile World Congress. It is free (yay!) and works like this:
Open the app, compose your photo. According to the app description, you can be up to 16 feet away and still have it work. When you're ready, raise your palm into the photo. When you see the closed hand icon, you know it saw your hand. Close your hand and it will give you a 3-second countdown to the shutter click!
A great feature I love about this app—it has a "photo booth" option. It takes a series of 3 shots very quickly and puts them into a filmstrip frame. (I'm still trying to figure out the timing on these.)
Am I going to start taking more individual selfies? Nope. I will, however, be making an effort to get in the picture more with my kids, and I'm hoping that this will make getting a great shot with my phone easier. Now I just need to get myself one of these tripods and I'll be set.
Check out these other great photo apps for you iPhone, or these fabulous four apps for your health.

