Sometime between moving out west and moving back to Ontario, the number of times we’ve had people over for dinner - just because - can be counted on one hand. Somewhere along the line we stopped entertaining. We do still have people over for all the major holidays, but for no special occasion? It's just wasn't happening.
There are plenty of excuses – the kids are busy with their activities, the house feels like it’s constantly under renovation (which means it never feels tidy enough), and as a working mom, when the weekend finally comes I’m too tired to even think about cleaning my house, cooking up a storm, entertaining, and then having to clean up all over again.
Except I like cooking and I like entertaining our family and friends - what I don’t like is the cleaning part! (and I'm thinking you may be the same!)

I've decided that this summer is the perfect time to start having people over again. It’s time to re-connect with friends, make more family memories in our home, and just stop being so hung up on how tidy the house is at any given point during the renovations. I want us to start getting outside for more dinner parties.

But even laid back, outdoor dinner parties need to have a little "sparkle." At our first dinner party of the season, I wanted our guests to know we had added a few extra little touches to make the night special.

If you are planning a dinner party of your own, here are some things you can do to make it extra special.

Choose a menu that allows you to pre-make and prep as much as possible before your guests arrive, so you can spend as much time out of the kitchen and amongst your family and friends as much as possible.
I popped the potato casserole and bread into the oven hours before the first guest arrived. I also set the table, seasoned the steaks, shucked the corn and assembled the salad (except the dressing), so everything was ready to go.
![]() Special Host Tip: About 30 minutes before guests arrive, stop what you’re doing and focus on yourself. Spend a few minutes getting changed and freshening up even if you’re running behind and there are still things left to do in the kitchen. Setting the table while guests arrive is much better than answering the door in an old t-shirt splashed with cheese sauce!
Special Host Tip: About 30 minutes before guests arrive, stop what you’re doing and focus on yourself. Spend a few minutes getting changed and freshening up even if you’re running behind and there are still things left to do in the kitchen. Setting the table while guests arrive is much better than answering the door in an old t-shirt splashed with cheese sauce!

I wouldn’t be the Canned Soup Mom if I didn’t tell you to keep dinner parties as simple as possible. My trick is to stick to recipes that come together quickly (or can be prepped ahead) and are low-risk (meaning you KNOW they are going to turn out and guests are going to love them).
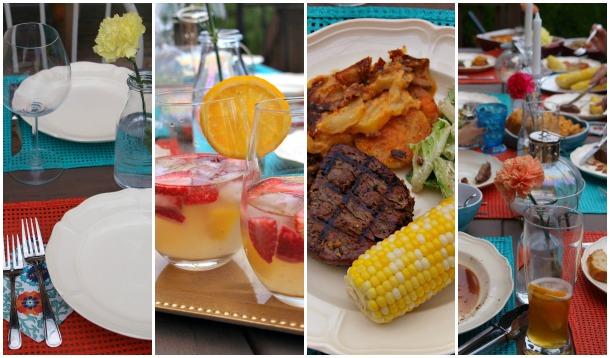
Most dinner party hosts get excited about planning and cooking the main course, but at this time of year, all the fresh local produce has me excited about the side dishes! For our dinner party, we served steak (my BBQ-master husband’s specialty), Chef Michael Smith’s ah-mazing Bacon Potato Casserole (recipe below), Rosemary Beer and Cheese Bread, salad, sautéed mushroms, and fresh corn.

Keeping it simple doesn’t mean your party can’t feel special. Even a backyard barbecue deserves something a little extra. I love setting the table with bright summery colours, candles, and fresh flowers. For my first dinner party of the season, I was not breaking out the paper plates and plastic cutlery. Even though we were outside, this dinner party called for real plates, glassware, and flatware that sparkled in the candlelight.
My other trick for making parties feel special is to come up with a featured cocktail. For our dinner party we served Strawberry Peach Sangria, which can also be made in a pitcher the night before.


If kids are on the guest list, it’s easy to make them feel a little special with their own special "just for kids" beverage and menu.
I like to feed the kids first then have a special activity planned. Our small guests kids filled up on hotdogs, corn on the cob, salad, and homemade bread. They also sipped on sparkling lemonade with blueberries for garnish. Then we had the badminton net set-up for a friendly game and the basement was set-up for movies and Minecraft. If you have an older child or a teenager around to help supervise and entertain the younger ones, that’s an added bonus (for you and your guests!) Once the kids were fed and entertained, it was time to throw the steaks on the BBQ and get the dinner on the table!

Dessert does not need to come immediately after dinner. In most cases, guests are happy to get up, stretch, check on the kids, move to another room and/or to just sit a moment and continue their conversations. This is the time I opt to clear the table and get a head-start on the dishes.
If you’ve prepped as much as possible before the party, this means that most of the pots and pans are already washed and put away. Make sure your dishwasher is empty before the party starts which makes clearing plates and loading them fast and easy. I will admit, when I read the Cascade Platinum promise of no pre-wash needed and that stuck on food cleans in only one wash, I wasn’t an immediate believer. But my dinner party was the perfect time to put it to the test! Within 15 minutes, I had scraped my plates, packed up the leftovers and loaded everything into the dishwasher. Not having to soak and rinse made clean-up super fast! Every un-rinsed plate and even the starchy and cheesy casserole dish went right into the dishwasher without soaking or rinsing.
I was blown away by the results. This is the before:


This is the AMAZING after...


Being a hostess is definitely work, even if you do keep it simple. But it’s important to take some time throughout the evening to just sit and enjoy. All the hard work is done, now it’s time to relax. Leave the dishwasher (and Cascade Platinum!) to clean the dishes and the rest of the tidy-up until after the guests leave.
If you’re like me and have had a bit of an entertaining hiatus, summer is the perfect time to get back into entertaining. Whipping up Chef Michael Smith’s Cascade exclusive Bacon Potato Casserole (a hit at my dinner party) is guaranteed to be a hit with your guests too.
![]() Chef Michael Smith's Bacon Potato Casserole
Chef Michael Smith's Bacon Potato Casserole

Ingredients
12 slices bacon, chopped (I use kitchen scissors and slice right into the pot)
1/3 cup water (right from the tap)
1/2 cup all-purpose flour
4 cups milk
3 cups smoked or old cheddar cheese
1 tbsp dried thyme
1 tbsp smoked or regular paprika
1 tsp salt
A few dashes up to 1/2 tsp of your favourite hot sauce
10-12 large russet potatoes, washed, peeled and sliced
Directions:
 Add bacon and water to a stockpot and cook over medium heat, stirring frequently until the water evaporates and bacon is crispy (approx. 10 minutes).
Return reserved bacon fat to pot, sprinkle with flour and stir into a paste.
Briefly bring to a full furious boil, and then reduce the heat to a slow, steady simmer.
Add potatoes and bacon to the pot and stir gently until evenly coated.
Sprinkle with remaining cheese, loosely cover with foil and bake in pre-heated 350F oven for 1 ½ to 2 hours. After approx. 1 hour, remove the foil so the top can begin browning. After 90 minutes begin checking for doneness every 10 minutes or so. Bake until the potatoes are tender, the top is golden brown and the sauce is bubbly, reduced and thickened, up to 2 hours in total.
Enjoy! Click for more of Chef Michael Smith's recipes and some of his own dinner party tips. Happy Summer, everyone!
 Put all ingredients into a bowl and use your hands to combine. Shape into hamburger patties. I like to make mine not too thick and often make a few “slider” sized ones for the kids (just remember, this usually means needing to bring a smaller sized bun). Freeze and pack in your cooler as described above. When ready to cook, place on pre-heated camping BBQ and cook until beef is cooked through, flipping at the half-way mark. Cooking time will vary depending on the size and thickness of your burgers and the temperature of your BBQ. Just be sure to test your burgers for doneness before serving.
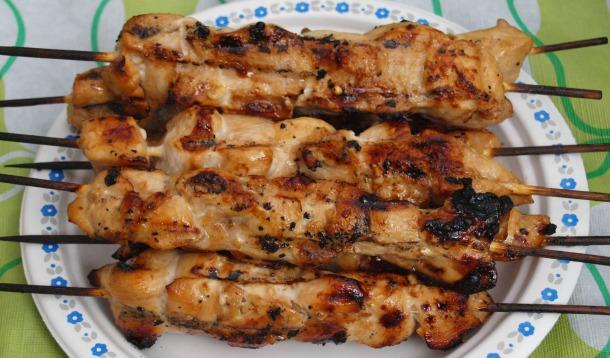
Although these Honey Balsamic Chicken Kabobs can be made on the barbecue at home, I save this recipe for our #CanadaWithKids camping adventures, because whenever we bring friends or family with us they’re always shocked that I made something “this delicious” in the backcountry in record time.

The trick is preparing and freezing at home. Here’s how…
Ingredients
8-10 wood skewers (not technically an ingredient but you need them!)
4-6 skinless, boneless chicken breasts
4 tbsp balsamic vinegar
2 tbsp honey
1 tbsp olive oil
1-2 cloves garlic, crushed
Juice of one lime
Salt and pepper to taste
Directions:
Soak wooden skewers in water for approx. 10 to 20 minutes.
Meanwhile, add vinegar, honey, oil, garlic, lime juice, salt and pepper into a bowl and whisk gently until combined. Set aside.
Cut chicken into cubes and thread cubed chicken onto skewers.
Brush marinade on both sides of chicken skewers and place skewers into a large Ziploc bag (careful not to poke a hole in the bag!).
Pour in remaining marinade, seal and refrigerate laying flat for approx. 4-8 hours.
If cooking on the barbecue at home, after marinating, simply grill until chicken is cooked through, rotating at the half-way mark.
If taking your chicken skewers camping, move your bag of chicken skewers to the freezer and freeze completely. Before heading out, I put the Ziploc bag of frozen chicken skewers into a rectangular reusable plastic container and then pack into the cooler. You can of course pack the Ziploc bag as is, but things get bumped and shifted in the cooler while camping and you do not want the skewers to poke a hole in your bag.
The chicken will defrost slowly in the cooler (providing you keep a good supply of replenished ice in there) which makes it a great option for dinner on day three.
When ready to cook, remove your skewers from the bag, discard the excess marinade, and cook on your camping barbecue until chicken is cooked through rotating occasionally (approx. 15-20 minutes depending on the temperature of your camping BBQ).
![]() Serve with Dad’s campfire potatoes and your favourite veggies and enjoy!
Serve with Dad’s campfire potatoes and your favourite veggies and enjoy!

