
 So – you have a GPS, and sure it’s great at getting you from one end of the province to another, but did you know you can update it with Points of Interests from various locations in Canada?
A ‘Point of Interest’ (POI) is a location on a map that shows you something that might be interesting to you. In your GPS, you can use these POI’s as start or end points for your trip, or even just have them display on your map so you can see them when you’re driving past.
Most GPS vendors include landmarks such as schools, gas stations, hospitals, and banks as standard POI’s when you turn your GPS on, but what you might not know is that you can actually download additional POI’s and load them onto your GPS. If your go to your GPS manufacturer’s website and do a search for ‘POI’, most of them will have a newly updated list for summer or winter travel and they will walk you through the process for installing them.
But what if you want something a little different? I was actually surprised to find that travellers and GPS enthusiasts have created custom POI lists for places like national Parks, heritage sites, and beaches that are all available for free. For our trip to Florida last year, I was even able to find a list of Disney related POI’s so all I had to do was pull up ‘Magic Kingdom’ in my GPS and we were on our way!
10 Steps to Manually Updating POIs
I have a TomTom GPS, so I’m going to talk about the process for manually updating POI’s for TomTom, but Garmin and Magellan are essentially the same idea. You should check your manual for information on how to update POI’s on your device.
![]() Step 1: Create a folder called ‘Custom POI’ on your PC in a location that you’ll always remember.
Step 1: Create a folder called ‘Custom POI’ on your PC in a location that you’ll always remember.
You’ll want to keep the POI’s you download handy on your PC because map updates are notorious for deleting custom POI’s and chances are, you’ll want to load them again in the future.
![]() Step 2: Check your GPS vendor website, or do a Google search for ‘TomTom POI’ + where you’re travelling, or whatever you are interested in.
Step 2: Check your GPS vendor website, or do a Google search for ‘TomTom POI’ + where you’re travelling, or whatever you are interested in.
For today, I’m going to search for ‘TomTom POI Canada National Parks’. That search brings me here (Note: I am not endorsing this site, or in any way affiliated with it. This one in particular does require a login, but many don’t.)
![]() Step 3: Download the file containing your POI’s to your ‘Custom POI’ folder on your PC.
Step 3: Download the file containing your POI’s to your ‘Custom POI’ folder on your PC.
Again, I’m using TomTom, so my file will be an .ov2 file, or a .zip file containing the .ov2 file. (Sounds confusing, but it will make sense soon.) Different GPS vendors all use different file types, what is common about them is that all POI files are basically a list of location names and their latitude and longitude.
![]() Step 4: Open the ‘Custom POI’ folder, and check if the files you downloaded are .zip format. If they are, right click and choose ‘Extract all’, otherwise, skip to step 5
Step 4: Open the ‘Custom POI’ folder, and check if the files you downloaded are .zip format. If they are, right click and choose ‘Extract all’, otherwise, skip to step 5
![]() Step 5: Connect your TomTom to your computer.
Step 5: Connect your TomTom to your computer.
Those of us with TomTom’s are used to TomTom Home. If that app starts up, you can just close it off. We won’t be using TomTom Home this time; we’ll just be copying the files directly onto the GPS.
I can see the beads of sweat forming, but don’t worry, if you’ve ever copied a file to a memory stick, you can do this as well.
![]() Step 6: Go back to the ‘Custom POI’ folder, and copy all of the files.
Step 6: Go back to the ‘Custom POI’ folder, and copy all of the files.
For TomTom you will see .ov2 and .bmp files.
![]() Step 7: Open your TomTom device in Windows as you would a memory stick, or another device
Step 7: Open your TomTom device in Windows as you would a memory stick, or another device
If you go to ‘My Computer’ you will see it listed as a device there. Double click on your TomTom device, and open the maps folder. This will be probably be called CANADA or USA-CANADA or something similar.
![]() Step 8: Paste your files into the maps folder
Step 8: Paste your files into the maps folder
![]() Step 9: Once the files have finished copying onto your GPS, disconnect your TomTom from the computer
Step 9: Once the files have finished copying onto your GPS, disconnect your TomTom from the computer
Your TomTom will reboot.
![]() Step 10: Check out your new fancy POI’s!
Step 10: Check out your new fancy POI’s!
Once your TomTom has rebooted, you can check out your new POI’s in your POI list directly on your device.
Pretty neat trick right? Where are you travelling this summer with your GPS?

So, last week I talked about how awesome Google+ is for separating how you share content. As a refresher, you can use Circles to separate your people into groups eg. “Friends”, “Family," ”Creepy People that I don’t really want to talk to but feel guilty for not adding.”
Now onto the next great part of Google+: Hangouts. Hangouts allow you to do exactly what it says, ‘hangout’ with up to 10 people from your circles at one time, and all for free.
We tested it the other night with my Mother-in-law, and she loved it too. Here’s how it works:
I decided I would host the hangout. I clicked on ‘Start a Hangout’ and when the screen opened, I picked who I wanted to invite to my hangout.
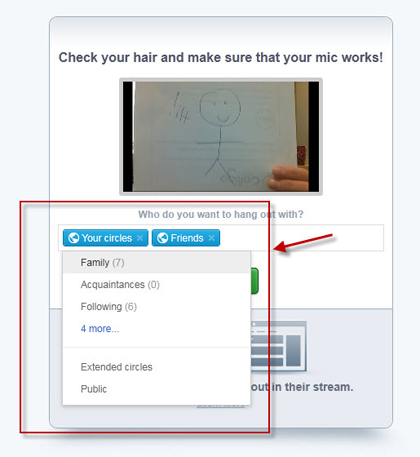
Everyone who was invited saw the invitation in their Google+, and was able to click on it to connect.
Within a few seconds, everyone invited appeared in their own little box screen. We were worried about how this would work when everyone was talking, but as the conversation started flowing we noticed that Google was smart enough to design Hangouts in such a way that when someone is talking, it expands their box so they are the most visible person to everyone included in the chat.
This means that if Grandma is talking from her webcam everyone sees her, if Baby Lula is cooing on another camera than the focus shifts to her. This resolves one of the biggest complaints from my family members any time we do a group chat “I just can’t tell who is talking!”
Now, imagine being able to share video of Lula’s first steps with Grandparents and other family all on the hangout at the same time you are chatting with them. Google+ Hangouts allows anyone on the hangout to share YouTube videos with the rest of the people hanging out too. You can watch them together, laugh together and cry together. To me, THIS is what collaboration is all about!
From a Mom perspective, Hangouts meets so many more of our needs than say, Windows Live Messenger, or Skype would. From a geek perspective, I love the technology behind it.
So, what do you think, do you want to hangout?
"
Last week, Google released its newest attempt at taking over the social media world. As a user of many social media sites, I wanted to hate Google +. My first thought was: Why the heck would I start adding things to another social media source? I use Twitter and Facebook daily, Twitter to follow and share with the world, and Facebook to follow and share with friends and family.
Man was I wrong. I can't hate Google+, in fact, I love it.
My issue with Facebook has always been that although I can customize my security settings to block the public or friends of friends from viewing my content, there are times when I want just a few people to view a photo of me being crazy, a photo of my son etc. Picking who exactly gets to see your content is something that isn't easily done in Facebook, but Google + meets this need and then some.
The whole premise of Google +, is that you assign the people in your life to 'circles'. There are four circles predefined by Google : Friends, Family, Acquaintances, & Following. The first three are pretty self explanatory, but the fourth one allows you to follow people (like in twitter) without them having to approve you. You add people to the circles that you want to.

So, how does the security aspect come in? Well, say for example, and I'm talking purely hypothetically of course, I wanted to post a goofy picture of myself at a corporate event. I'm not sure my family would care to see it, but my co-workers and friends would. I would create a circle called 'Work Friends' and add my co-workers to it. Then, when I uploaded the photos or album of photos, in the '+Add More People' box, I would select exactly which groups I wanted to see it. In this case I'd select all of them and leave Family off, then when I publish the album, all of the users from the selected circles will see the photo, but none of my family would. Awesome right? I can share pictures of my family with just my family, pictures of myself with friends (such as this picture of myself and @cbernardi) with my friends, and the picture of me at the company Christmas party wearing the red blinking Rudolph nose and dancing the Macarena will never come up in conversation with my brother in law or appear in a public search.

Circles can also be used to define who you want to share your status updates with and what 'posts' from other people you want to forward on to be visible by people you know.

So, now that I've dazzled you with Circles, I want to touch on Sparks. Sparks are a way to collect information that is interesting to you. For example, I added 3 sparks: 'Erica Ehm' (sorry boss), 'parenting', and 'technology.' When I click on the spark for 'Erica Ehm' it pulls a list of stories that are relevant to that topic. I can then use the 'Share' feature to share to my Circles as I see fit, or just read the story and do nothing.


See why I'm loving this so much? Information sharing is customizable, and in a super easy and intuitive way.
Later this week I'll give you a run down on the 'Hangout' feature of Google + and also talk about photo albums.
What do you think of Google+? Do you have an account yet? If you're on Google+ feel free to add me, I promise I won't publish that Christmas photo to you.
You can add Krista to your Google+ circles by using: Krista.Swanson at gmail dot com

