We all have lots of 'odd socks' around the house...especially in the Spring when we'd like nothing more than to kick them off and slip into sandals! This Easter, put those odd socks to use and turn them into homemade, one-of-a-kind Easter bunnies! I have zero sewing experience and I made this adorable guy in about twenty minutes—my kids are both in love with their sock bunnies!

You might need to a make a quick trip to the dollar or craft store, but most of the items in this sock bunny are things you'll have around the house already:

Supplies: sock (any size—the size of your sock will determine the size of your bunny!), ribbon, darning needle (extra large hole), buttons, stuffing, pom pom and glue gun (glue gun optional but very handy!)

Stuff the sock with stuffing all the way up to the sock's end. You can adjust the softness of the bunny by how much stuffing you put in.

Tie a ribbon around the neck area (wherever you decide that will be), and sew the ears with the ribbon and darning needle. Much easier than regular needle and thread, and the ribbon looks nice showing - no need to be super neat or anything! Just start at the top and sew down and around to define the ears.

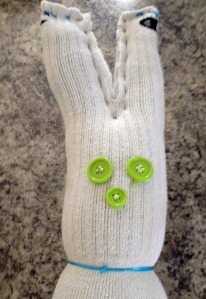
Then, sew buttons on for eyes, nose and decorations. You can also add googly eyes, ribbon whiskers, or other decorations.

Outline the arms by sewing with the ribbon along each side of the body. This gives the bunny it's shape.
Finally, cut between your ribbon sewing on the ears and trim around the tops of the ears to shape them. Add a pom pom tail on the back and you've got your very own homemade sock bunny!
This post was written my one of momstown's crafty mamas (who doesn't own a sewing machine and just bought her first needle for this craft!)
Happy Easter! Come over to momstown for more Easter craft ideas that are fun, easy, and kid-friendly!
Get hopping with even more ways to help you with your Easter entertaining, get crafty with your kids, and celebrate chocolate.

Everyone loves hunting for Easter eggs, but throw a bunch of multi-age children into a field free-for-all, and it can be utter chaos. Little kids melting down, because they aren’t fast enough to collect any eggs; big kids breezing around, bragging about their overflowing baskets; toddlers stuck in the mud; and mamas saddened by the muddied Easter clothes.
It all starts with fun, and momstown has serious experience on the Easter egg hunt front. Let us tell you, momstown Burlington knows how to host a neighbourhood Easter egg hunt that’s fun for everyone. Our annual Easter egg hunt is something that our members look forward to year after year.

Step 1: As organizer, purchase a million multi-coloured reusable eggs.
Take an educated guess about the number of kids that you are expecting, and ensure that you will have at least six eggs per child. Don’t worry about stuffing them with anything, parents are particular about what their children eat...and stuffing them takes forever!
After the kids collect the eggs, have them redeem them at a prize table. They can swap their eggs for a choice of inexpensive spring gifts, like bubbles, skipping ropes, bouncy balls, and sidewalk chalk. The organizer can keep all the eggs until next year, so the only cost, really, is the prize table each year.
Step 2: Assign each age group a colour (or colours).
This will keep the crying of younger kids and the overflowing baskets of older kids down. If only the two-year-olds collect the yellow eggs, and the five-year-olds pink eggs, things will be much smoother. Just ensure that you have enough colours per age group. This trick is also a great tip for keeping the peace in your own family egg hunt.
Step 3: Mud clothes for everyone.
As the saying goes: there’s no bad weather, just bad clothing. Fussy Easter clothes are for inside and calm non-messy activities. A fun Easter egg hunt is neither of those. Bring out the splash pants, rubber boots and washable coats. That goes for parents too! You will have way more fun if you’re not worrying about getting dirty.
Step 4: Every kid needs a basket.
Not a bag, but a basket. Why? Well, that’s just the tradition, and it’s not Halloween with a bag of candy. The eggs are supposed to bounce out when the kids run-it’s part of the memory! Silly bunny ears and drawn-on whiskers do make the pictures cuter, too!

Have a great Easter egg hunt, year after year, like momstown Burlington has enjoyed! We’d love to hear your tips and ideas for hosting the best Easter egg hunt, too!
Spring isn’t quite here yet but momstown has spring fever!
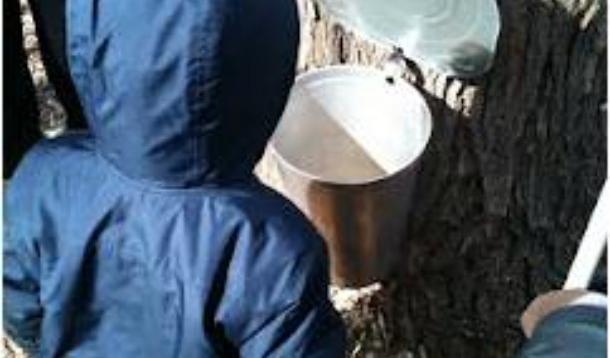
How about spending a fabulous day out at a local Maple Syrup Festival? Fresh air, nature, a mini science lesson and sugary treats? What’s not to love?
momstown Oakville takes an annual field trip to a nearby conservation area with a maple syrup history. When we’re lucky we get a sunny day, melting snow, happy kids and running sap.

5 things you never knew about Maple Syrup:
Test your kids with your new maple syrup trivia over a fantastic meal of yummy pancakes! Here’s a recipe to try along with your new syrup selection! It’s also a fun recipe to invite your junior chef to help with too.
Kid-Friendly Oatmeal Banana Pancakes
1.5 cups all purpose flour
1 cup large flaked rolled oats
1/4 cup packed brown sugar
1 teaspoon baking powder
1/2 teaspoon baking soda
1/4 teaspoon salt
1 1/2 cups milk
2 eggs beaten
2 ripe bananas mashed (about 3/4 cup)
3 tablespoons melted butter
2 teaspoons vanilla extract
1 tablespoon of oil or spray oil for cooking
Combine all wet and dry ingredients separately. Once thoroughly mixed, combine wet and dry ingredients.
Cook until browned on each side (about 2-3 minutes per side). Serve with maple syrup!
You can play around with ingredients adding nuts or nut butters, chocolate chips... Enjoy!
Maple tips by momstown Oakville’s head mama, Kelly, who is a baking fiend and loves a good pancake recipe.
Here are more yummy recipes to include your new found love of maple syrup, in:
Roasted Sweet Potatoes with Maple Syrup

