This guest post was written by Jenn Howe, one of YMC’s awesome Project Managers and a mom of two who does her best to be organized, too! Here is her tale of how she stayed in on a cold winter weekend to tame her messy kitchen pantry and create an efficient space for her and her family.
It had to be done. In the darkness of winter, I realized it was now or never. With no pressing outings planned on a -20° Saturday I simply had no excuse. So I finally dug deep into the bowels of my kitchen cupboard to unhand the chaos and tame my Tupperware—creating a functional pantry and kitchen-station system.
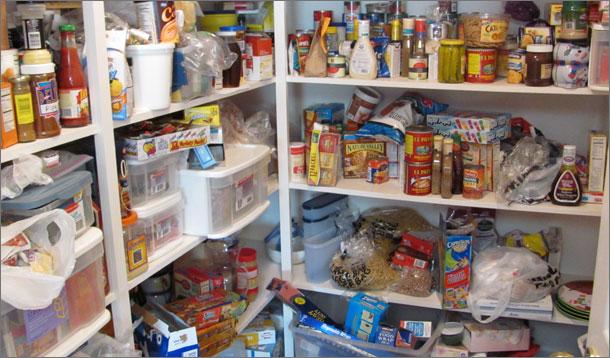
It’s been years since our kitchen reno and things were looking mighty disorganized. It was taking me longer to find my way around my own kitchen and I was spending way too many mornings desperately looking for the right lid to a school lunch container. I was tired of having to open up five different cupboards to find the ingredients to a 5-ingredient muffin recipe. Bulk food was starting to pile up in our mudroom because I didn’t know where to put it in the kitchen.
So, here I am. Baring my soul to you—gasp—with pictures of my disorganized cupboards. It’s like exposing a secret part of myself to the whole world. I think I’d rather show you a pic of my panty drawer with you.
But I wanted to share how easy and rewarding (albeit gross) it was to cross this chore off of my list. Here’s how I did it.
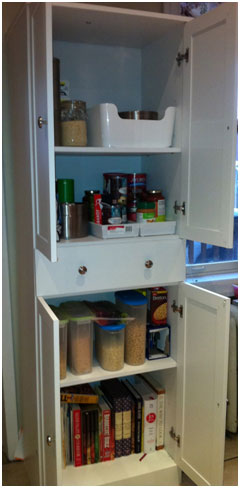
Truth be told, I never really took the time to organize my kitchen pantry properly. 12 years ago, fancy organizing pull-out cupboards and peek-a-boo drawers weren’t readily available. When I realized I needed a little more cupboard space, I found a small-space standalone pantry unit at a big box store for $120 that fit nicely next the fridge. It is a shallow unit that stores everyday, frequently used pantry items. Knowing I had this newfound space, I started by making these three lists:
List #1 — All the everyday, popular items that would go in the new pantry unit. For me that’s canned items, everyday quick baking, rice and pasta, kids crackers, and cereal. I want these things at arms reach to make quick muffins or pancakes in the morning or for the kids to make their own cereal snacks or to grab straws.
List #2 — Pantry items that I don’t use so much such as specialty flours, dried fruit, specialty pastas and rice. These things would go in deeper cupboards.
List #3 — Bulk items like stock, pasta sauce, and juices. These heavy items could be stored out of way until they need to be replenished in the main pantry cupboard or fridge.
Now that I had a plan, it was time to tackle cleaning out the cupboards. I was brought up to believe that “Thou shall not throw out food” is the 11th Commandment. But I needed to be ruthless. Dried-up dried fruit. Chuck. Aunt Jean’s bottled relish from 2004. Chuck. Lasagna noodles expiry date 2007. Chuck. Unmatched Tupperware. Recycle bin. After a good kitchen cleaning, I had a clean slate to work with.
Here's how I organized my kitchen staples.

![]() Frequently grabbed items like rice, chocolate chips, and pasta went into glass or stainless steel jars. I made sure to buy jars that readily popped opened instead of mason jars.
Frequently grabbed items like rice, chocolate chips, and pasta went into glass or stainless steel jars. I made sure to buy jars that readily popped opened instead of mason jars.
![]() Cereals went in easy-pour cereal containers. No more Rice Krispies splashing out of the box!
Cereals went in easy-pour cereal containers. No more Rice Krispies splashing out of the box!

![]() Kids can help themselves to cereal, bars, and crackers by storing them on a lower shelf.
Kids can help themselves to cereal, bars, and crackers by storing them on a lower shelf.

![]() To keep things accessible, I grouped lots of items and put them into larger bins. And, a bonus, it’s like creating a drawer to pull things out of the cupboard for easy reach.
To keep things accessible, I grouped lots of items and put them into larger bins. And, a bonus, it’s like creating a drawer to pull things out of the cupboard for easy reach.
Using simple plastic tubs, I created little stations to keep everything in its place.
Station #1 — My 5-min baking station: flour, oats, chia, baking powder, salt, baking soda, sugar, vanilla, chocolate chips, and measuring tools. It’s the backbone of most baking recipes!
 Station #2 — All specialty baking goods and cake supplies went in a large tub in an out of the way “baking cupboard” with flours and cookie cutters.
Station #3 — Specialty pastas and grains were housed in a large bin in a higher cupboard.

Station #4 — I make my coffee and tea at home, a lot, so why bother putting it in the cupboard? A simple tray houses a coffee station on the counter.
Station #5 — Plastic containers and lids found each other once again in a new storage bin at eye level. No longer stashed erratically in a backbreaking bottom cabinet.

So that’s how I created a kitchen pantry that works for me. Now let’s cross fingers that I maintain the organization. As my mother said, “Always putting things back in the right place is 80% of the battle.”
I dare you to tackle your own kitchen! Comment below if you want to share tips that solved your kitchen storage dilemmas.

