I work from home. As with most job situations, it comes with both goods and not-so-goods. The goods include — but are not limited to — being home and completely available for my kids, being able to eat cold Chinese food from the container standing over my kitchen counter, and not having to get dressed. The not-so-goods include — but are not limited to — being home and completely available for my kids, being gross and eating cold leftovers instead of a proper lunch, and not getting dressed.
Because I work from home and am available for my kids, mornings are my domain. I make three lunches, I make sure three breakfasts are eaten, three sets of teeth are brushed, three backpacks are filled with three sets of homework, I make sure no one's belly is showing and no one is wearing leggings as pants, and I make sure three kids get out of the door on time for school. If you are doing the math at home, this leaves very little time for extravagent hairstyle and updos.
No. I'm a battle-picker parent, and I fight the battle of the hair like this: You can't look like a hobo (i.e., your hair must be brushed) and it needs to be off of your face (this serves two purposes — my girls don't have to worry about their hair while they should be worrying about studying, and lice prevention). My girls love fun and different braid styles and they watch a lot of YouTube.
Luckily, with some products like Goody Ouchless hair elastics and bobby pins, I — I mean they — can have an adorable style finished in less then five minutes.
Yes, less than five minutes.

These are some of the fan favourites at our house. As you can see, my daughter Emily is somewhat of an expert.
1. The Milkmaid Braid

- Split all your hair down the middle. Make two low side braids and secure each one with a Goody Ouchless Elastic Band.
- Pull one up across the forehead and pull the end as far as it will go towards the opposite ear (so it looks almost like a headband). Start securing with bobby pins — as many as it takes for the braid to stay put. Now pull the other braid across the same way, towards the opposite ear. Secure with bobby pins.
 Tip: Bobby pins are your best friends when it comes to braiding!

2. The Triple Twister

- Make three braids of equal size—secure each one with an Ouchless Elastic Band.
- Braid the three braids together and pull the bottom up and tuck underneath the braid. Secure with bobby pins.
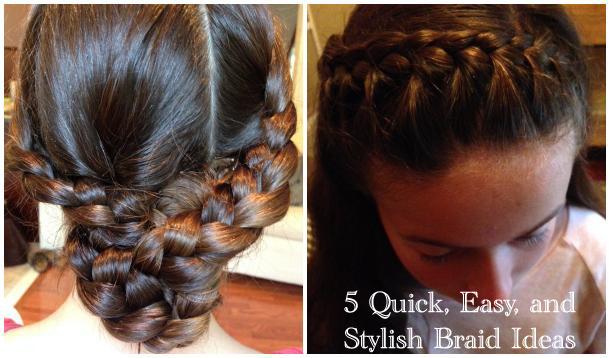
3. The Backwards Milkmaid

This braid is similar to The Milkmaid, but you pull the braids near the nape of the neck, just under ear-level.
- Split all your hair down the middle. Make two low side braids and secure each one with an ouchless elastic band.
- Pull one up across the back of the head and pull the end as far as it will go towards the opposite ear. Start securing just under the ear with bobby pins — as many as it takes for the braid to stay put.
- Now pull the other braid across the same way, towards the opposite ear. Secure with bobby pins.
4. The Feather Braid

- Make a low ponytail and secure. Pull 1/8 of the hair from one side out and braid it all the way down the bottom. Do the same with another 1/8 of the hair on the opposite side.
- This is where it gets a little tricky. Split the leftover hair from the ponytail into two — so essentially you should have four pieces of hair.
- Bring the two outermost pieces (the two braids) and place them in between the two remaining pieces.
- Then continue this process of pulling the outer two pieces into the middle of the leftover pieces and braid down until you reach the end. Secure with an elastic.
5. The Bang Braid

This one not only looks impressively complicated (it's not!), but it's also great for kids (and adults!) who are growing out their bangs.
- Create a deep part — alternatively you can make two braids using just your regular part — and grab about a 3-inch section of hair. Starting at the deep part, begin your braid. Take the right piece and pull it over the middle piece, now take the left piece and pull it over the middle and so on.
- Each time you pull the right side over, grab an extra small chunk of hair and weave that in. (You are essentially making a French braid down the side of your head.
- When you get to the end of the forehead, just before the ear, stop pulling extra hair in and continue braiding down until you are ready to end your braid. You can secure with bobby pins.
Whichever braid you choose, I hope these ideas will help make your back-to-school mornings go more smoothly—and more stylishly!