
What is it with the weeks before the holidays? It seems like everyone needs to cram in four months of good cheer into two and a half weeks: concerts, parties, dinners, lunches, potlucks, recitals, caroling. If you have a child who is enrolled in an activity, you will be inundated with Special Holiday Activities; if you have more than one child in more than one activity, chances are you are probably feeling like you've been run over by a steamroller right now, or like you're treading water but the water is getting progressively deeper and you have weights on your ankles.
Maybe by this point in December you are feeling like it is all too much, this Christmas thing, and the thought of holiday baking makes you want to hide in the bathroom and cry. Or drink. Or drink while hiding in the bathroom, with the children knocking on the door, saying "Mom, are you in there? Can we make cookies for the class?"
![]() How to Crush Candy Canes, Not Your Fingers
How to Crush Candy Canes, Not Your Fingers
What does all this have to do with popcorn, you may ask? I'll tell you: this is a holiday treat that can be thrown together in no time at all. Let's say you have yet another holiday party to attend this weekend and you are supposed to bring a plate full of baking to share. Before you grab a bottle of wine and a funnel, relax. Take a deep breath. I've got you covered.
This candy cane popcorn requires about five minutes of active time, plus it allows you to take out your frustrations by smashing the candy canes into little pieces. Get the kids to help you portion the popcorn into treat bags, or just eat it all yourself; your call. Whatever you do, remember that in a few short weeks the craziness will be over and you can go back to drinking your wine in glasses, rather than via funnel or from the bottle in a paper bag, like a normal person.
Ingredients
 Put the candy canes into a zippered plastic bag and place on a cutting board. Using a mallet, rolling pin, or the end of a drink muddler, smash them until you feel a bit better about the holiday season. Keep going. The more crushed they are, the better.
Put the popped popcorn into a very large bowl.
Place the Andes chocolates or white chocolate wafers into a microwave safe bowl and melt, stirring every thirty seconds. This can also be done in a double boiler. If using the white chocolate wafers, stir in the peppermint extract and food colouring if desired.
Pour the melted white chocolate over the popcorn and gently toss to coat. Arrange the coated popcorn on a wax paper-lined baking sheet and sprinkle with the crushed candy cane.
Allow to harden for approximately 30 minutes, then break apart and portion into bags. Or just eat it! I won't judge. Whatever gets you through.


Are you thinking "No, wait, I really do want to bake something?" Beat holiday baking fatigue with these cookie recipes. Maybe you need tricks to keep organized for holiday baking? I've got you covered. How about another popcorn recipe? Try my Addictively Delicious Caramel Corn!

A little while back, my family and I were invited to dinner at a friend's house. A few days before the event, my friend - knowing my meatless milieu - called me to ask about preparing a special dish just for me, and I tell you this: I was extremely grateful but also embarrassed. I told her not to worry, she didn't need to go through any extra effort, but she insisted. Dinner that night was not only delicious, but it was also one of the most enjoyable experiences I have had. Although I was shy about having something made just for me, I was also filled with gratitude for her effort and kindness.
I'm not the only veggie lover who feels this way. Even though this is how vegans and vegetarians are commonly perceived: "How do you know if someone is vegan? Don't worry, they'll f*cking tell you."
The truth is, most of us feel a little shy asking for special treatment if you're having us over for dinner. I polled my circle of vegan and vegetarian friends, and, except for one, they all said the same thing: the less fuss the better. Most of us, when invited over to dinner, would rather not discuss our diets and lifestyle in great detail. Of course, if the vegetarian in your life is your own teenager, then disregard everything I just said and get ready to listen to the virtues of a plant-based diet and why everyone should be eating one.
The question is, what do you do when you are having a big dinner party and one of your guests is a vegetarian? Maybe it's the holidays and you are making a turkey dinner, but are stumped about what to serve your vegan niece. Or perhaps your brother-in-law has gone meatless and you want to serve him something at the big steak cookout. Whatever the case, here are the do's and don'ts of having a vegetarian over for dinner.
Side dishes can make up a whole meal. Do you remember that old Will and Grace episode, where Will's dad says "I could make a whole meal out of the appetizers!"? Well, we plant-based people can make a whole meal out of the side dishes. Consider serving hearty, protein-rich side dishes featuring quinoa, chickpeas, beans, or nuts.

Hey, we know you love your bacon. We know you think it makes everything better, but to us, it makes everything inedible. Keep the bacon on the side of the Caesar salad, and we'll all be happy.

It would be a shame to make an incredible eggplant parmesan especially for your vegetarian guest just to find out that your guest doesn't eat eggs or dairy. Butter, cream, cheese, eggs, and even honey are no-go's for many plant-based people, so it's worth asking your guest if they partake in those items.

As mentioned above, side dishes are usually more than enough to satisfy a vegetarian guest. Don't feel that you need to rush out and buy a Tofurkey.
That being said, it's fun to try new things! Think of this as an opportunity to try something you've never tried before, like this ratatouille or these pecan almond lentil balls - a filling, vegan main dish that even my meat-loving husband enjoys. And who wouldn't be excited about this mushroom gravy that is a savoury and rich alternative to traditional beef gravy.

Your guests are here to see you and to share in a meal. We aren't here to criticize. We are here to enjoy your company, so let's raise a glass and toast to vegetarians and meat-eaters, dining together in harmony!
Is your child talking about becoming a vegetarian? Here's how to incorporate vegetarianism into an omnivorous household.
Let's be honest: Most people practically live in their kitchen. Throughout the year, I spend a lot of time in there, but things get nuts during the holiday season and I wind up spending the majority of my day cooking, baking, and creating treats. My house is a small, mid-century bungalow and despite kitchen renovations, cupboard and counter space is still at a premium, as it is for many people. Chaos and clutter is overwhelming and difficult to work in, so keeping your kitchen organized is important for streamlining operations, and ultimately leads to more enjoyable time in there.
With that in mind, here are 6 tips for keeping your kitchen organized during this busy time of year—and beyond!
Keep your everyday plates, pans, and pots within reaching distance, and less-used crockery, casserole dishes, and fancy bowls in the hard-to-reach cupboards over the fridge. I also keep my essential cooking utensils in a pretty vase by the stove, so I don’t need to dig through a drawer to find my favourite mixing spoon. Out of sight, out of mind, so seeing where my favourite wooden spoon is makes cooking easier and more pleasurable.

When you're baking six dozen cookies for the kids' classroom holiday parties at the same time you're making brownies for the teacher's appreciation luncheon, you need all the counter space you can get. It’s important to utilize the awkward under-cabinet space; this is the perfect place to store frequently used appliances such as your stand mixer, food processor, or most importantly—the coffee maker. I keep my occasionally-used appliances such as my dehydrator and juicer in my storage room because they're not daily use items.

Have you ever opened a cupboard and have everything tumble out, crashing around you? The key to avoiding such an avalanche: nestable containers. Ziploc has launched an innovative line of containers designed to be nested within each other when empty which helps eliminate cupboard clutter and saves valuable storage space. These containers, with their easy One Press Seal stack perfectly when full of holiday baking or other yummy things, which saves fridge and freezer space as well.

Oh, the junk drawer; that receptacle for all miscellaneous and unwanted items. It's the downfall of many an organized cook, but it doesn't have to be. I recently reorganized my junk drawer and what a cathartic experience that was! Instead of having cookie cutters, scissors, potato mashers, and hundreds of mysterious elastic bands all jumbled together in a drawer, you can now have a neatly organized drawer that actually opens and closes without effort (and has a few less elastic bands). Try using drawer separators or small lidded containers to house your odds and ends. Take control and OWN that junk drawer!
Avoid playing "Guess What’s In The Freezer," by labelling all containers with their contents and the date. Instead of cramming your cupboards with rubber-banded bags of oatmeal, quinoa, and rice, transfer the contents to stackable containers, and add cooking instructions to the label—even after all these years, I still can’t remember how long to cook quinoa or how much water is needed for brown rice! Labels take the guesswork out of food storage, so add some to your containers and you are all set!
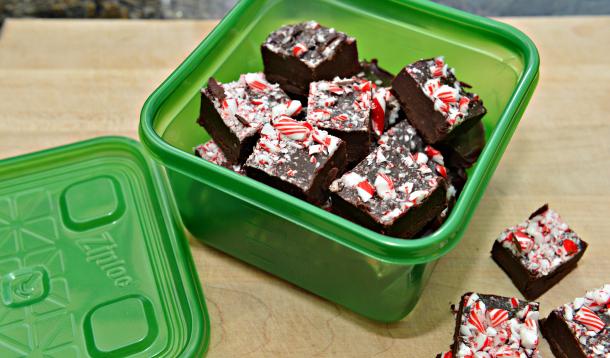
Once your kitchen is organized, spread the love! ‘Tis the season for hostess gifts and cookie exchanges, and the Ziploc Brand Holiday Collection containers come in festive colours and in a variety of shapes and sizes – perfect for storing your favourite cookies, squares, and other delicious sweet treats! Speaking of which, I have a wonderful recipe for Peppermint Fudge to share with you—it’s vegan, gluten-free, and can be whipped up in five minutes. It’s also delicious!

![]() Easy Peppermint Fudge (Vegan and Gluten-Free)
Easy Peppermint Fudge (Vegan and Gluten-Free)
Ingredients
Line an 8x8 baking pan with parchment paper. Allow the paper to overlap the edges of the pan, like handles.
In a medium saucepan, heat coconut milk to boiling.
Reduce heat and add chocolate chips and peppermint extract, stirring constantly until mixture is smooth.
Pour chocolate mixture into the prepared pan; sprinkle with crushed candy canes, if desired.
Chill for 3-4 hours, or, if you can't wait that long, put it in the freezer for about 30 minutes until firm.
Using the parchment paper “handles”, lift out of the pan, cut into squares, and bring to neighbours, friends, teachers—everyone will be feeling the kitchen love!

Note the parchment paper "handles".
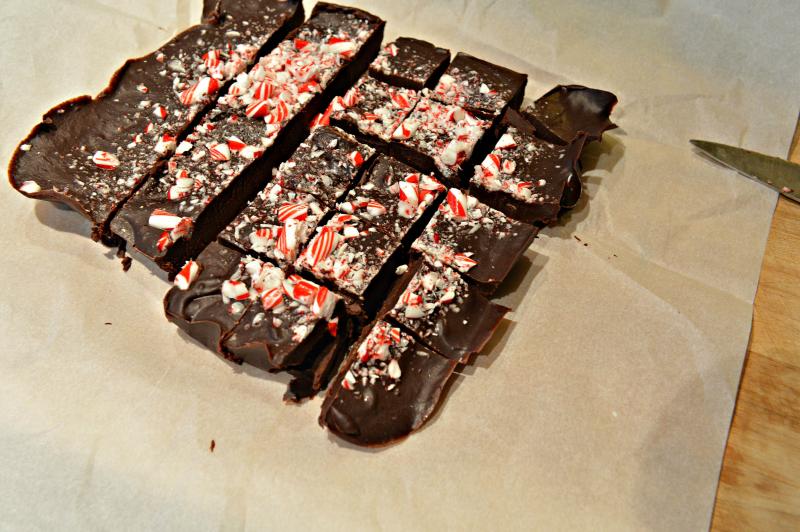
Lift the fudge out and cut into squares.
This is proudly sponsored by our friends at Ziploc.
www.lifelessons.ziploc.com/

